> ## Documentation Index
> Fetch the complete documentation index at: https://docs.usebruno.com/llms.txt
> Use this file to discover all available pages before exploring further.
# Configure SAML SSO with Okta
This guide walks you through configuring SAML Single Sign-On for Bruno using Okta as your identity provider.
Before you begin, make sure you have completed the [prerequisites](./overview#prerequisites) and have admin access to both Okta and the Bruno License Portal.
## Configure SSO in Bruno
Before configuring a SAML application in Okta, first configure SSO in Bruno.
1. Log in to the [Bruno License Portal](https://license.usebruno.com/)
2. Navigate to **Settings** → **SSO** in the left sidebar
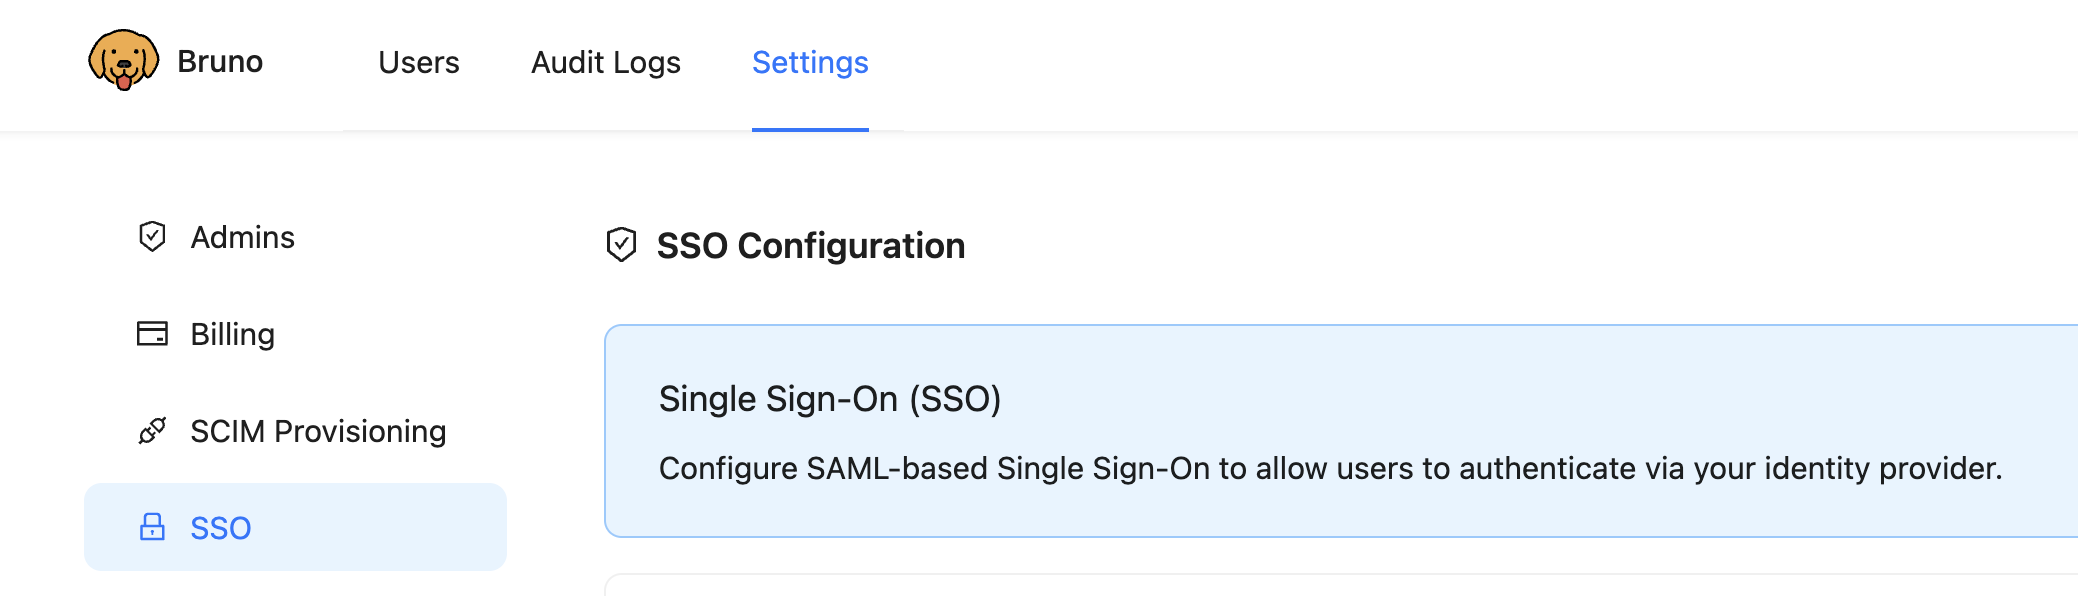 3. Toggle the **Enable SSO** switch on
4. Note the following values (you'll need these when configuring Okta):
* **SAML ACS URL**: Copy this URL exactly as shown in Bruno
* **SP Issuer ID / Entity ID**: Set your own unique identifier (e.g., `bruno-sso`, `bruno-okta`, `your-company-bruno`, etc.)
3. Toggle the **Enable SSO** switch on
4. Note the following values (you'll need these when configuring Okta):
* **SAML ACS URL**: Copy this URL exactly as shown in Bruno
* **SP Issuer ID / Entity ID**: Set your own unique identifier (e.g., `bruno-sso`, `bruno-okta`, `your-company-bruno`, etc.)
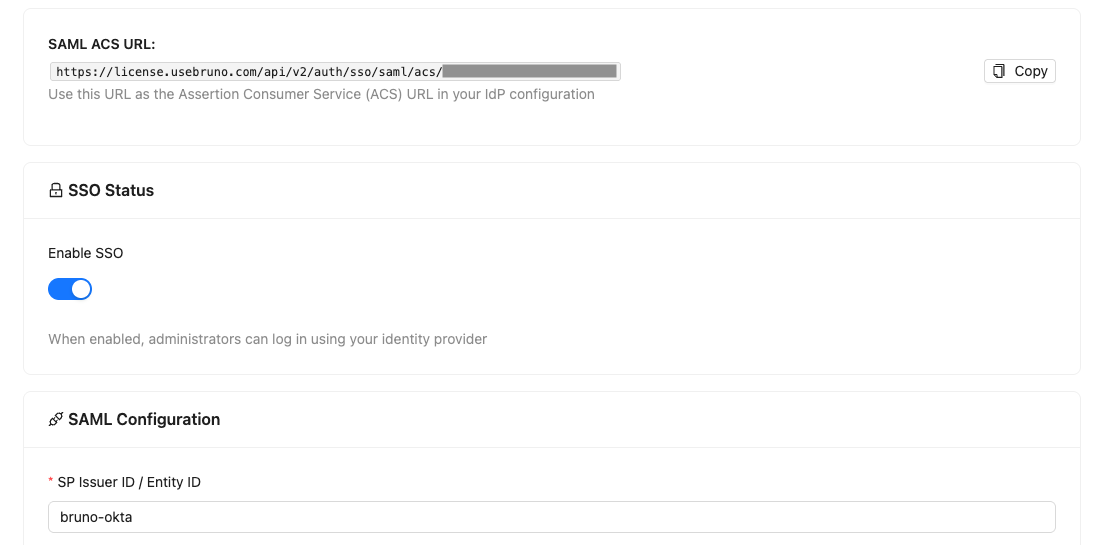 Keep this page open in a separate tab - you'll return here after configuring Okta to complete the Bruno SSO setup.
## Configure SSO with Okta
### Step 1: Create a New SAML Application
1. Log in to your Okta Admin Console
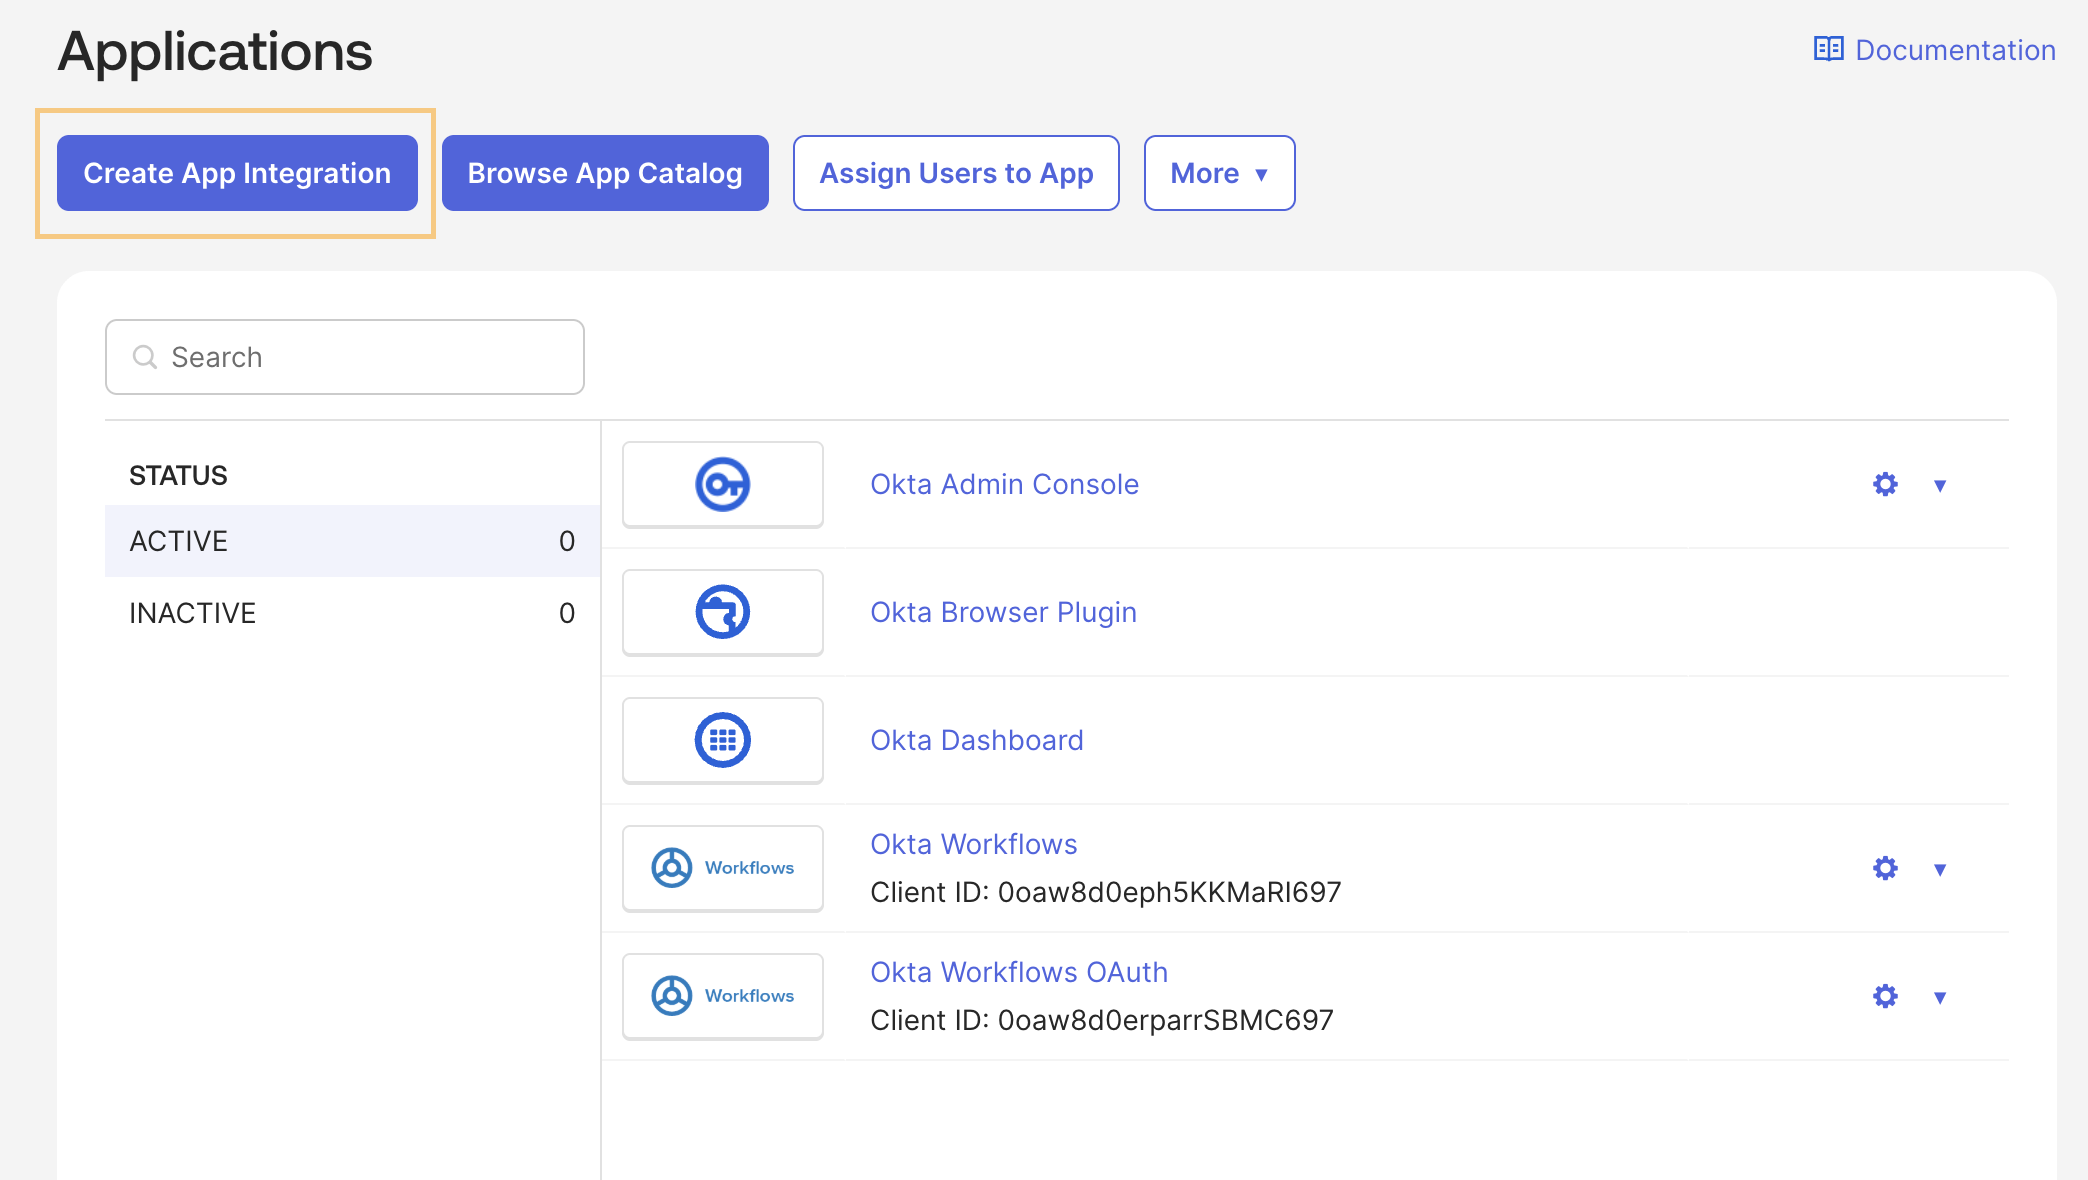
2. Navigate to **Applications** → **Applications** in the left sidebar
3. Click **Create App Integration**
Keep this page open in a separate tab - you'll return here after configuring Okta to complete the Bruno SSO setup.
## Configure SSO with Okta
### Step 1: Create a New SAML Application
1. Log in to your Okta Admin Console
2. Navigate to **Applications** → **Applications** in the left sidebar
3. Click **Create App Integration**
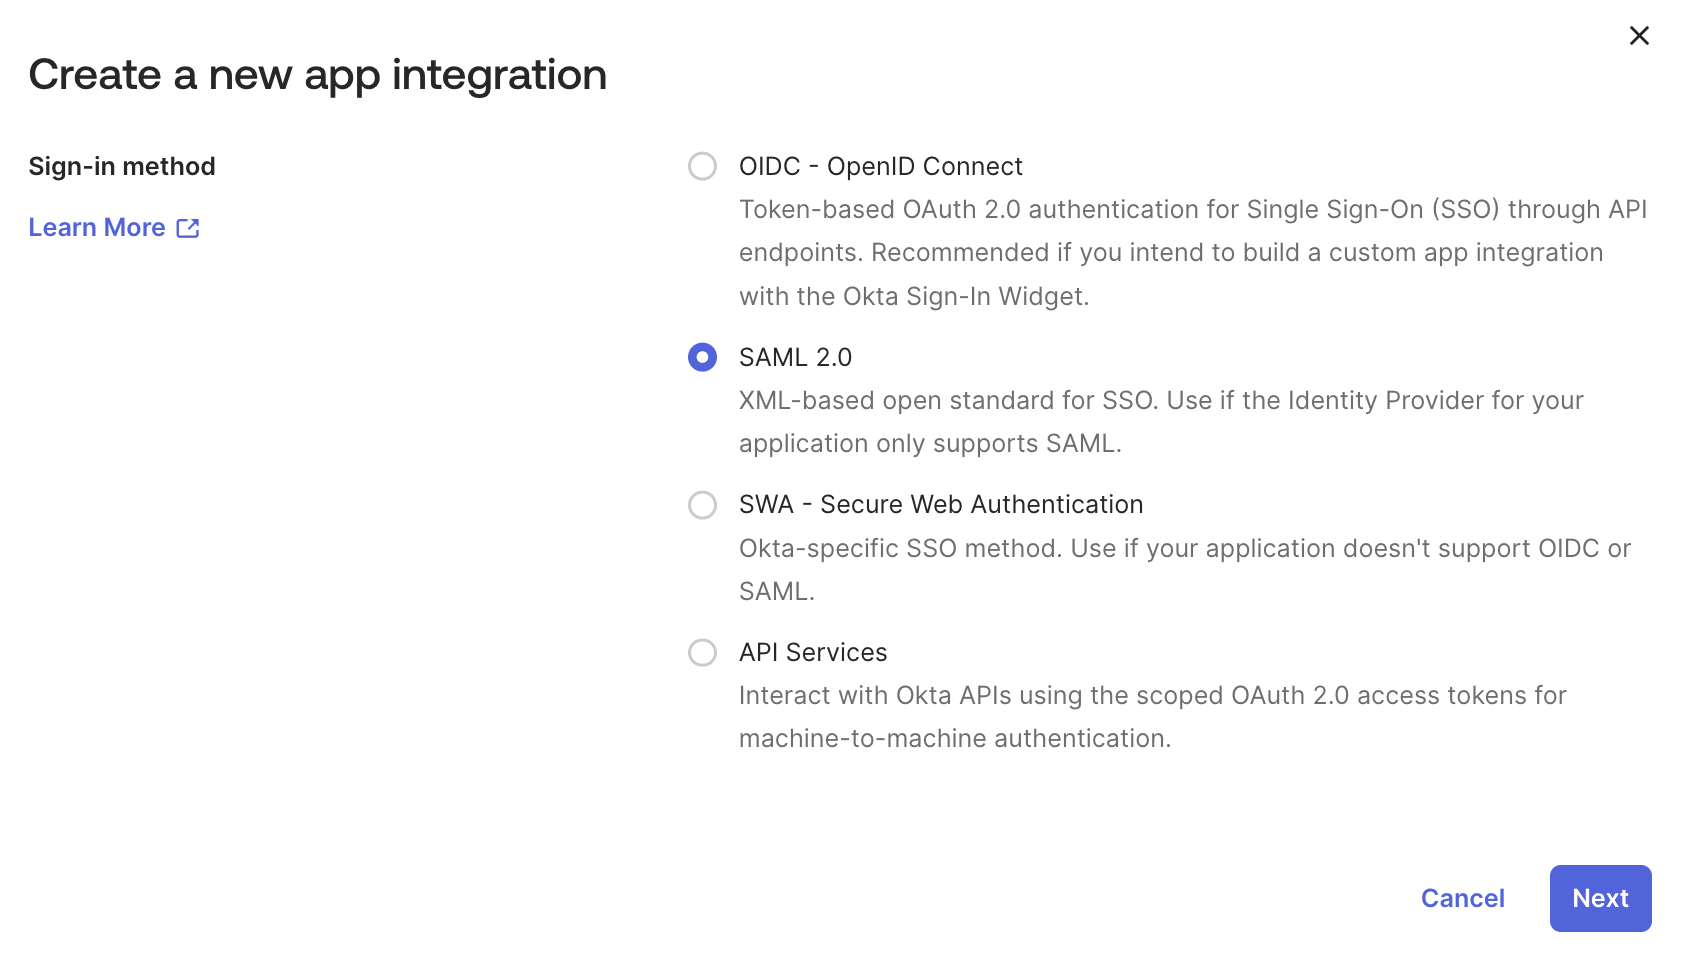
 4. Select **SAML 2.0** as the sign-in method
5. Click **Next**
4. Select **SAML 2.0** as the sign-in method
5. Click **Next**
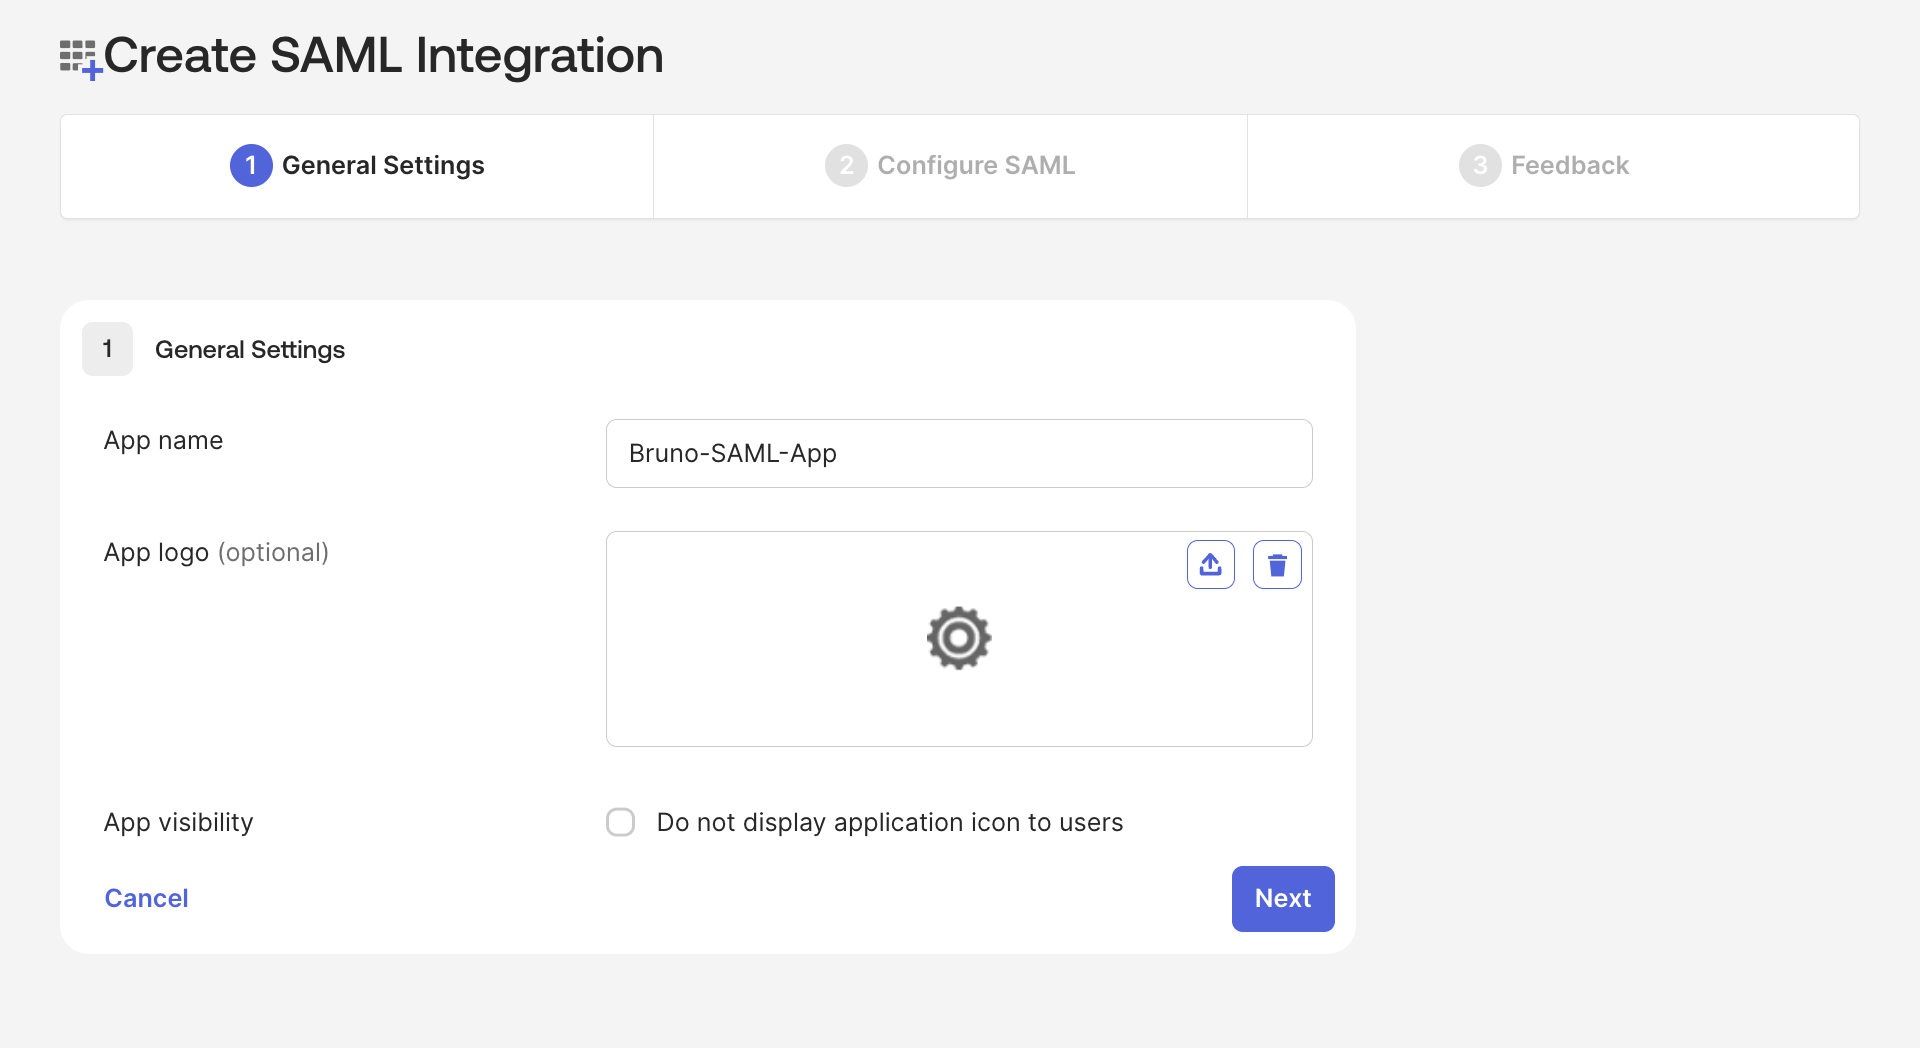
 ### Step 2: Configure General Settings
1. Enter the following information:
* **App name**: Set your own unique identifier (e.g., `Bruno`, `Bruno-SAML-App`, etc.)
* **App logo**: (Optional) Upload Bruno logo
* **App visibility**: Configure based on your organization's preferences
2. Click **Next**
### Step 2: Configure General Settings
1. Enter the following information:
* **App name**: Set your own unique identifier (e.g., `Bruno`, `Bruno-SAML-App`, etc.)
* **App logo**: (Optional) Upload Bruno logo
* **App visibility**: Configure based on your organization's preferences
2. Click **Next**
 ### Step 3: Configure SAML Settings
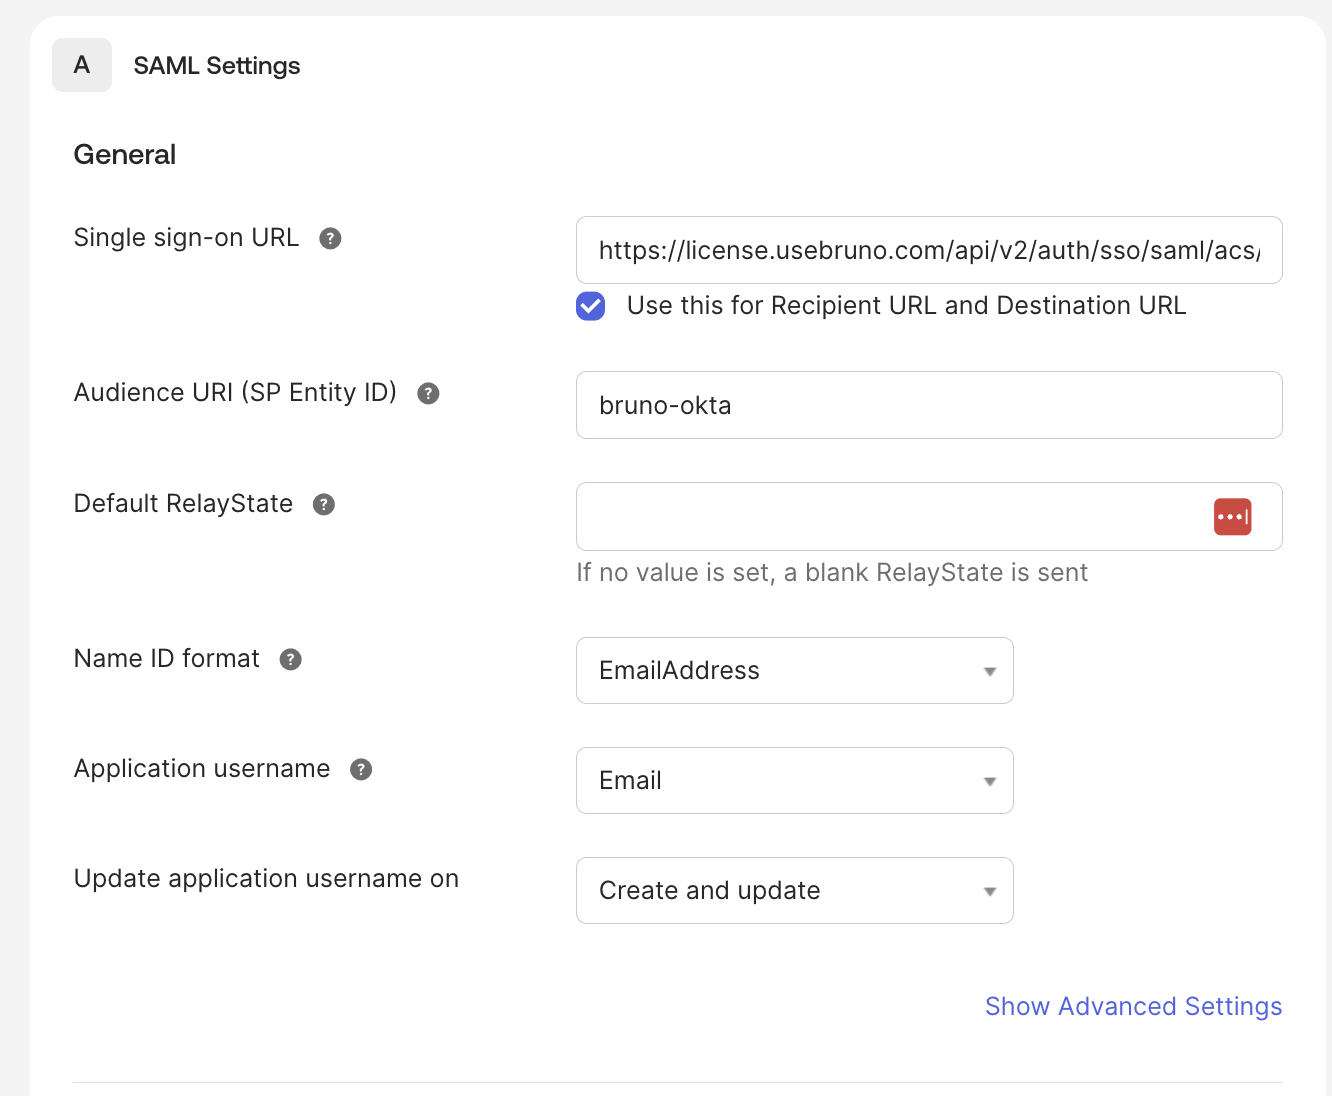
Copy the values from the Bruno SSO settings page and paste them into your SAML configuration in Okta.
**Single Sign-On URL:**
1. In the **Single sign-on URL** field, copy and paste the **SAML ACS URL** from Bruno
2. Check **Use this for Recipient URL and Destination URL**
**Audience URI (SP Entity ID):**
1. In the **Audience URI (SP Entity ID)** field, paste the **SP Issuer ID / Entity ID** value from the Bruno License Portal
* **Important**: This value must match EXACTLY what you configured in the Bruno SSO Configuration page
**Name ID Format:**
1. Select **EmailAddress** from the **Name ID format** dropdown
**Application Username:**
1. Select **Email** from the **Application username** dropdown
### Step 3: Configure SAML Settings
Copy the values from the Bruno SSO settings page and paste them into your SAML configuration in Okta.
**Single Sign-On URL:**
1. In the **Single sign-on URL** field, copy and paste the **SAML ACS URL** from Bruno
2. Check **Use this for Recipient URL and Destination URL**
**Audience URI (SP Entity ID):**
1. In the **Audience URI (SP Entity ID)** field, paste the **SP Issuer ID / Entity ID** value from the Bruno License Portal
* **Important**: This value must match EXACTLY what you configured in the Bruno SSO Configuration page
**Name ID Format:**
1. Select **EmailAddress** from the **Name ID format** dropdown
**Application Username:**
1. Select **Email** from the **Application username** dropdown
 ### Step 4: Configure Attribute Statements
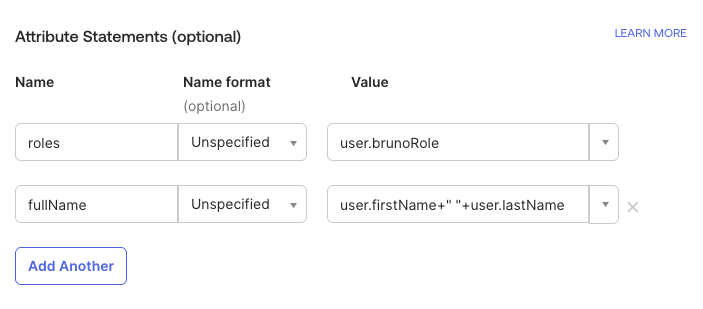
Bruno needs the user's full name plus a role/group value to map them to access levels in the License Portal. You can send the role/group value using **either or both** of two approaches — choose what fits how your organization manages access in Okta:
* **Option A: `roles` Profile Attribute Statement** — Send a per-user role value (a static value, a user attribute, etc.)
* **Option B: `groups` Group Attribute Statement** — Send the names of Okta groups the user belongs to (required if you assign users to the Bruno app via **Assign to Groups**)
Both approaches are equally valid and can be used together. Bruno recognizes the attribute names `role`, `roles`, `group`, and `groups` (case-insensitive) for role mapping.
Add the following attribute statements to your Okta SAML configuration:
| Name | Source | Notes |
| ----------------------- | ---------------------------------------------------------- | ----------------------------------------------------------------------------------------------------------------------------------------------- |
| **fullName** | `user.firstName+" "+user.lastName` or equivalent attribute | Required. Represents the combined user's first and last name. |
| **roles** or **groups** | A role value (Option A) or a group filter (Option B) | Use `roles` as a Profile Attribute Statement (Option A), OR use `groups` via Group Attribute Statements (Option B), OR both. See details below. |
#### Option A: `roles` Profile Attribute Statement
In Okta's **Attribute Statements** section, add:
| Name | Name Format | Value |
| --------- | ----------- | ------------------------ |
| **roles** | Unspecified | Any role value from Okta |
**Configuring the `roles` attribute:**
The `roles` attribute can be configured in several ways:
1. **Static value for testing**: Set a hardcoded value like `"admin"` for all users assigned to this app
* Example: Value = `"admin"`
2. **Map to an existing or created Okta user attribute**: If your Okta users already have a role attribute or you create a specific attribute for Bruno roles
* Example: Value = `user.userType` or `user.role` or `user.brunoRole`
**Important**: The role value sent by Okta will be mapped to Bruno access levels in the License Portal's SSO Settings. You'll configure which role values correspond to admin or user access in Bruno (see Step 3 in the Bruno configuration section below).
**Example Scenarios:**
* If you set Value = `"Engineering"`, you'll add `Engineering` to either "Admin Roles" or "User Roles" in Bruno
* If you set Value = `user.department`, and a user's department is `IT`, you'll add `IT` to the appropriate role field in Bruno
#### Option B: `groups` Group Attribute Statement
If you assign users to the Bruno app via Okta groups (**Assign to Groups**) and rely on group membership for role mapping, configure a Group Attribute Statement. Without it, Okta will not include group membership in the SAML assertion and group-assigned users with no Profile `roles` value will receive a "You do not have necessary permissions" error.
In Okta's **Group Attribute Statements** section, add:
| Name | Name Format | Filter | Value |
| ---------- | ----------- | ------------- | ----- |
| **groups** | Unspecified | Matches regex | `.*` |
**Filtering Groups:**
Using `Matches regex` with `.*` sends all group names the user belongs to. You can narrow this down:
* **Starts with**: e.g., `bruno-` to only send groups starting with "bruno-"
* **Equals**: e.g., `bruno-admins` to send only a specific group
* **Contains**: e.g., `bruno` to send groups containing "bruno"
The group names sent must match the values you configure in Bruno's **Admin Roles** or **User Roles** fields.
#### Configuring the `fullName` attribute
The `fullName` attribute is always required as a Profile Attribute Statement, regardless of which option(s) you use above. It can be configured by:
* Concatenating first and last name: `user.firstName+" "+user.lastName`
* Using a single field if your Okta user profile has a combined name field
* Mapping to any existing user property that contains the full name
### Step 4: Configure Attribute Statements
Bruno needs the user's full name plus a role/group value to map them to access levels in the License Portal. You can send the role/group value using **either or both** of two approaches — choose what fits how your organization manages access in Okta:
* **Option A: `roles` Profile Attribute Statement** — Send a per-user role value (a static value, a user attribute, etc.)
* **Option B: `groups` Group Attribute Statement** — Send the names of Okta groups the user belongs to (required if you assign users to the Bruno app via **Assign to Groups**)
Both approaches are equally valid and can be used together. Bruno recognizes the attribute names `role`, `roles`, `group`, and `groups` (case-insensitive) for role mapping.
Add the following attribute statements to your Okta SAML configuration:
| Name | Source | Notes |
| ----------------------- | ---------------------------------------------------------- | ----------------------------------------------------------------------------------------------------------------------------------------------- |
| **fullName** | `user.firstName+" "+user.lastName` or equivalent attribute | Required. Represents the combined user's first and last name. |
| **roles** or **groups** | A role value (Option A) or a group filter (Option B) | Use `roles` as a Profile Attribute Statement (Option A), OR use `groups` via Group Attribute Statements (Option B), OR both. See details below. |
#### Option A: `roles` Profile Attribute Statement
In Okta's **Attribute Statements** section, add:
| Name | Name Format | Value |
| --------- | ----------- | ------------------------ |
| **roles** | Unspecified | Any role value from Okta |
**Configuring the `roles` attribute:**
The `roles` attribute can be configured in several ways:
1. **Static value for testing**: Set a hardcoded value like `"admin"` for all users assigned to this app
* Example: Value = `"admin"`
2. **Map to an existing or created Okta user attribute**: If your Okta users already have a role attribute or you create a specific attribute for Bruno roles
* Example: Value = `user.userType` or `user.role` or `user.brunoRole`
**Important**: The role value sent by Okta will be mapped to Bruno access levels in the License Portal's SSO Settings. You'll configure which role values correspond to admin or user access in Bruno (see Step 3 in the Bruno configuration section below).
**Example Scenarios:**
* If you set Value = `"Engineering"`, you'll add `Engineering` to either "Admin Roles" or "User Roles" in Bruno
* If you set Value = `user.department`, and a user's department is `IT`, you'll add `IT` to the appropriate role field in Bruno
#### Option B: `groups` Group Attribute Statement
If you assign users to the Bruno app via Okta groups (**Assign to Groups**) and rely on group membership for role mapping, configure a Group Attribute Statement. Without it, Okta will not include group membership in the SAML assertion and group-assigned users with no Profile `roles` value will receive a "You do not have necessary permissions" error.
In Okta's **Group Attribute Statements** section, add:
| Name | Name Format | Filter | Value |
| ---------- | ----------- | ------------- | ----- |
| **groups** | Unspecified | Matches regex | `.*` |
**Filtering Groups:**
Using `Matches regex` with `.*` sends all group names the user belongs to. You can narrow this down:
* **Starts with**: e.g., `bruno-` to only send groups starting with "bruno-"
* **Equals**: e.g., `bruno-admins` to send only a specific group
* **Contains**: e.g., `bruno` to send groups containing "bruno"
The group names sent must match the values you configure in Bruno's **Admin Roles** or **User Roles** fields.
#### Configuring the `fullName` attribute
The `fullName` attribute is always required as a Profile Attribute Statement, regardless of which option(s) you use above. It can be configured by:
* Concatenating first and last name: `user.firstName+" "+user.lastName`
* Using a single field if your Okta user profile has a combined name field
* Mapping to any existing user property that contains the full name
 **Important**: The `fullName` attribute plus at least one role/group source (`roles` Profile Attribute Statement, `groups` Group Attribute Statement, or both) are required for Bruno SAML SSO to function correctly. Attribute names are case-sensitive and must match exactly as shown.
**Preview the SAML Assertion**
1. Scroll down to the **Preview the SAML assertion generated from the information above** section
2. Click **Preview the SAML Assertion**
3. Verify the generated XML contains the configured attributes: `NameID Format`,`roles`, `fullName`
4. Click **Next**
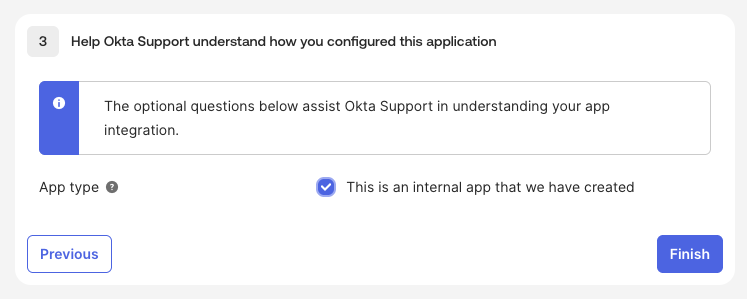
### Step 5: Complete Okta App Setup
1. On the **Feedback** page:
* Select **I'm an Okta customer adding an internal app**
* Check **This is an internal app that we have created**
2. Click **Finish**
**Important**: The `fullName` attribute plus at least one role/group source (`roles` Profile Attribute Statement, `groups` Group Attribute Statement, or both) are required for Bruno SAML SSO to function correctly. Attribute names are case-sensitive and must match exactly as shown.
**Preview the SAML Assertion**
1. Scroll down to the **Preview the SAML assertion generated from the information above** section
2. Click **Preview the SAML Assertion**
3. Verify the generated XML contains the configured attributes: `NameID Format`,`roles`, `fullName`
4. Click **Next**
### Step 5: Complete Okta App Setup
1. On the **Feedback** page:
* Select **I'm an Okta customer adding an internal app**
* Check **This is an internal app that we have created**
2. Click **Finish**
 ## Finish SSO Configuration in Bruno
### Step 1: Add SSO URL to Bruno License Portal
**IdP Login URL / SSO URL**
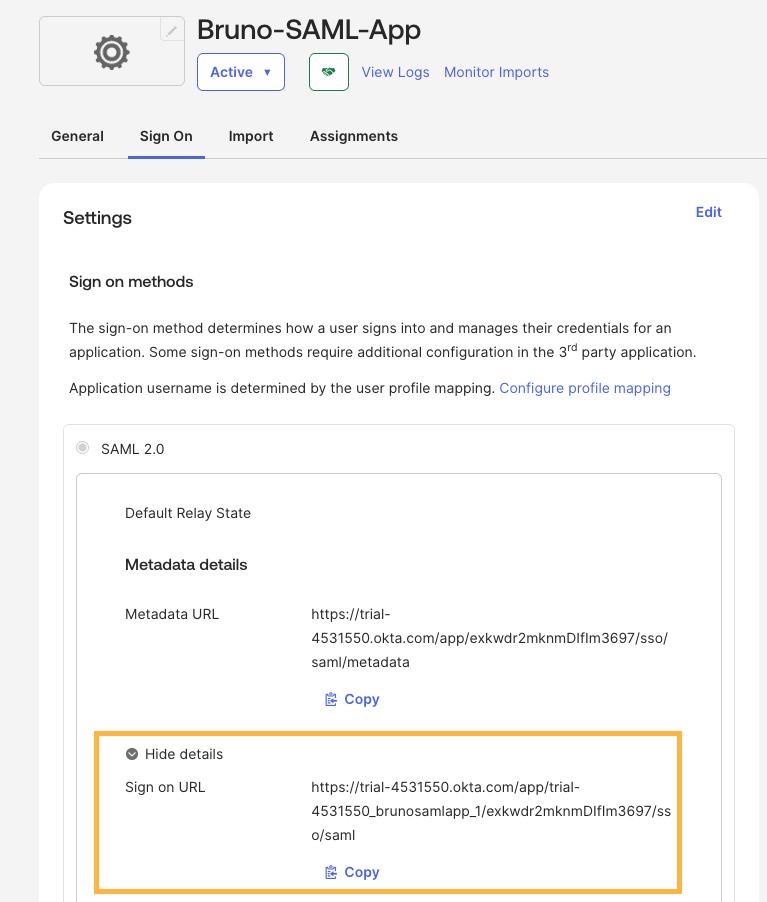
1. In your configure Okta application, navigate to the **Sign On** tab
2. Scroll down to the **SAML 2.0** section, expand the **Hide details** section
3. Copy the following values (you'll need these for Bruno configuration):
* **Sign on URL**: Copy this URL
## Finish SSO Configuration in Bruno
### Step 1: Add SSO URL to Bruno License Portal
**IdP Login URL / SSO URL**
1. In your configure Okta application, navigate to the **Sign On** tab
2. Scroll down to the **SAML 2.0** section, expand the **Hide details** section
3. Copy the following values (you'll need these for Bruno configuration):
* **Sign on URL**: Copy this URL
 4. Return to the Bruno License Portal tab you opened [from the earlier configuration](#configure-sso-in-bruno)
5. Navigate to **Settings** → **SSO** (if not already there)
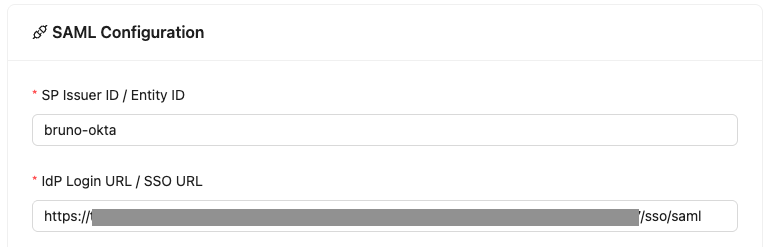
6. Under **SAML Configuration** paste the **Sign on URL** from Okta into the **IdP Login URL / SSO URL** field
4. Return to the Bruno License Portal tab you opened [from the earlier configuration](#configure-sso-in-bruno)
5. Navigate to **Settings** → **SSO** (if not already there)
6. Under **SAML Configuration** paste the **Sign on URL** from Okta into the **IdP Login URL / SSO URL** field
 ### Step 2: Add IdP Certificate to Bruno License Portal
**Okta IdP Certificate**
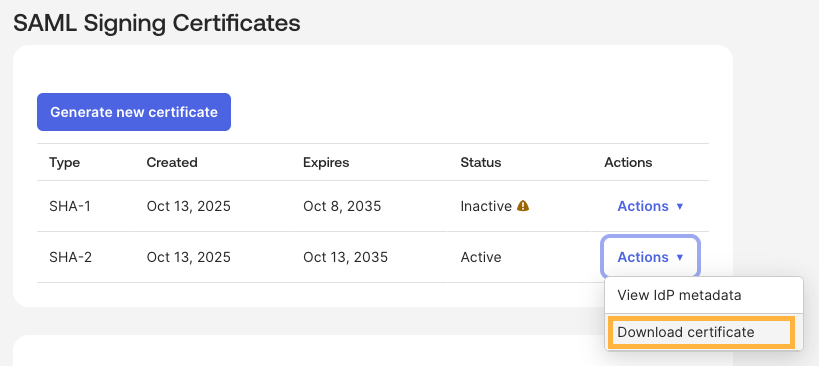
1. Scroll down the **Sign On** tab to **SAML Signing Certificates**
2. Click **Generate new certificate**
3. For the newly generated certificate, click the **Actions** dropdown and select **Download Certificate**
### Step 2: Add IdP Certificate to Bruno License Portal
**Okta IdP Certificate**
1. Scroll down the **Sign On** tab to **SAML Signing Certificates**
2. Click **Generate new certificate**
3. For the newly generated certificate, click the **Actions** dropdown and select **Download Certificate**
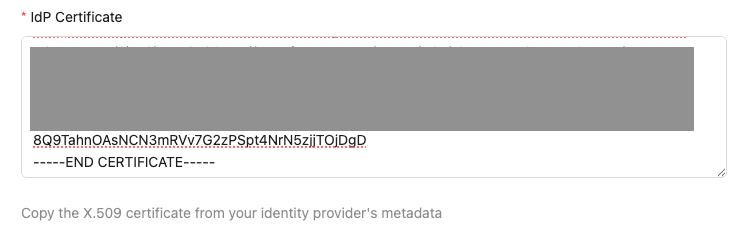
 4. Open the downloaded certificate file and copy the contents (include the `-----BEGIN CERTIFICATE-----` and `-----END CERTIFICATE-----` lines)
5. Return to the Bruno License Portal tab you opened [from the earlier configuration](#configure-sso-in-bruno)
6. Under **SAML Configuration** paste the certificate contents into the **IdP Certificate** field
4. Open the downloaded certificate file and copy the contents (include the `-----BEGIN CERTIFICATE-----` and `-----END CERTIFICATE-----` lines)
5. Return to the Bruno License Portal tab you opened [from the earlier configuration](#configure-sso-in-bruno)
6. Under **SAML Configuration** paste the certificate contents into the **IdP Certificate** field
 ### Step 3: Map the role values from Okta to Bruno access levels
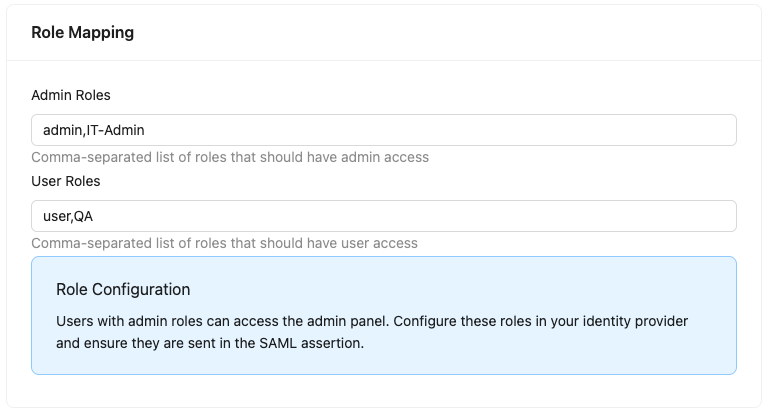
1. Under the Bruno License Portal in the SSO Configuration page, scroll down to the **Role Mapping** section
2. **Admin Roles**: Enter the role values (comma-separated) that should have admin access to Bruno
* Example: `admin,BrunoAdmin,IT-Administrators`
* These values must match what you configured in the `roles` attribute in Okta
* Users with these roles can access the admin panel and manage licenses
3. **User Roles**: Enter the role values (comma-separated) that should have user access to Bruno
* Example: `user,Engineering,Developers,QA`
* These values must match what you configured in the `roles` attribute in Okta
* Users with these roles will be able to activate their Bruno licenses with SSO. **They will not have access to the admin panel.**
### Step 3: Map the role values from Okta to Bruno access levels
1. Under the Bruno License Portal in the SSO Configuration page, scroll down to the **Role Mapping** section
2. **Admin Roles**: Enter the role values (comma-separated) that should have admin access to Bruno
* Example: `admin,BrunoAdmin,IT-Administrators`
* These values must match what you configured in the `roles` attribute in Okta
* Users with these roles can access the admin panel and manage licenses
3. **User Roles**: Enter the role values (comma-separated) that should have user access to Bruno
* Example: `user,Engineering,Developers,QA`
* These values must match what you configured in the `roles` attribute in Okta
* Users with these roles will be able to activate their Bruno licenses with SSO. **They will not have access to the admin panel.**
 **How Role Mapping Works:**
The role value you configured in Okta's `roles` attribute statement will be sent in the SAML assertion. Bruno will check if this value matches any role in the "Admin Roles" or "User Roles" fields.
**Example:**
* In Okta, you set the `roles` attribute to `"Engineering"`
* In Bruno Admin Roles, you enter: `admin,BrunoAdmin`
* In Bruno User Roles, you enter: `user,Engineering,QA`
* Result: Users with the `Engineering` role are able to activate their Bruno licenses with SSO (matches "Engineering" in User Roles)
**Important**: Role values are case-sensitive. Ensure the values in Okta's `roles` attribute match exactly with the values you enter in Bruno's Admin Roles or User Roles fields.
### Step 4: Configure Session Settings
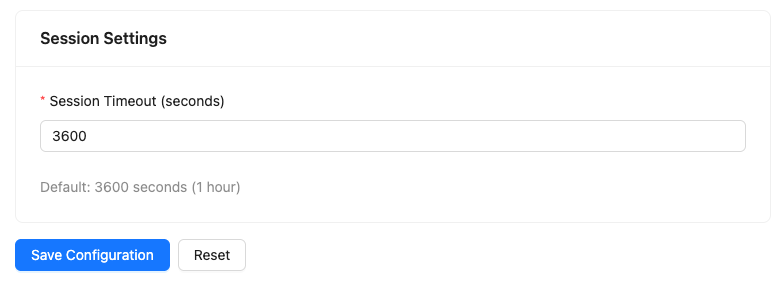
1. Scroll down to the **Session Timeout** section:
* Set the session timeout in seconds (default: 3600 = 1 hour)
2. Click **Save Configuration** to apply your SAML SSO configuration
**How Role Mapping Works:**
The role value you configured in Okta's `roles` attribute statement will be sent in the SAML assertion. Bruno will check if this value matches any role in the "Admin Roles" or "User Roles" fields.
**Example:**
* In Okta, you set the `roles` attribute to `"Engineering"`
* In Bruno Admin Roles, you enter: `admin,BrunoAdmin`
* In Bruno User Roles, you enter: `user,Engineering,QA`
* Result: Users with the `Engineering` role are able to activate their Bruno licenses with SSO (matches "Engineering" in User Roles)
**Important**: Role values are case-sensitive. Ensure the values in Okta's `roles` attribute match exactly with the values you enter in Bruno's Admin Roles or User Roles fields.
### Step 4: Configure Session Settings
1. Scroll down to the **Session Timeout** section:
* Set the session timeout in seconds (default: 3600 = 1 hour)
2. Click **Save Configuration** to apply your SAML SSO configuration
 ## Test Your SAML Configuration
### Assign Users or Groups
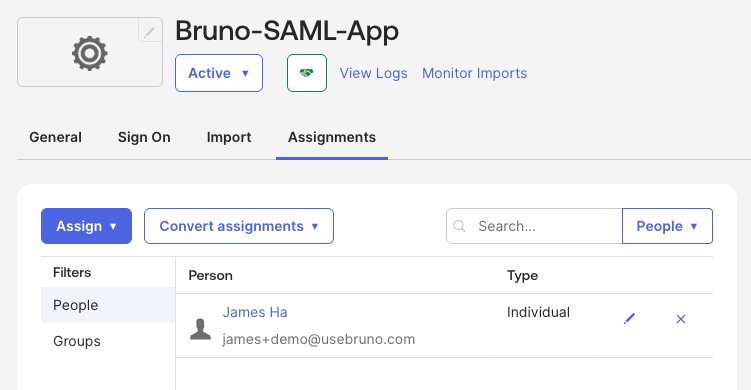
1. In your Okta Bruno application, navigate to the **Assignments** tab
2. Click **Assign** → **Assign to People** or **Assign to Groups**
* **Note**: Users assigned must already exist in your subscription under the Bruno License Portal in order to login with SSO
* **Important**: If assigning via **Assign to Groups**, make sure you have configured a **Group Attribute Statement** in [Step 4](#step-4-configure-attribute-statements). Without it, Okta will not send group membership in the SAML assertion and users will get a permissions error.
3. Select the users or groups that should have access to Bruno
4. Click **Assign** and **Done**
## Test Your SAML Configuration
### Assign Users or Groups
1. In your Okta Bruno application, navigate to the **Assignments** tab
2. Click **Assign** → **Assign to People** or **Assign to Groups**
* **Note**: Users assigned must already exist in your subscription under the Bruno License Portal in order to login with SSO
* **Important**: If assigning via **Assign to Groups**, make sure you have configured a **Group Attribute Statement** in [Step 4](#step-4-configure-attribute-statements). Without it, Okta will not send group membership in the SAML assertion and users will get a permissions error.
3. Select the users or groups that should have access to Bruno
4. Click **Assign** and **Done**
 ### Test SSO Login
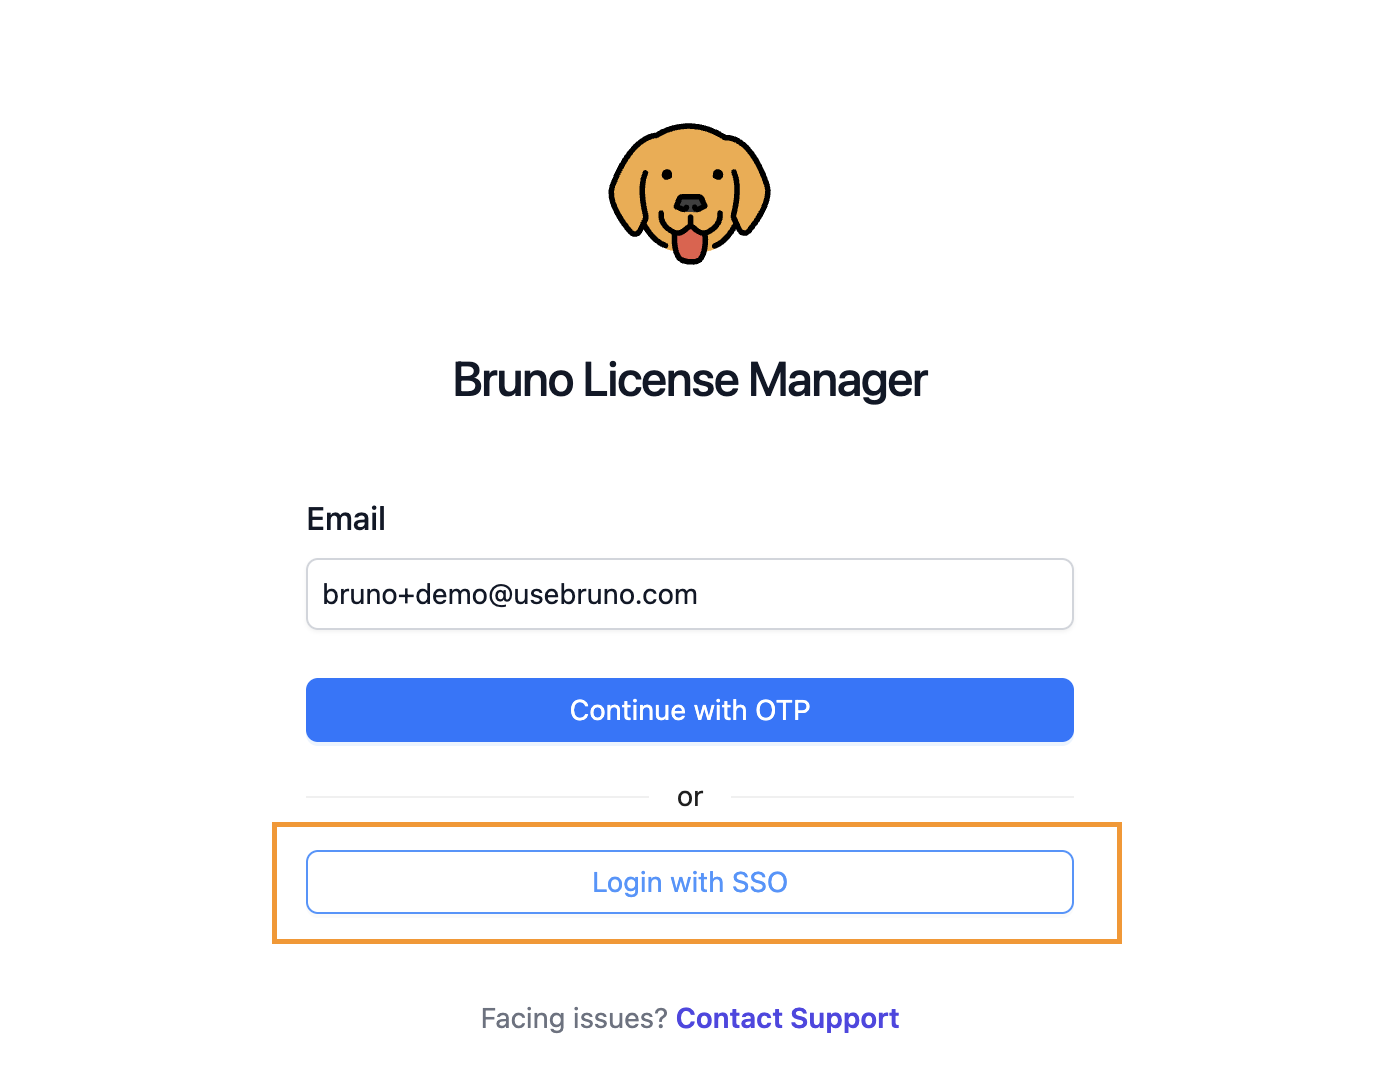
1. Navigate to the Bruno License Portal ([https://license.usebruno.com/](https://license.usebruno.com/))
2. Enter the email address of a user assigned to the Bruno app in Okta
3. Click **Login with SSO**
4. You should be redirected to Okta to authenticate
### Test SSO Login
1. Navigate to the Bruno License Portal ([https://license.usebruno.com/](https://license.usebruno.com/))
2. Enter the email address of a user assigned to the Bruno app in Okta
3. Click **Login with SSO**
4. You should be redirected to Okta to authenticate
 5. If your user is an admin in Bruno and contains the correct role mapping, you should be redirected back to the Bruno License Portal
## Next Steps
After setting up SSO with Okta, you can:
* [Configure SCIM Provisioning](../scim-provisioning/overview) to automate user provisioning and deprovisioning
* [Manage your Bruno licenses](../license-portal) in the License Portal
## Related Resources
For more information about configuring SAML SSO and managing attributes in Okta, refer to these Okta documentation resources:
* [SAML app integrations](https://help.okta.com/en-us/content/topics/apps/apps-about-saml.htm) - Overview of SAML protocol and Okta SAML applications
* [Create SAML app integrations](https://help.okta.com/en-us/content/topics/apps/apps_app_integration_wizard_saml.htm) - Step-by-step guide for creating SAML applications in Okta
* [Define attribute statements](https://help.okta.com/en-us/content/topics/apps/define-attribute-statements.htm) - Configure SAML attribute statements for user attributes and roles
* [Define group attribute statements](https://help.okta.com/en-us/content/topics/apps/define-group-attribute-statements.htm) - Map Okta groups to SAML attributes for role-based access control
* [Application Integration Wizard SAML field reference](https://help.okta.com/en-us/content/topics/apps/aiw-saml-reference.htm) - Reference guide for SAML configuration fields
* [Build a Single Sign-On (SSO) integration](https://developer.okta.com/docs/guides/build-sso-integration/saml2/main/) - Developer guide for building SAML SSO integrations
5. If your user is an admin in Bruno and contains the correct role mapping, you should be redirected back to the Bruno License Portal
## Next Steps
After setting up SSO with Okta, you can:
* [Configure SCIM Provisioning](../scim-provisioning/overview) to automate user provisioning and deprovisioning
* [Manage your Bruno licenses](../license-portal) in the License Portal
## Related Resources
For more information about configuring SAML SSO and managing attributes in Okta, refer to these Okta documentation resources:
* [SAML app integrations](https://help.okta.com/en-us/content/topics/apps/apps-about-saml.htm) - Overview of SAML protocol and Okta SAML applications
* [Create SAML app integrations](https://help.okta.com/en-us/content/topics/apps/apps_app_integration_wizard_saml.htm) - Step-by-step guide for creating SAML applications in Okta
* [Define attribute statements](https://help.okta.com/en-us/content/topics/apps/define-attribute-statements.htm) - Configure SAML attribute statements for user attributes and roles
* [Define group attribute statements](https://help.okta.com/en-us/content/topics/apps/define-group-attribute-statements.htm) - Map Okta groups to SAML attributes for role-based access control
* [Application Integration Wizard SAML field reference](https://help.okta.com/en-us/content/topics/apps/aiw-saml-reference.htm) - Reference guide for SAML configuration fields
* [Build a Single Sign-On (SSO) integration](https://developer.okta.com/docs/guides/build-sso-integration/saml2/main/) - Developer guide for building SAML SSO integrations