> ## Documentation Index
> Fetch the complete documentation index at: https://docs.usebruno.com/llms.txt
> Use this file to discover all available pages before exploring further.
# Quick Start
Bruno is a Git-friendly, local-first, open-source API client designed for developers. This guide will take you from the basics to more advanced features, helping you build a strong understanding of Bruno.
## Prerequisites
* A basic understanding of HTTP and REST
* [Bruno installed](https://www.usebruno.com/downloads) (v3.x)
* **[Git](https://git-scm.com/install/)** (Needed for collaboration via Git)
* **[Node.js](https://nodejs.org/en/download/)** (Needed for the CLI workflow)
## Getting started
You can refer to the **[Bruno Starter Guide](https://github.com/bruno-collections/bruno-starter-guide)** collection for solutions:
**Fetch in Bruno** button to open the collection in Bruno, **or** git clone the repository [Bruno Starter Guide](https://github.com/bruno-collections/bruno-starter-guide).
Use the **[Bruno Starter Guide](https://github.com/bruno-collections/bruno-starter-guide)** collection as a reference solution while following this guide. If you get stuck at any step, open the collection to see the expected request setup.
Work through the challenges **in order**. Each step assumes the previous one.
***
## 1. Create a collection
**Objective:** Create a collection (sequence of requests) to store your API requests.
1. Open Bruno (workspace home).
2. Click the **+** icon (top-left) → **Create collection**.
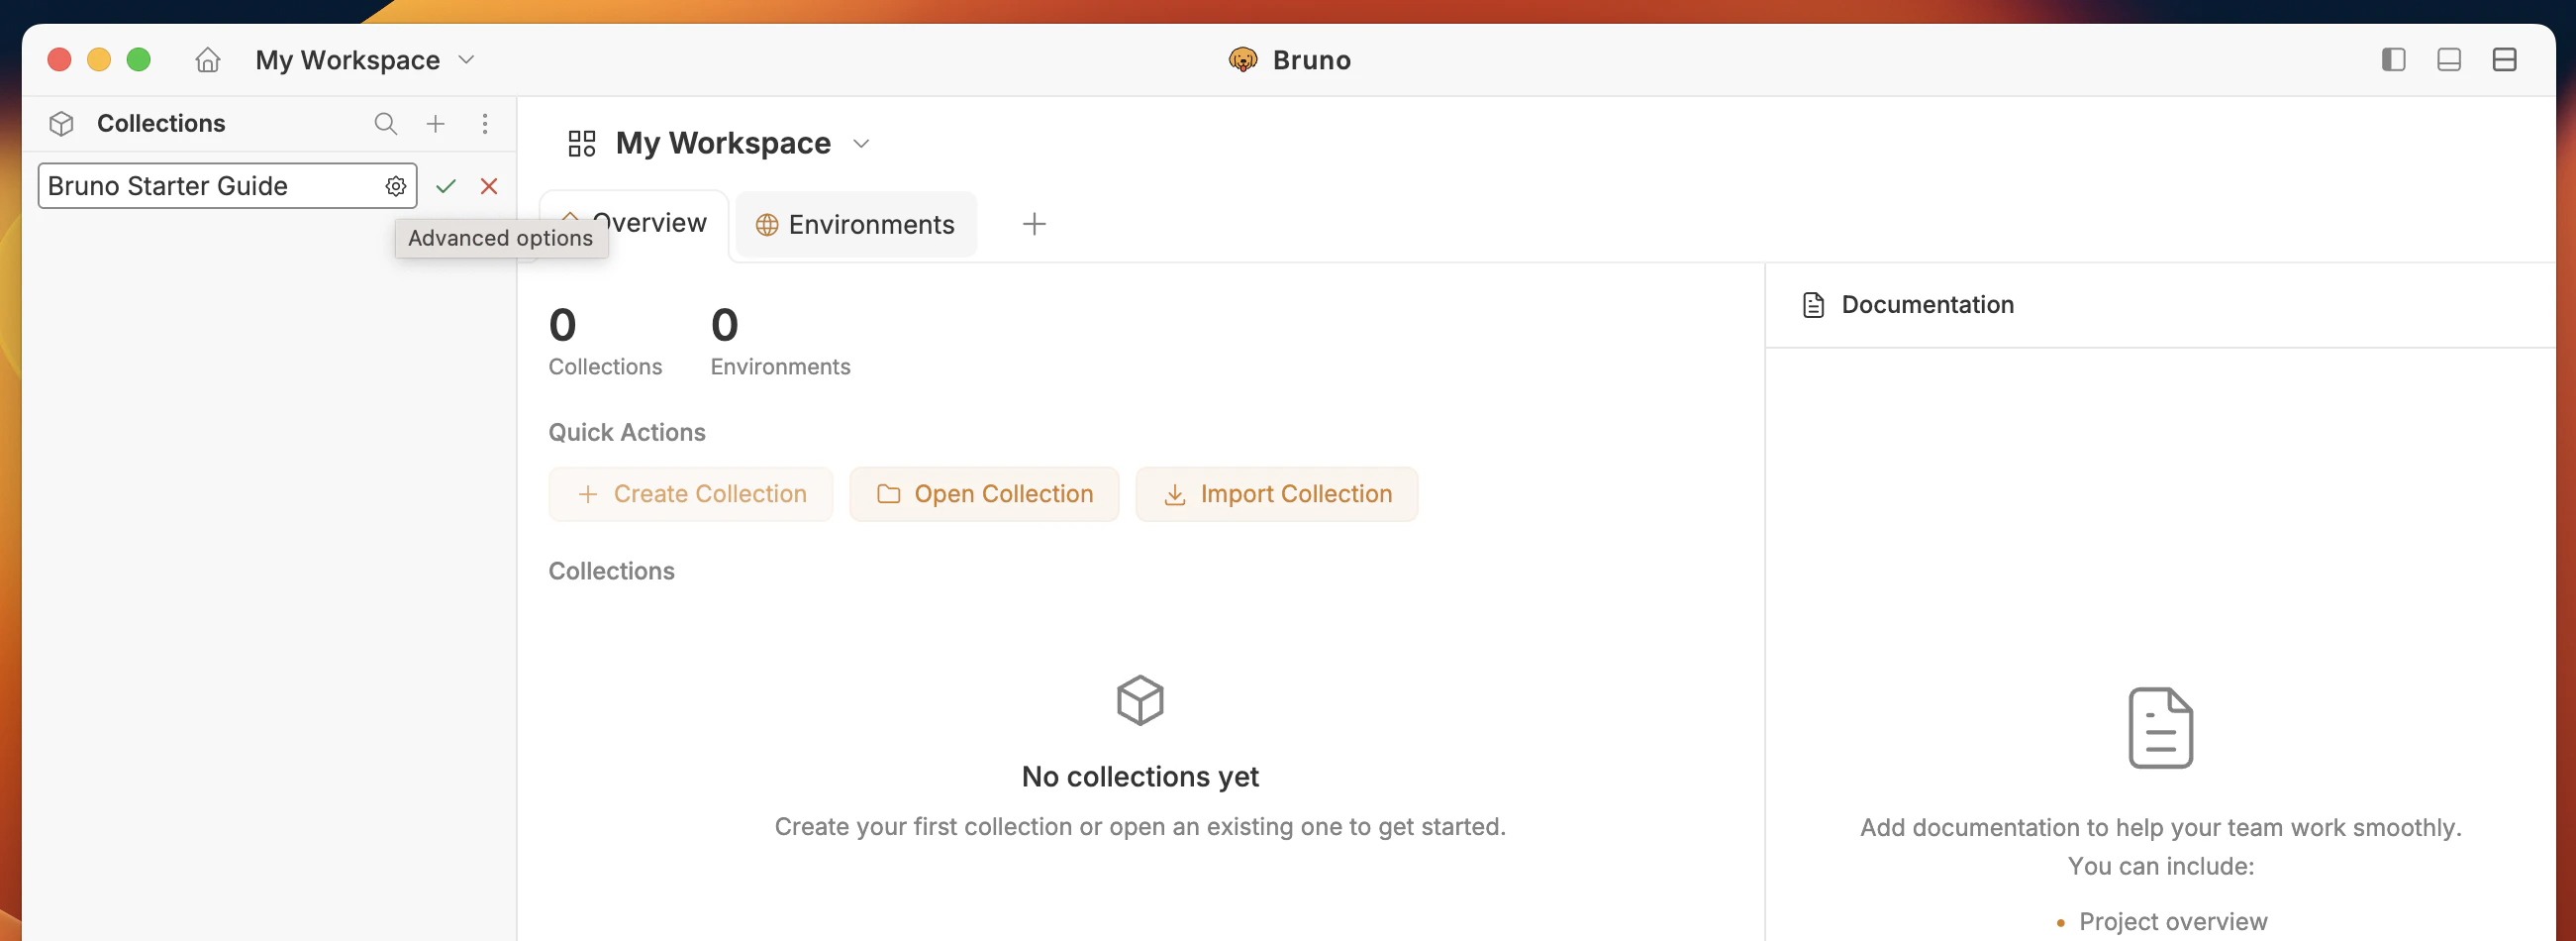
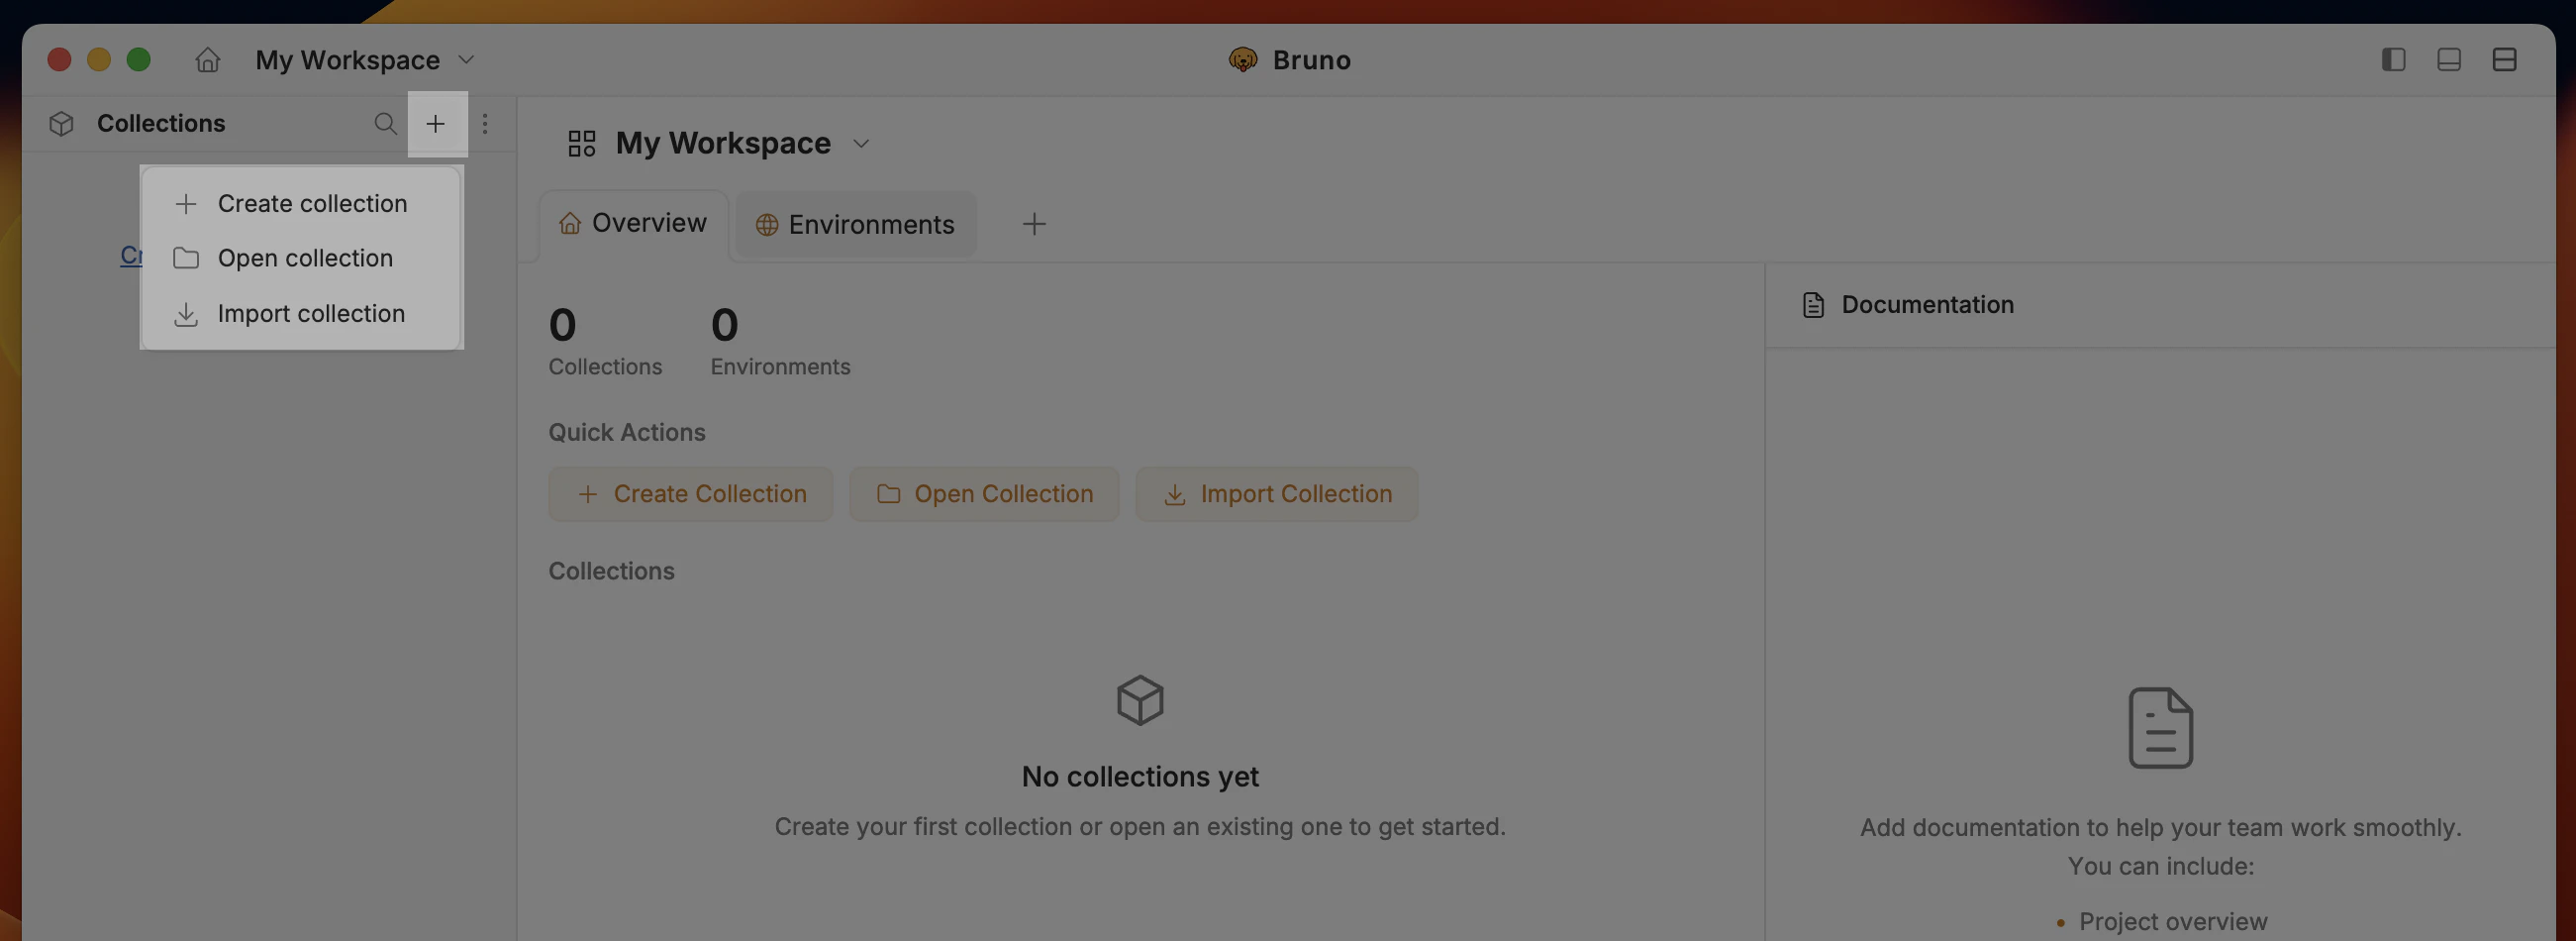 3. Enter a name **Bruno Starter Guide** (click on settings icon for advanced options) and choose the desired folder on your system.
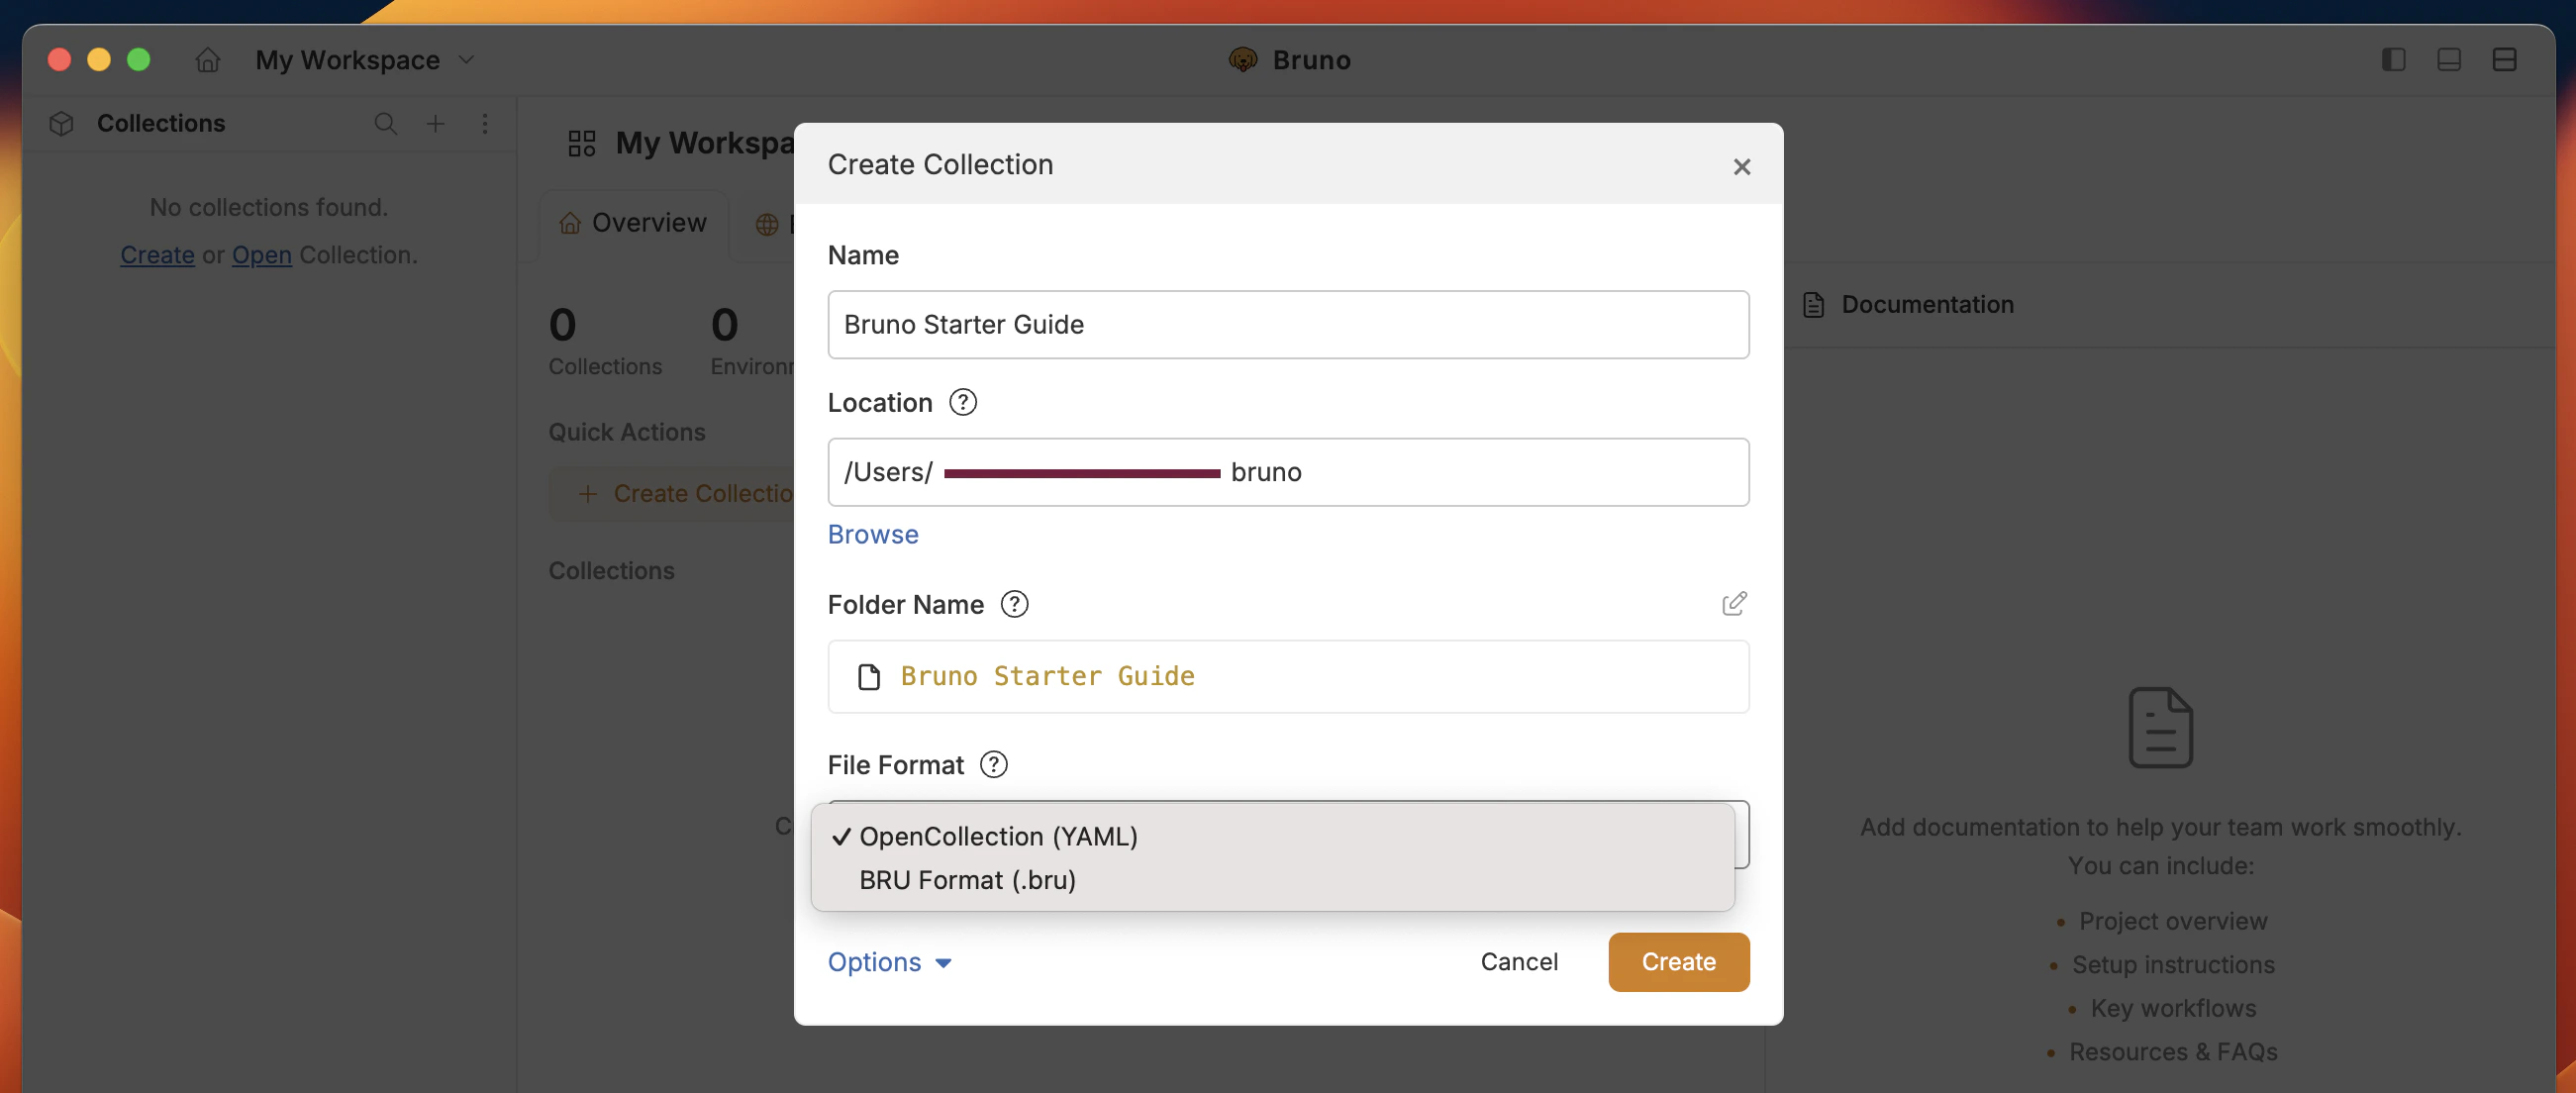
 4. Select file format (YAML or BRU -> YAML recommended) and click **Create**.
 Congratulations! You have successfully created your first collection. The UI should look like this:
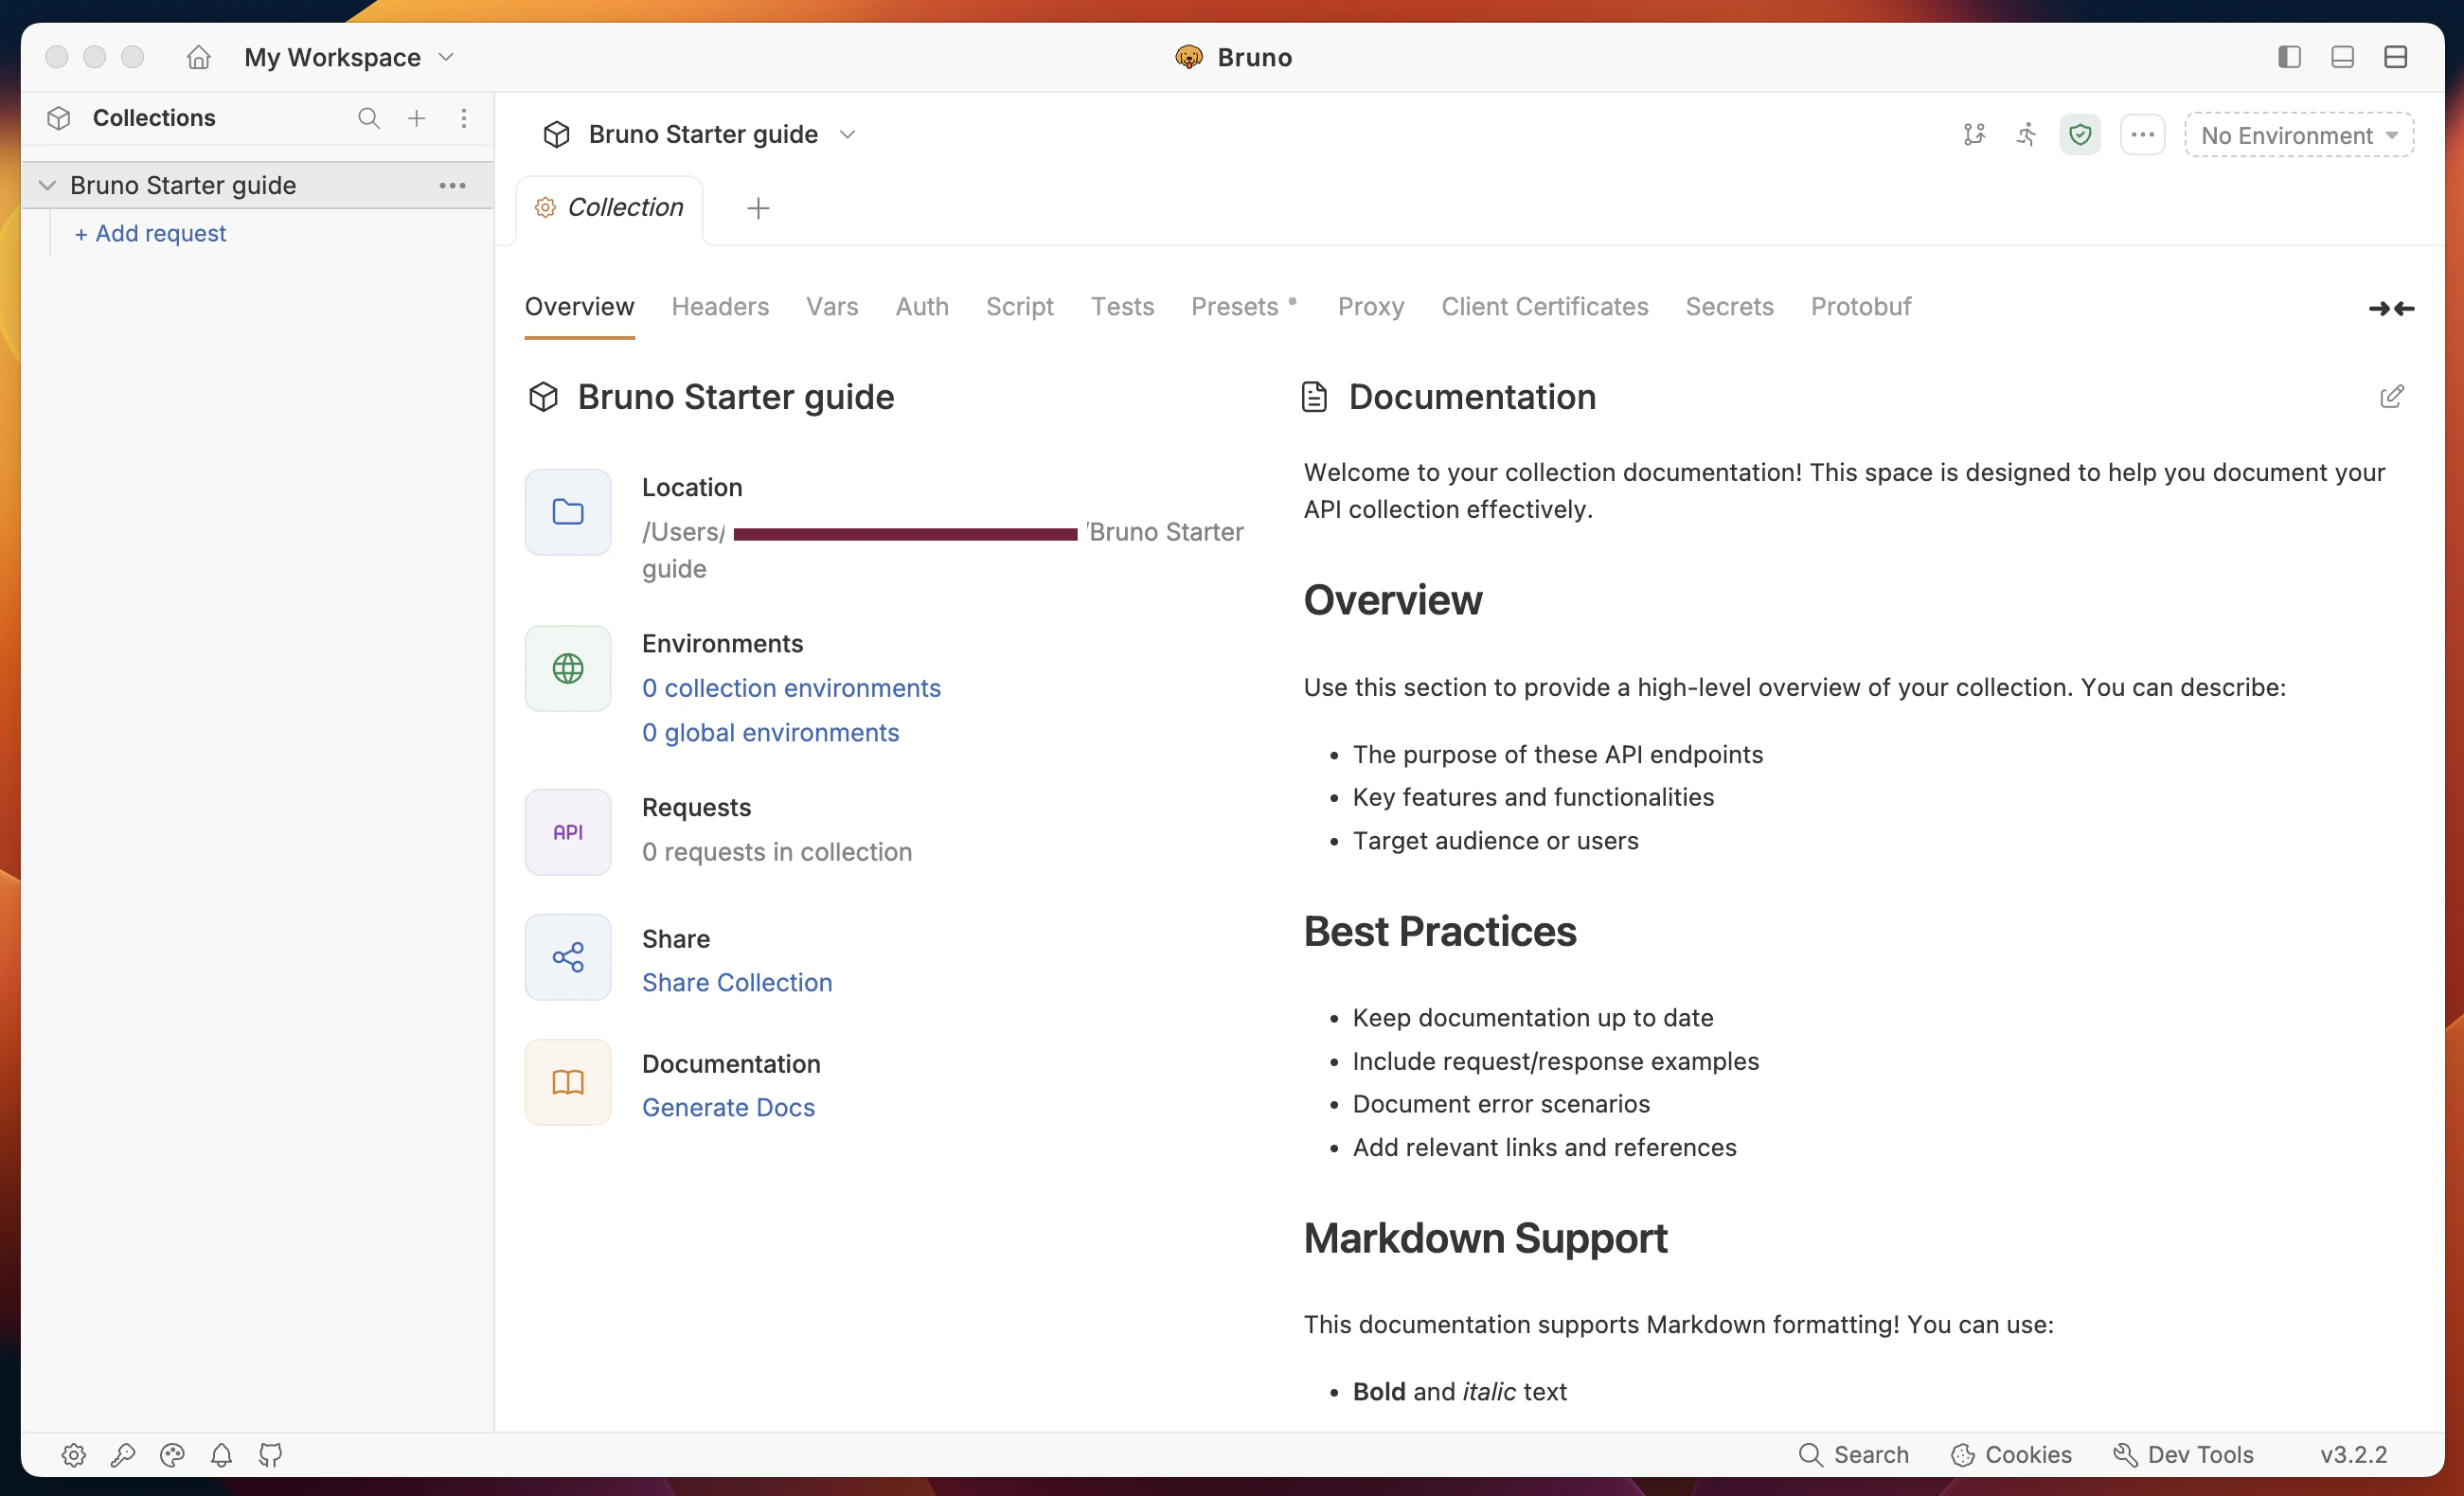 **Success Criteria:**
* Collection is visible in the sidebar with name **Bruno Starter Guide**.
* Collection is created with the desired file format (YAML recommended).
***
## 2. Create a request
**Objective:** Create and execute your first request from the collection.
1. Click the collection context menu (...) → create a **New Request**.
**Success Criteria:**
* Collection is visible in the sidebar with name **Bruno Starter Guide**.
* Collection is created with the desired file format (YAML recommended).
***
## 2. Create a request
**Objective:** Create and execute your first request from the collection.
1. Click the collection context menu (...) → create a **New Request**.
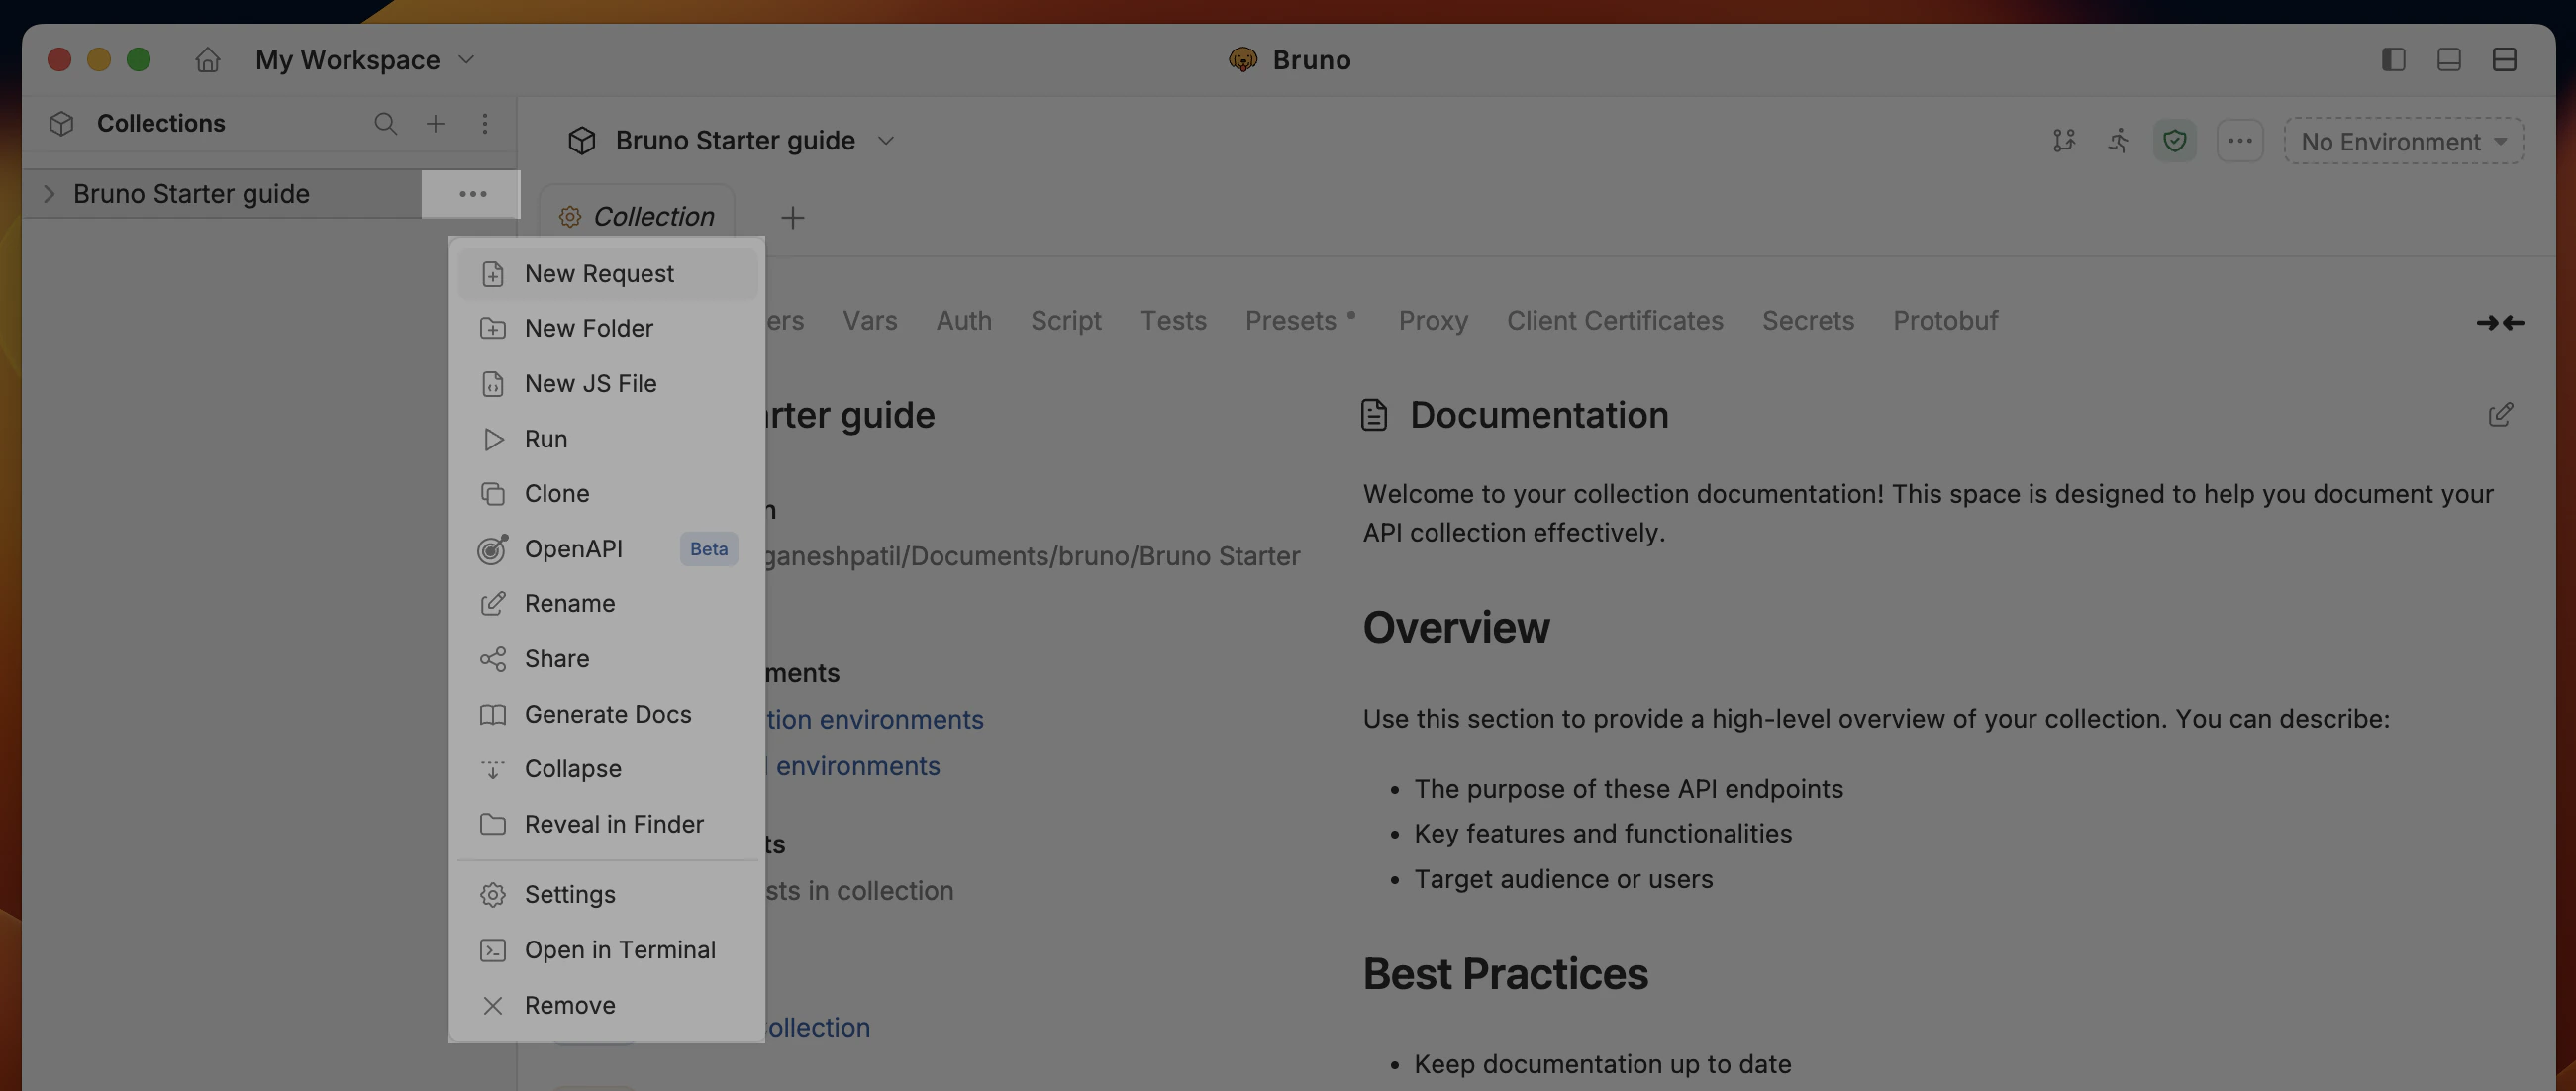 2. Select:
* `type` HTTP - (GraphQL, gRPC, WebSocket, or cURL is also supported)
* `Request Name` as `01-github-api`
* `URL` as `https://api.github.com/users/usebruno`.
2. Select:
* `type` HTTP - (GraphQL, gRPC, WebSocket, or cURL is also supported)
* `Request Name` as `01-github-api`
* `URL` as `https://api.github.com/users/usebruno`.
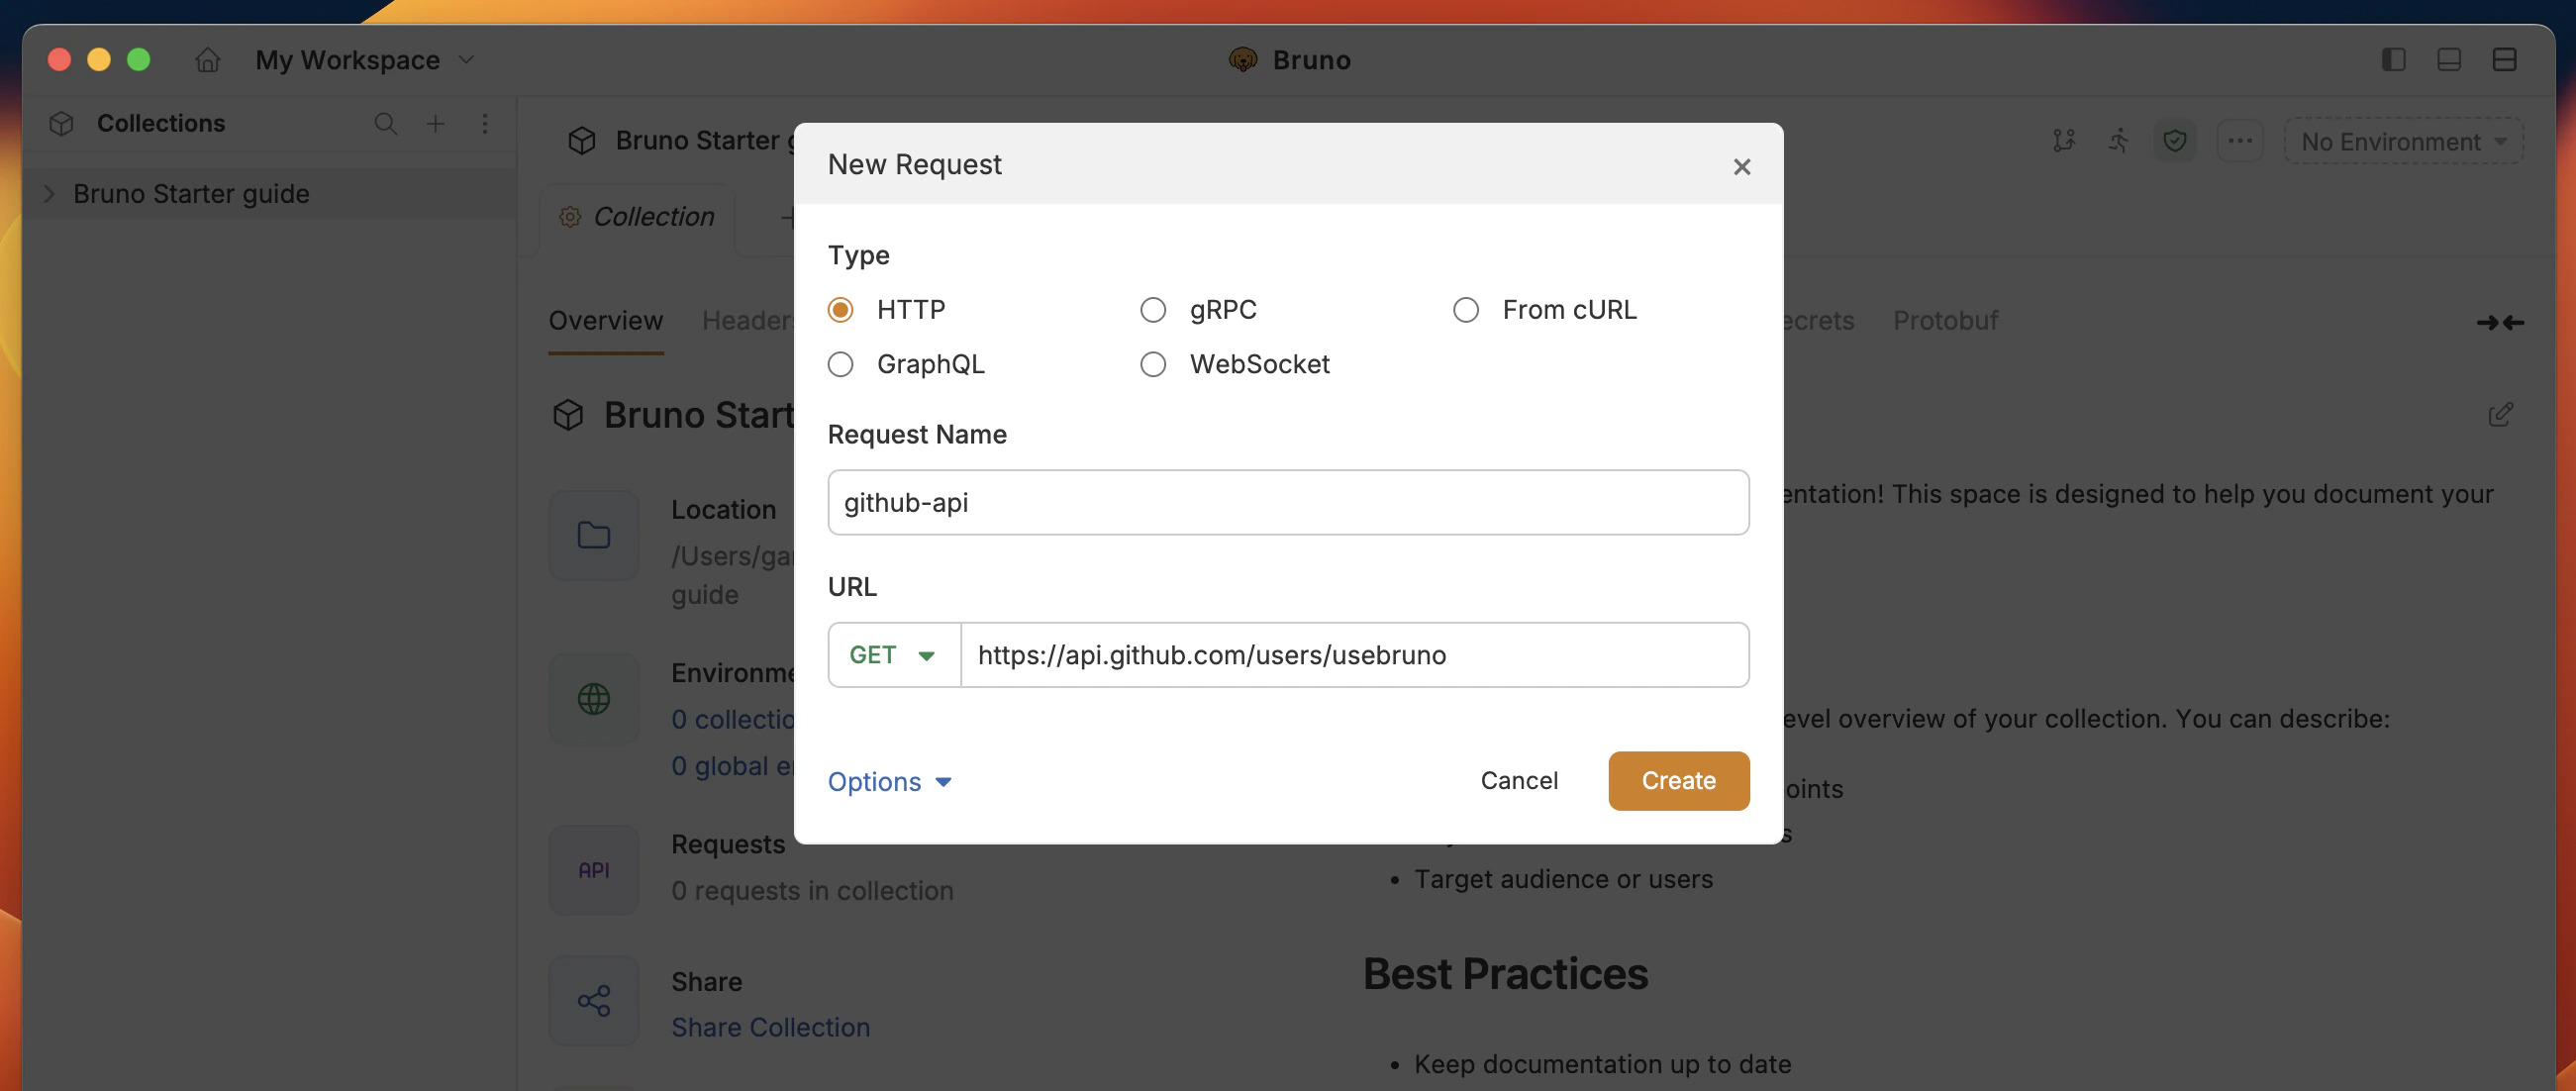 3. Execute request by clicking on Send button or pressing Cmd/Ctrl + Enter.
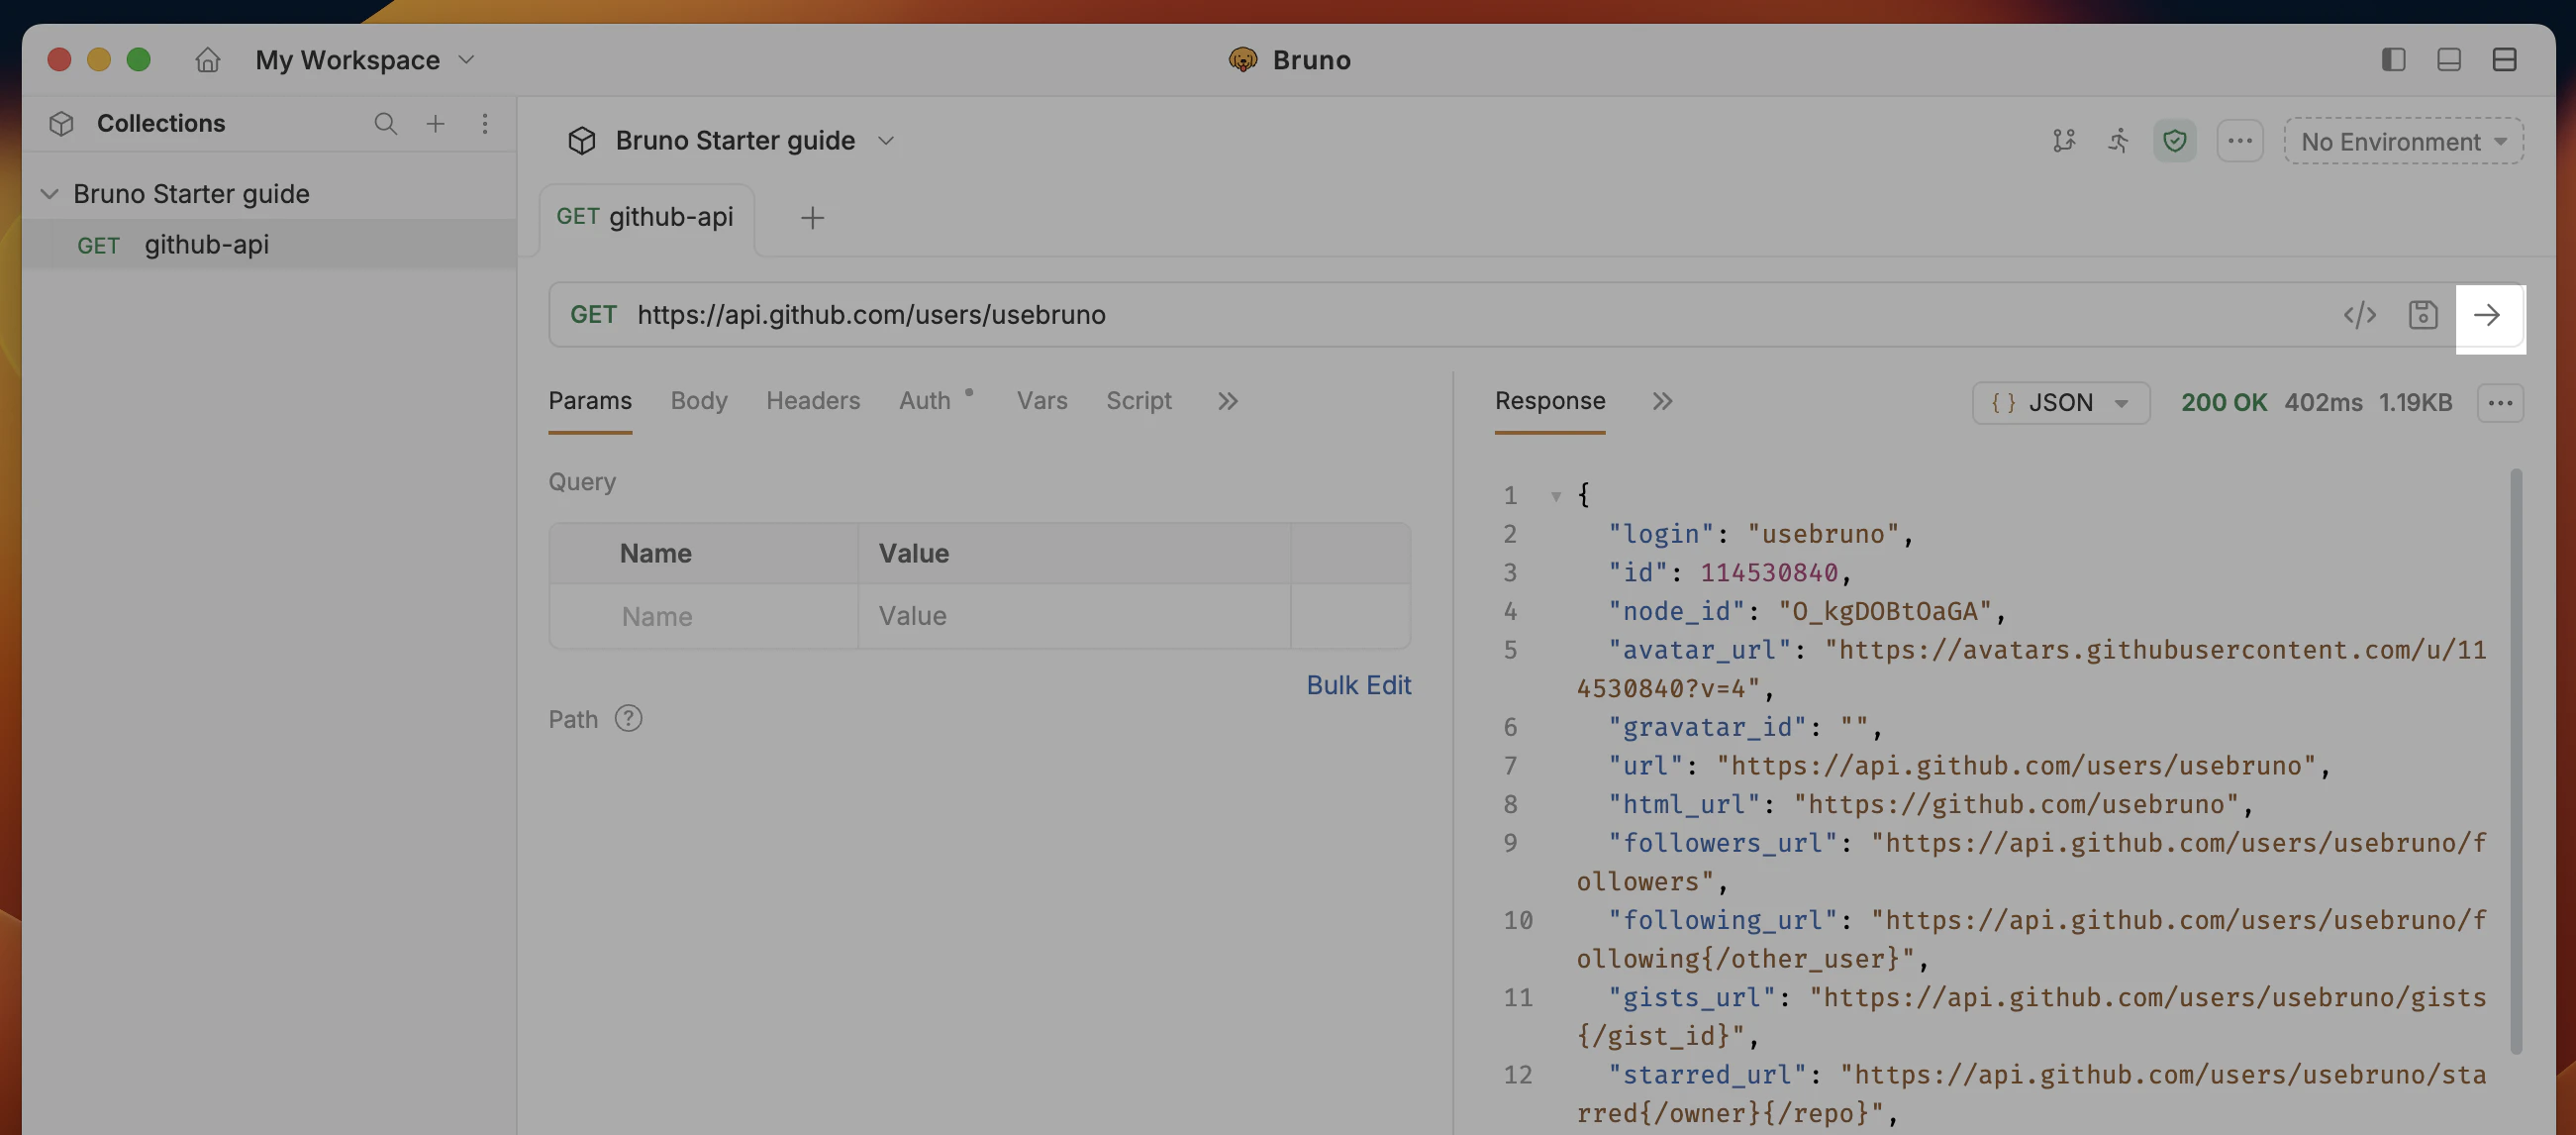 You have successfully sent your first request. The UI should look like this:
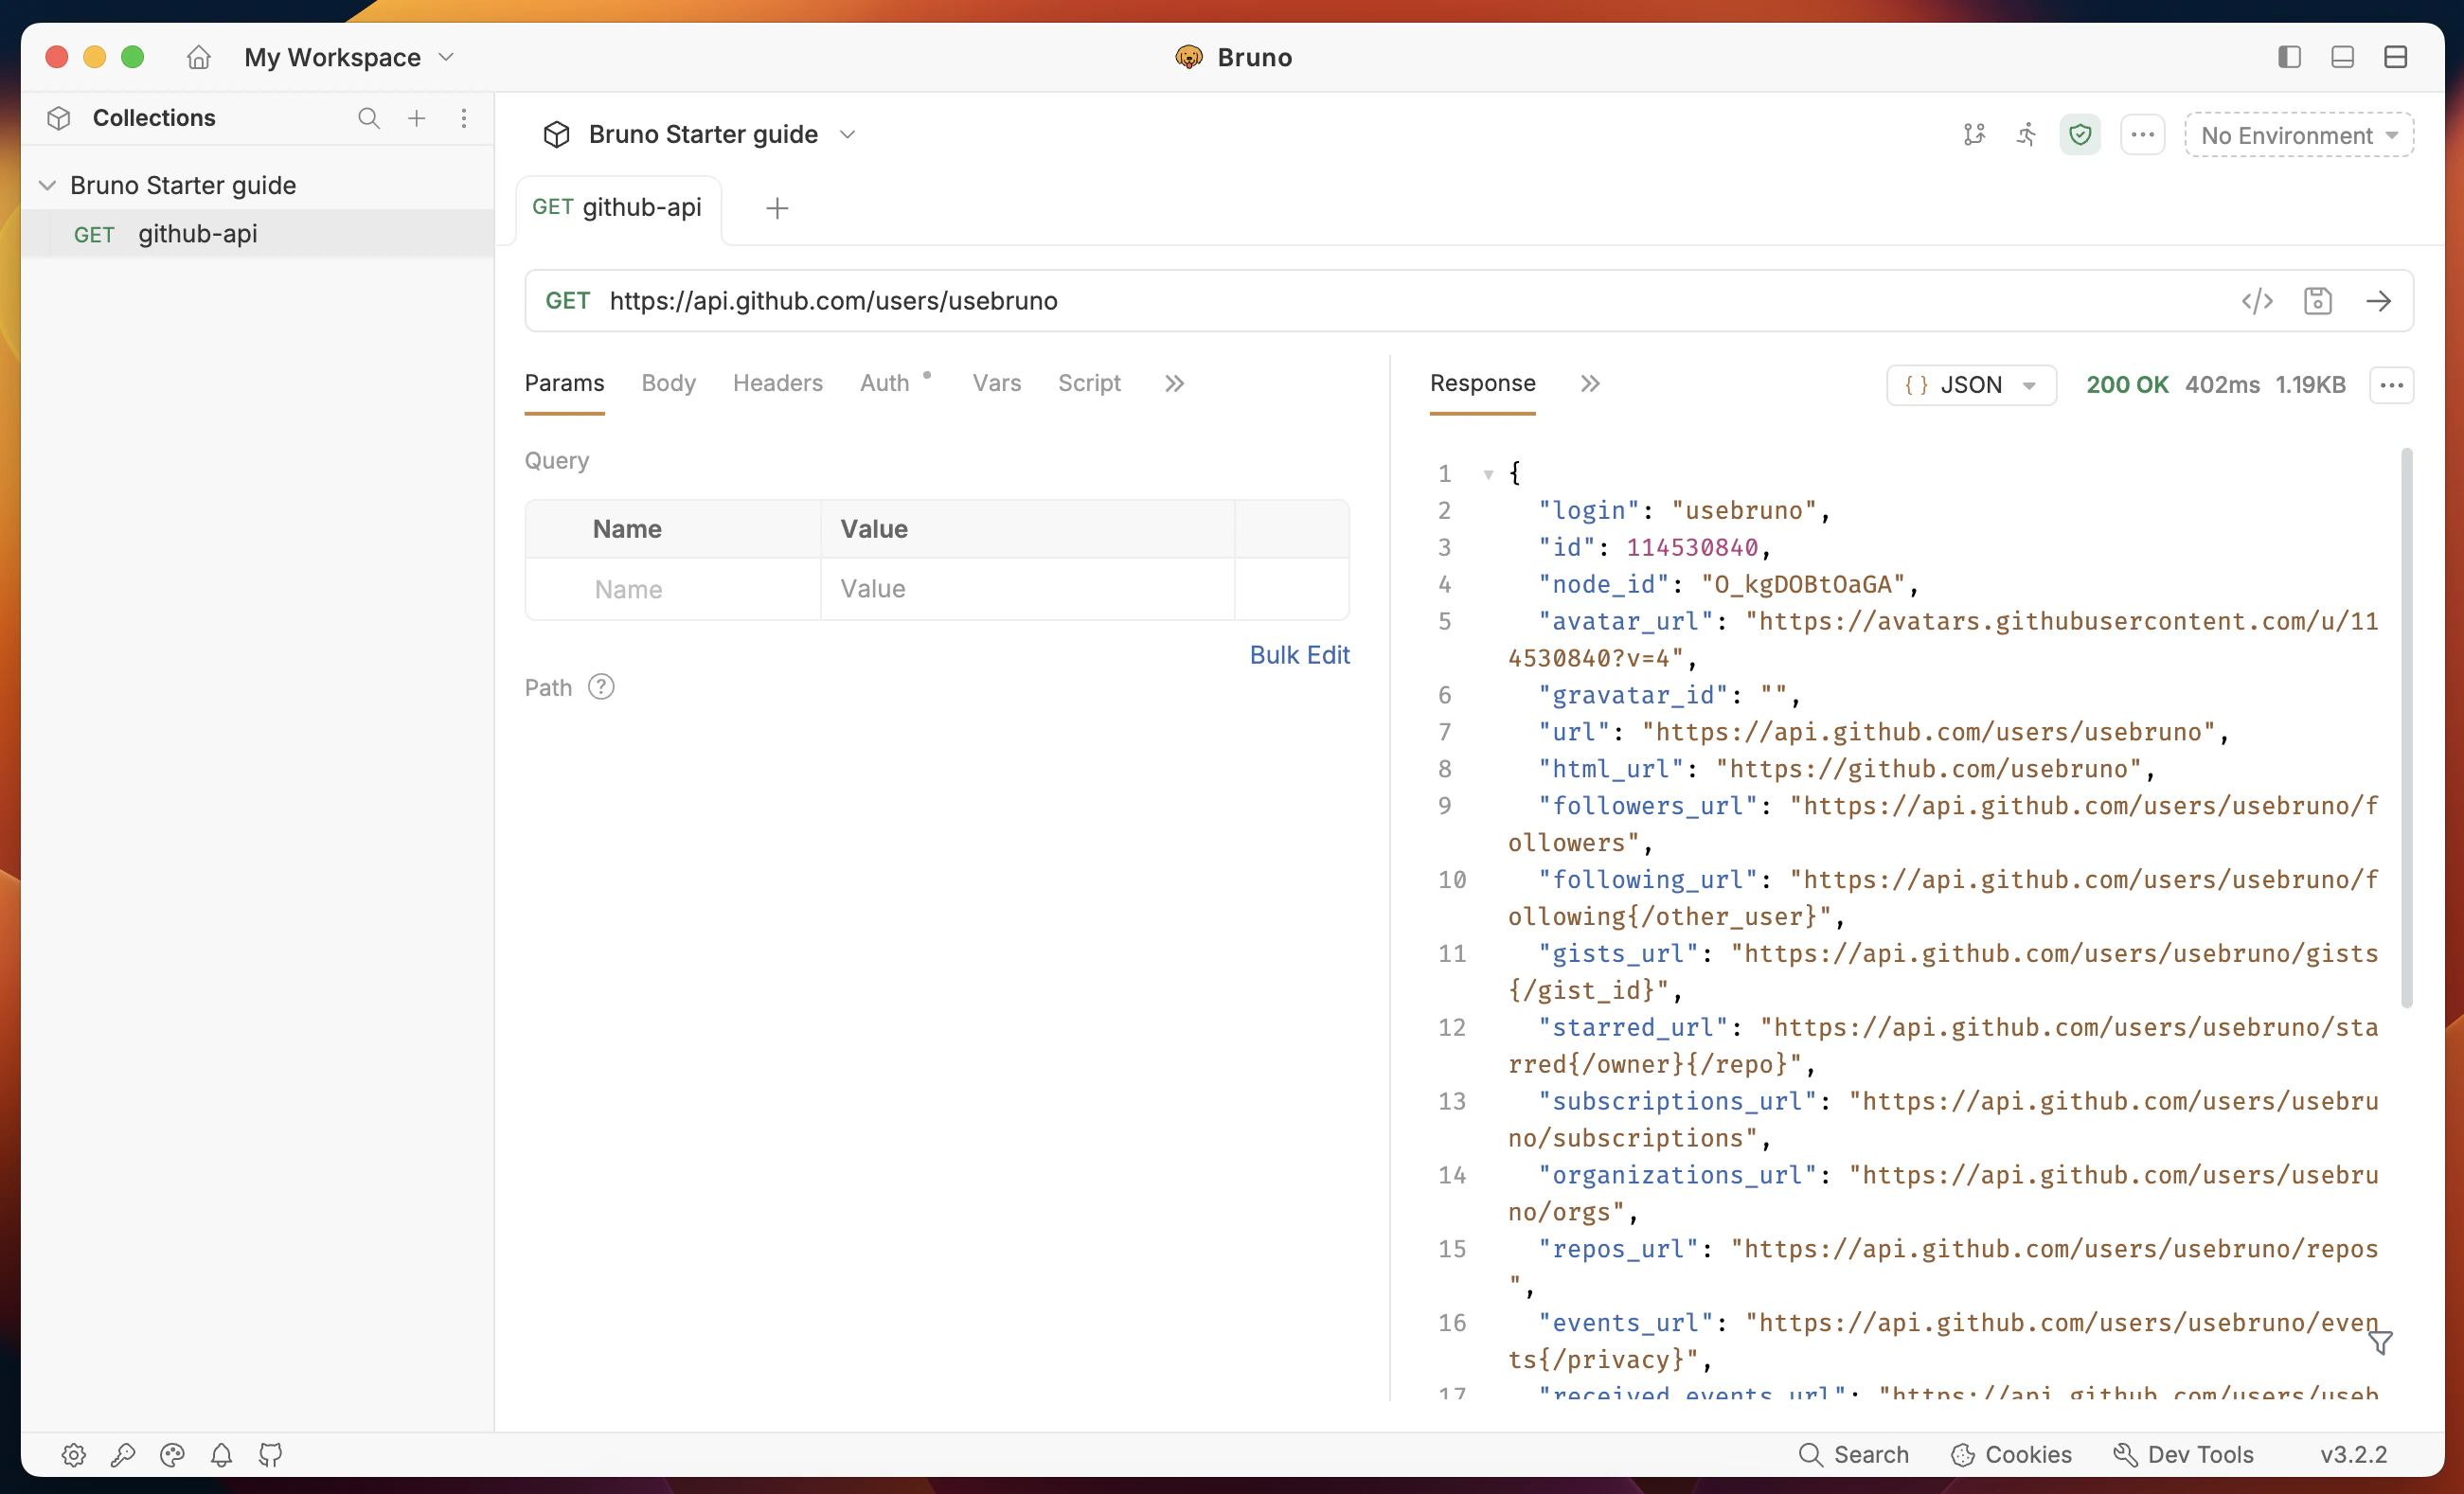 **Success Criteria:**
* Status is **200** (Green text - 200 OK)
* Response body with details of the `usebruno` user.
***
## 3. Send a request with data
**Objective:** Create a request with **POST** method and send data with API request.
1. Create a new request with:
* Request type as **HTTP**
* Request name as `02-echo-bru`
* method as **POST**
* URL as `https://echo.usebruno.com`
**Success Criteria:**
* Status is **200** (Green text - 200 OK)
* Response body with details of the `usebruno` user.
***
## 3. Send a request with data
**Objective:** Create a request with **POST** method and send data with API request.
1. Create a new request with:
* Request type as **HTTP**
* Request name as `02-echo-bru`
* method as **POST**
* URL as `https://echo.usebruno.com`
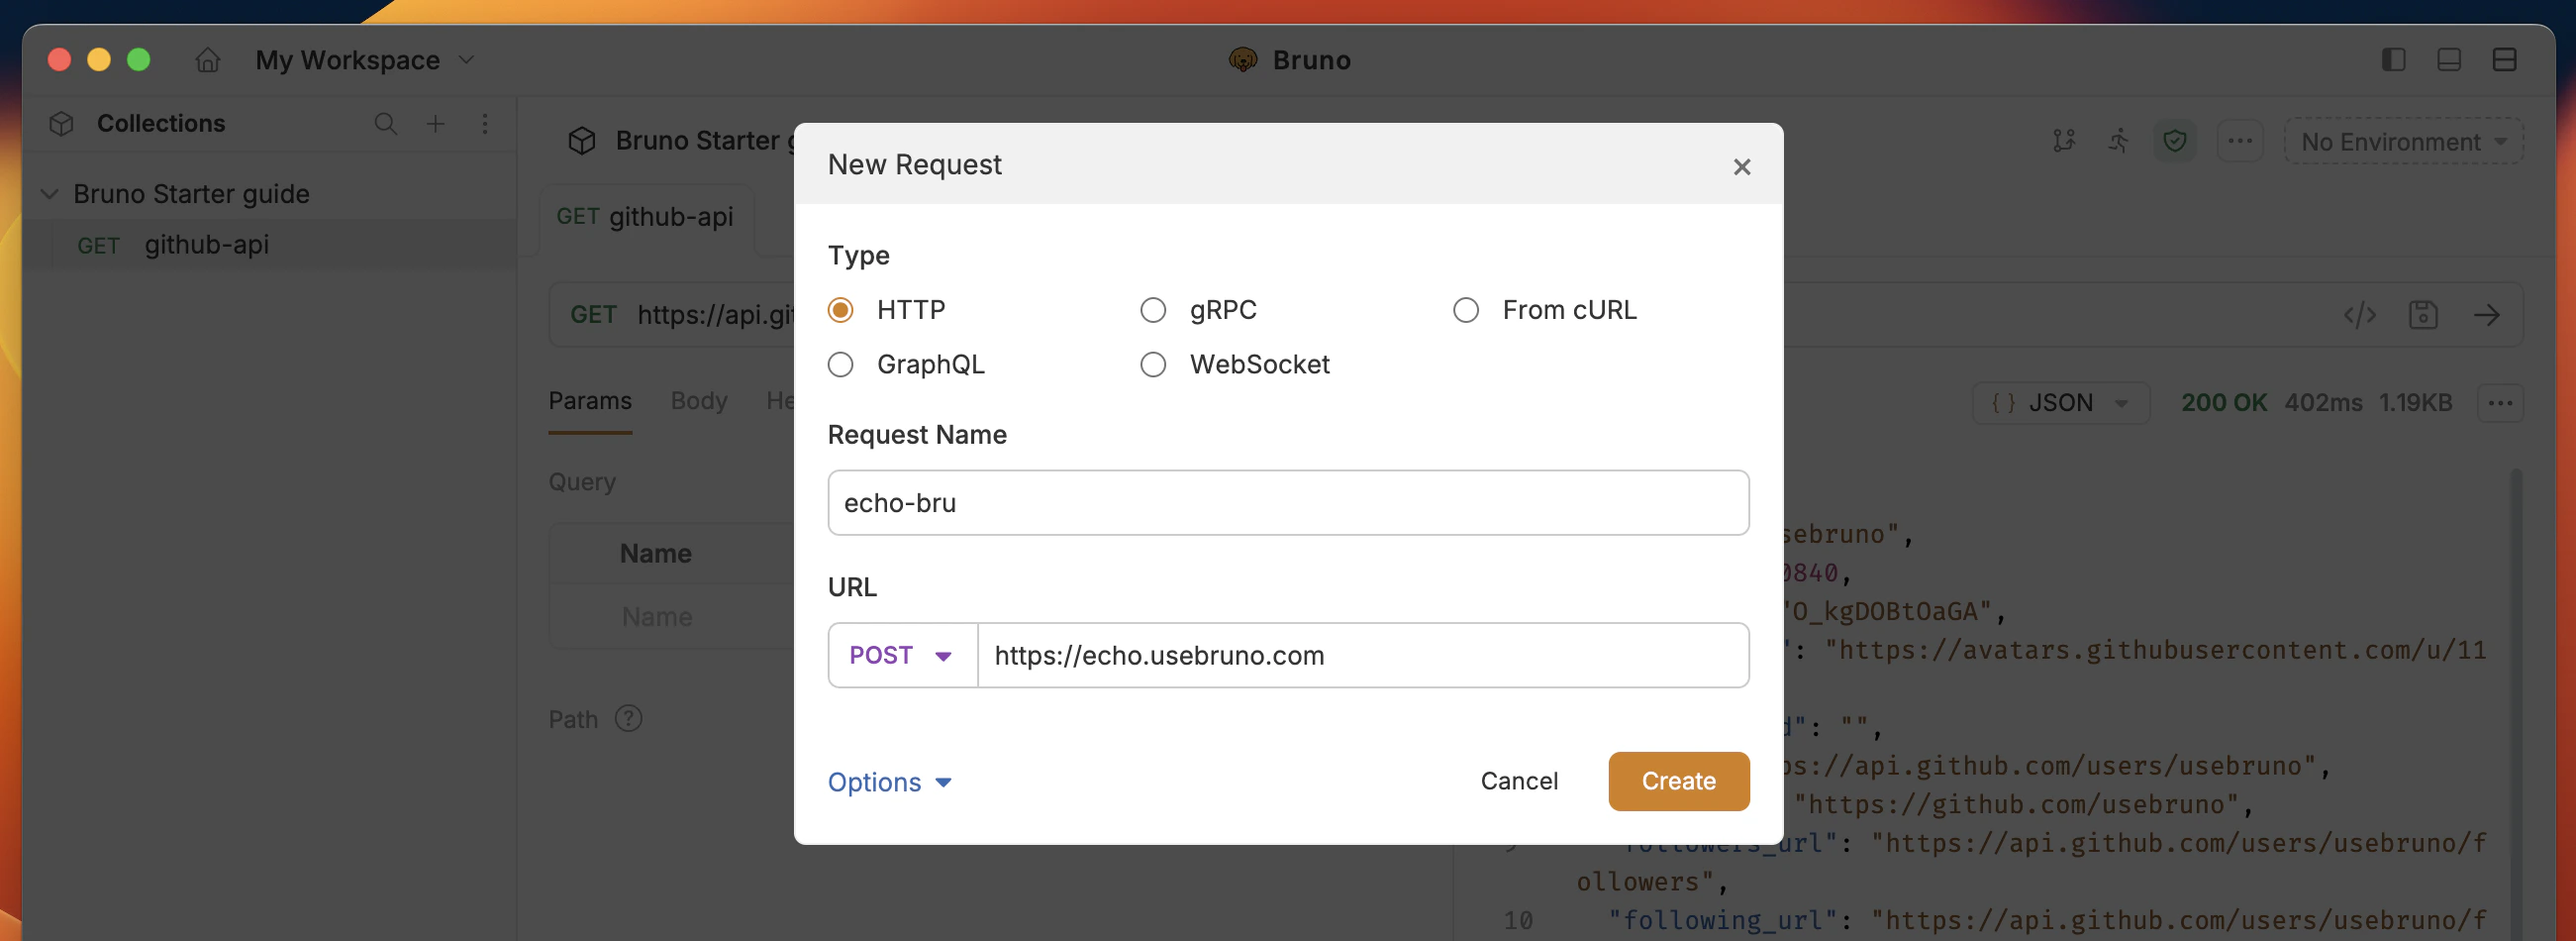 2. Go to the **Body** tab and select → **JSON** as an option
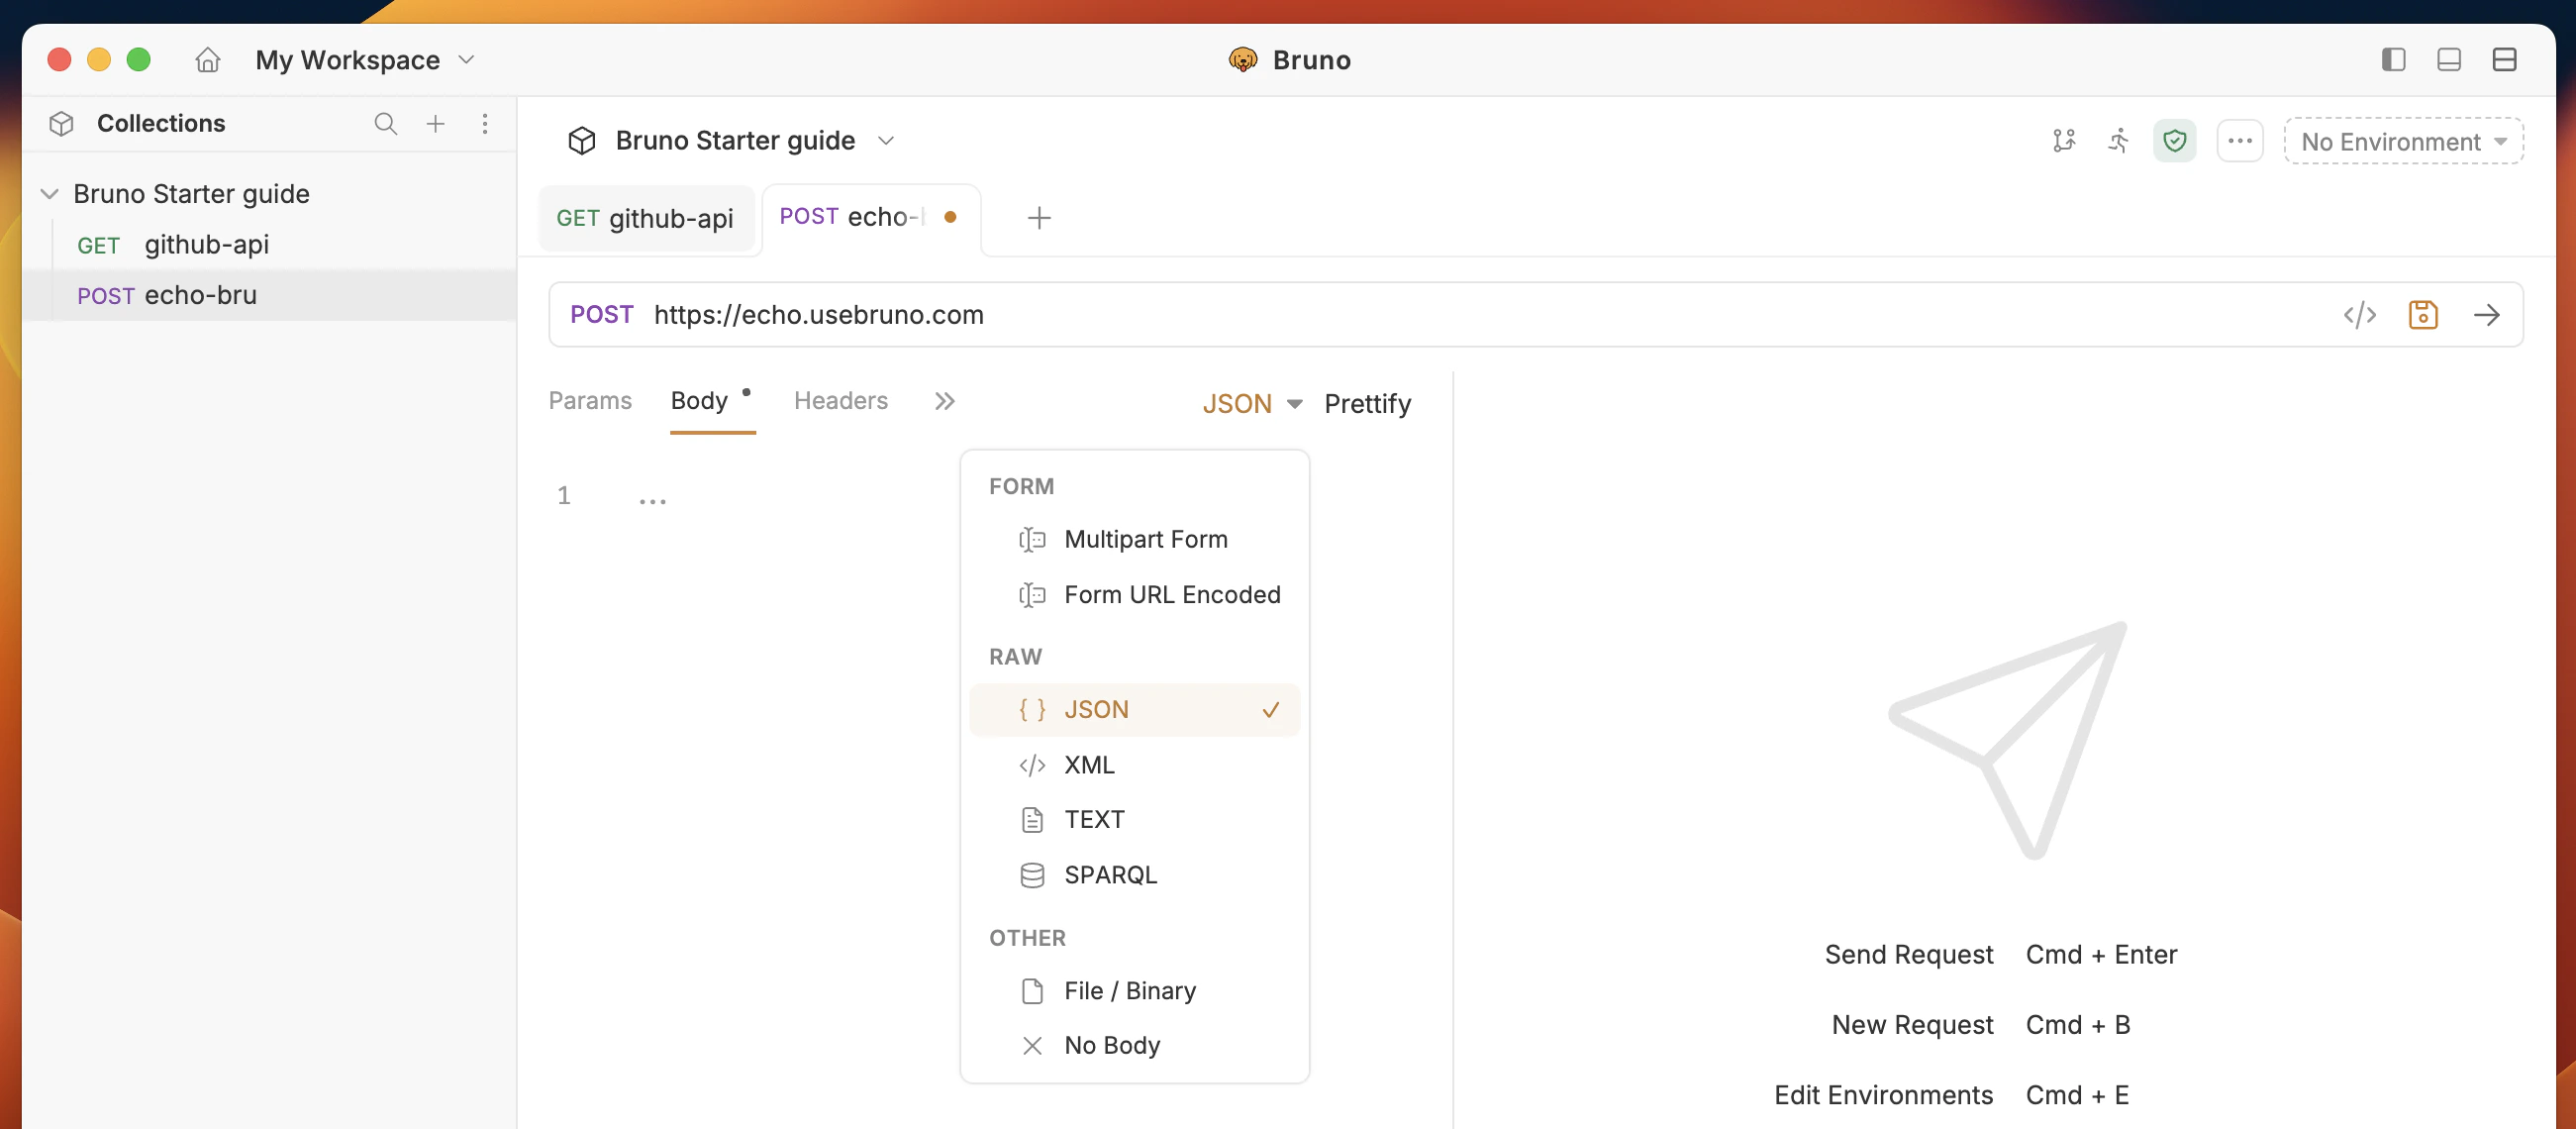 3. Add the following JSON data to the body of the request:
```json theme={null}
{
"title": "Bruno",
"msg": "Loved by developers. Built for developers."
}
```
4. Execute request by clicking on Send button or pressing Cmd/Ctrl + Enter.
3. Add the following JSON data to the body of the request:
```json theme={null}
{
"title": "Bruno",
"msg": "Loved by developers. Built for developers."
}
```
4. Execute request by clicking on Send button or pressing Cmd/Ctrl + Enter.
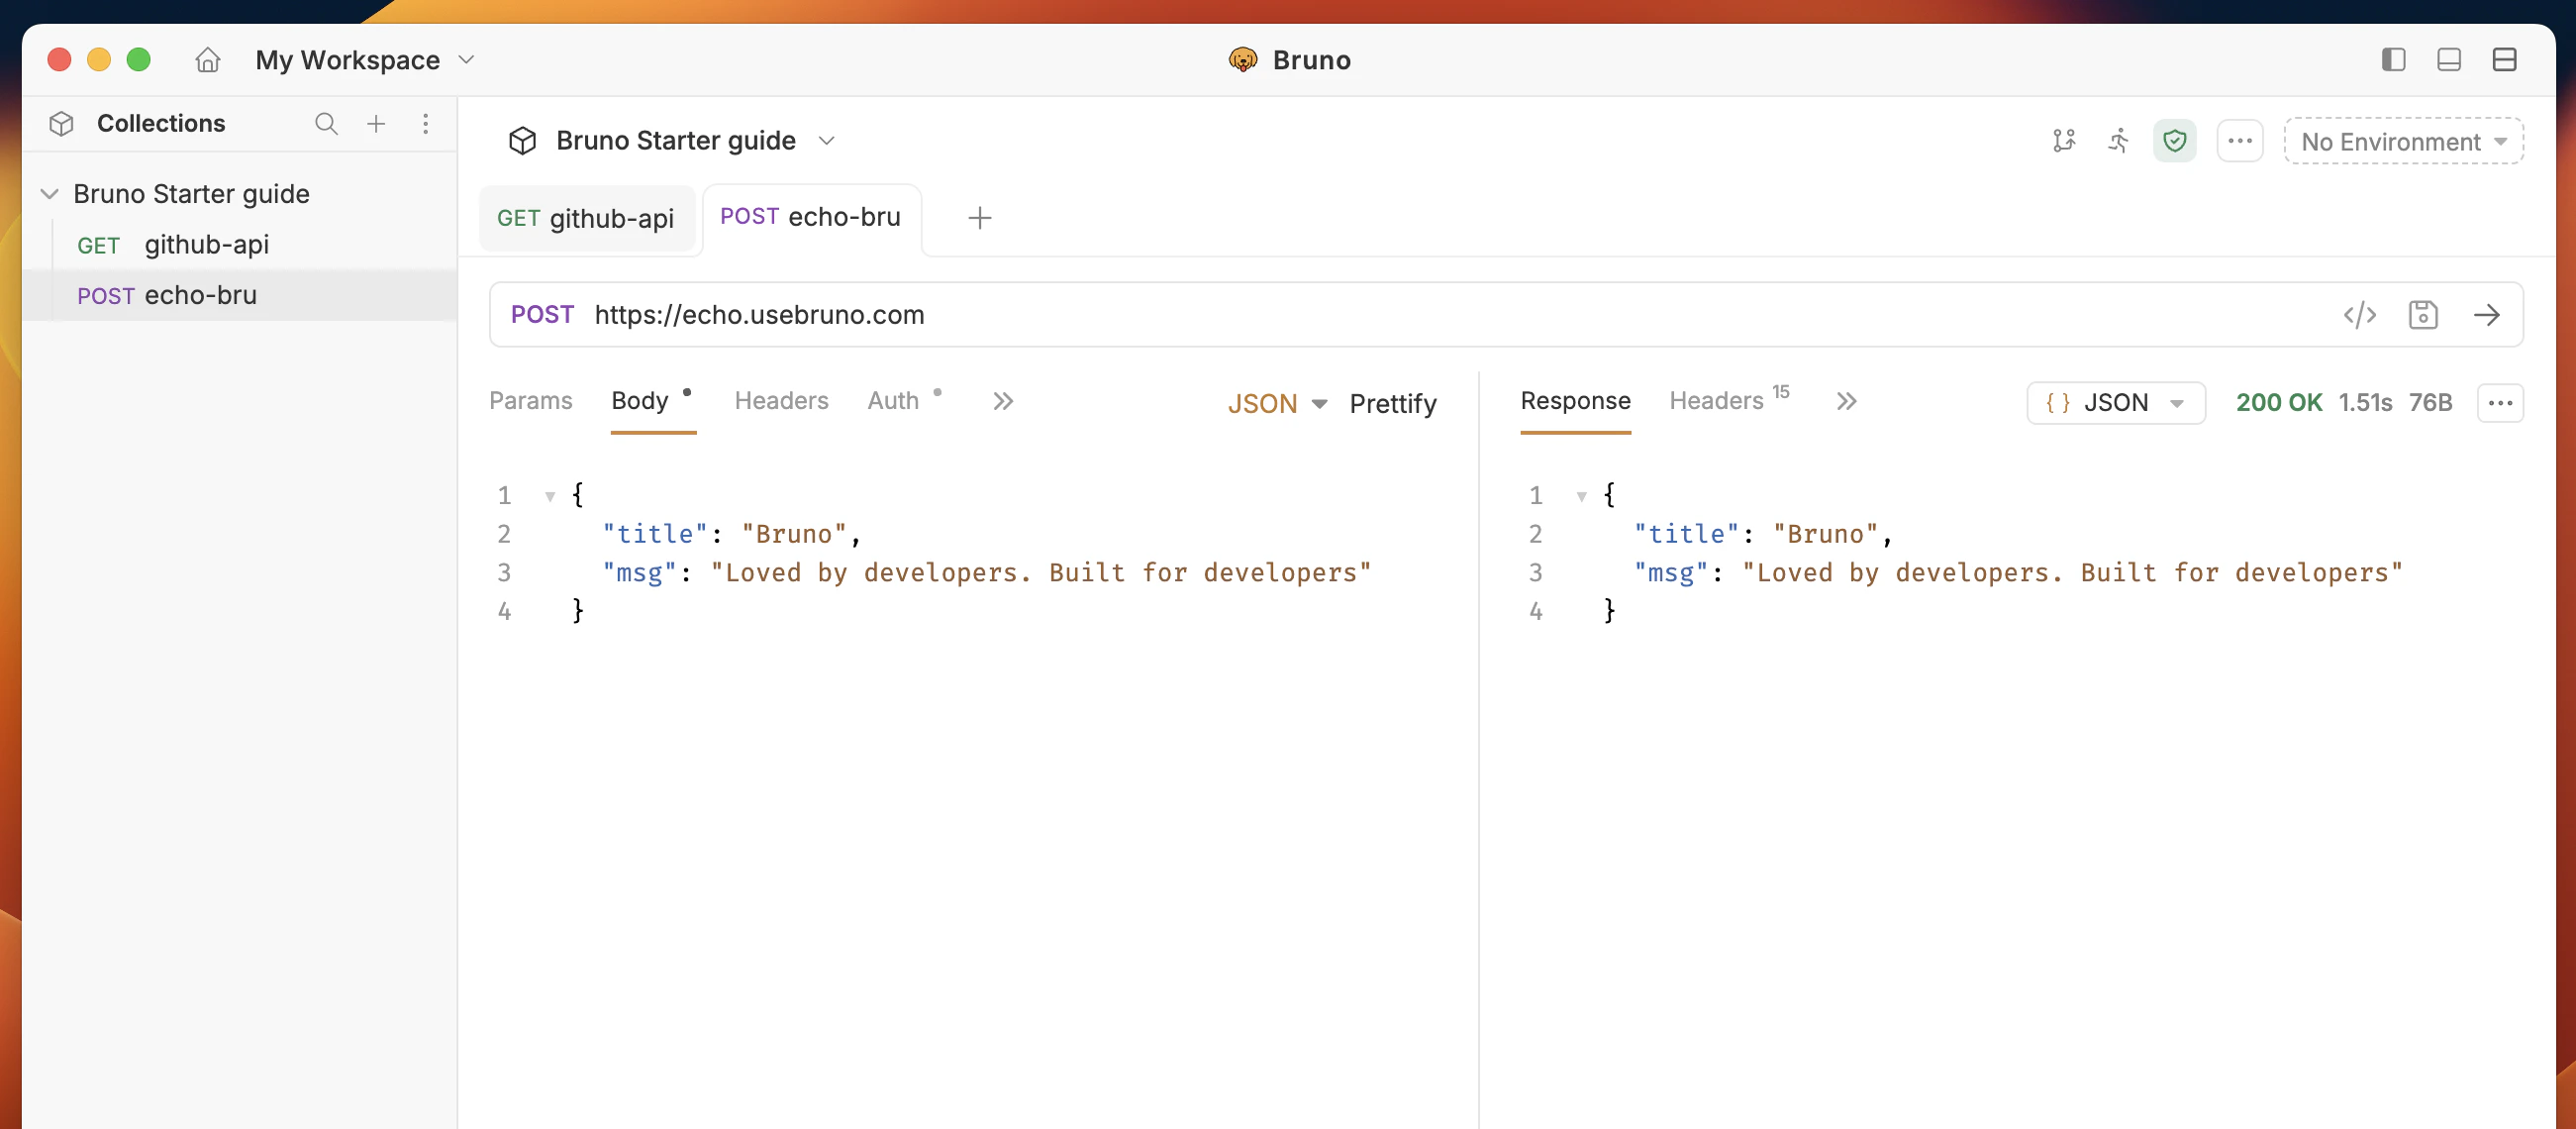 You have successfully sent **JSON** data to the API. This is Bruno's echo endpoint, so you will receive the same data in the response.
**Success Criteria:**
* JSON data is sent to the API.
* Response body contains the same JSON data.
***
## 4. Create an environment
**Objective:** Create an environment variable to store a **URL** and reuse it with `{{baseURL}}`.
1. Open the **Environments** settings (top-right — **No environment**).
You have successfully sent **JSON** data to the API. This is Bruno's echo endpoint, so you will receive the same data in the response.
**Success Criteria:**
* JSON data is sent to the API.
* Response body contains the same JSON data.
***
## 4. Create an environment
**Objective:** Create an environment variable to store a **URL** and reuse it with `{{baseURL}}`.
1. Open the **Environments** settings (top-right — **No environment**).
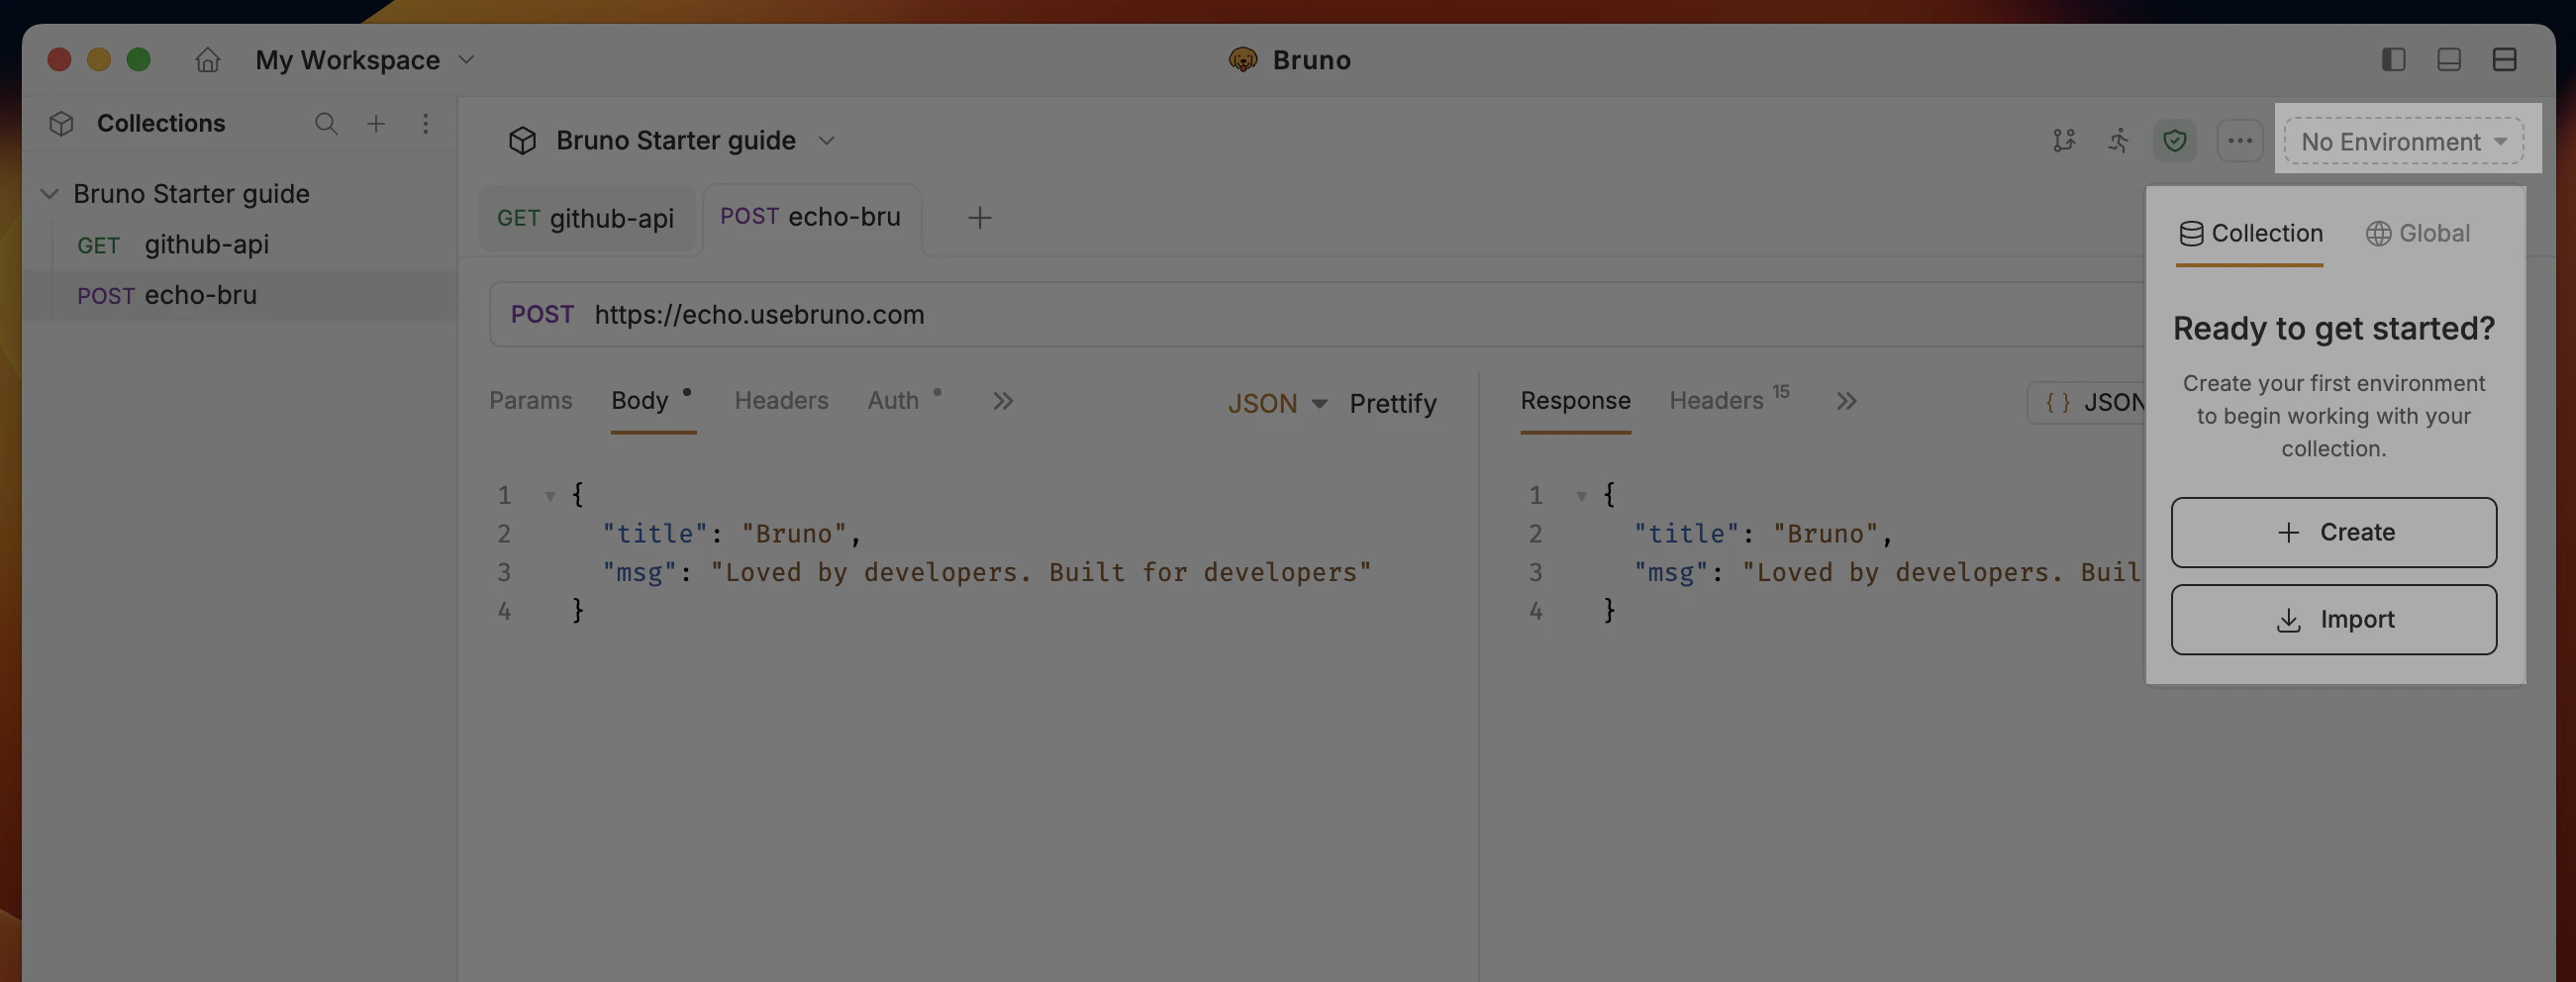 2. Click the **Create** button in the **Collection** section.
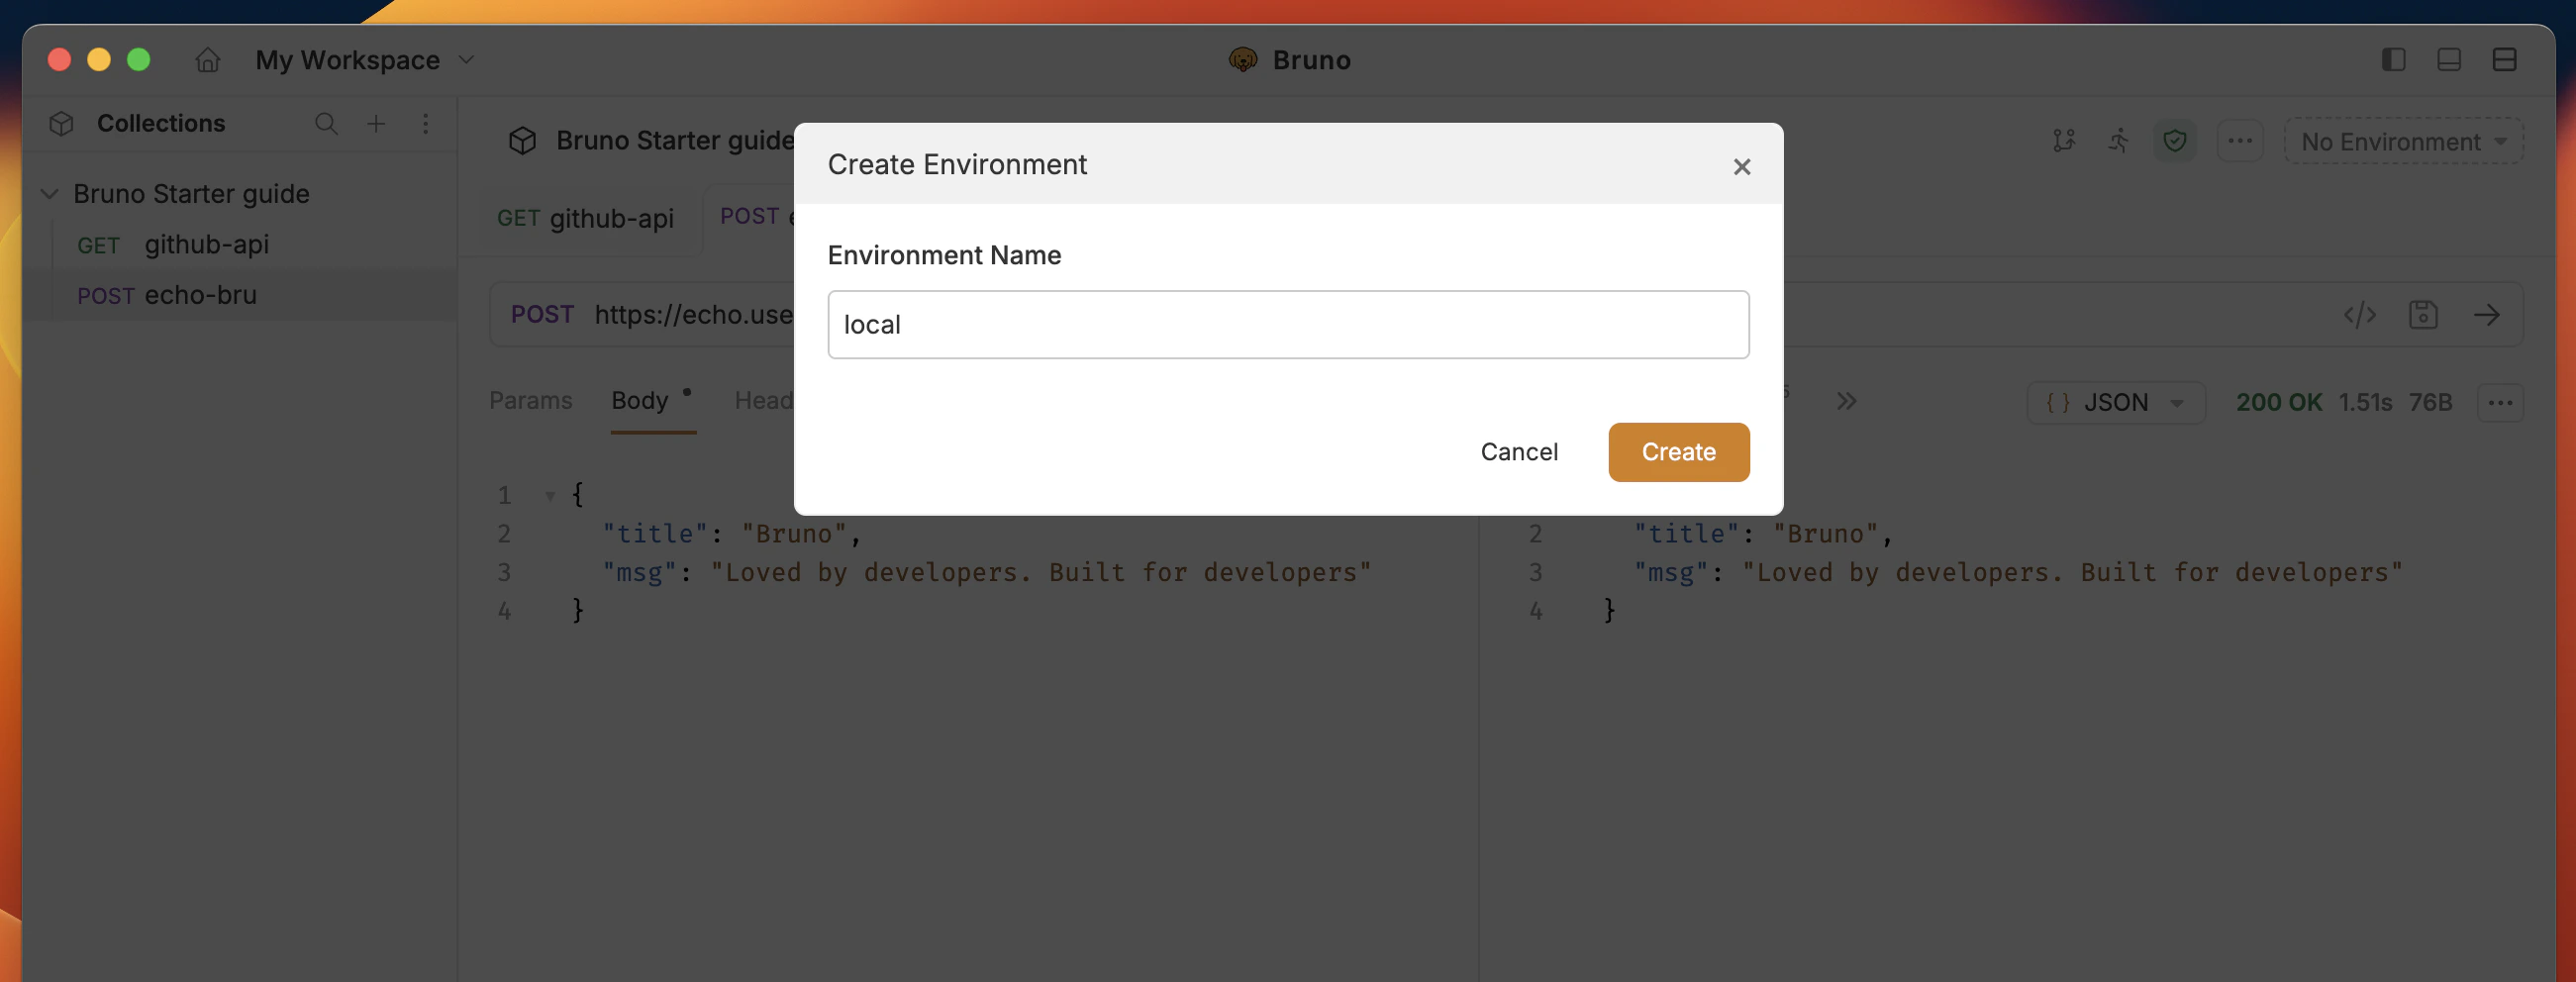
3. Name the environment `local` in the environments popup
2. Click the **Create** button in the **Collection** section.
3. Name the environment `local` in the environments popup
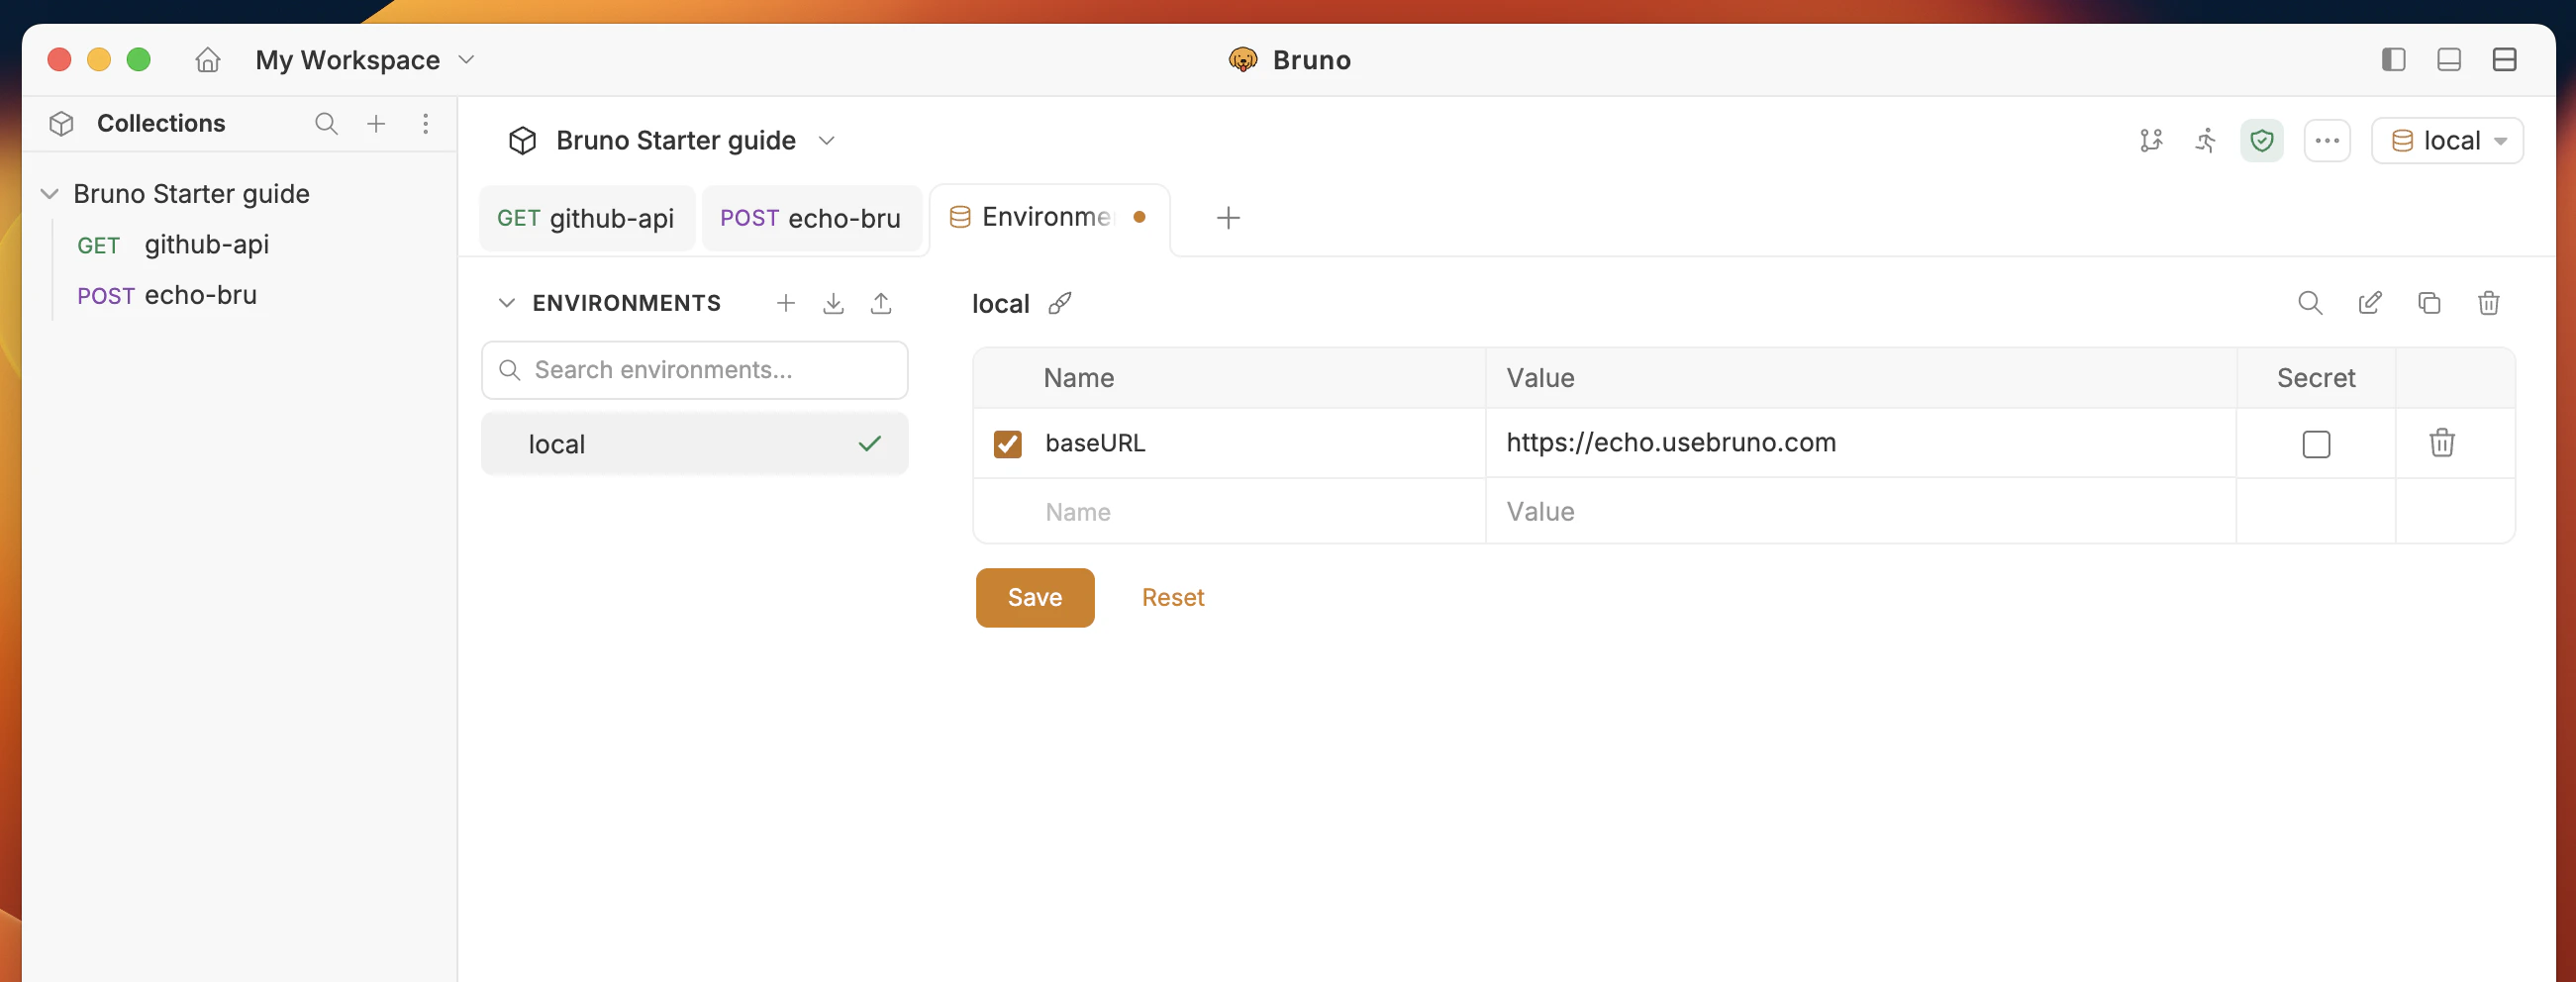
 4. Add the following variable to the environment:
* **Name:** `baseURL`
* **Value:** `https://echo.usebruno.com`
4. Add the following variable to the environment:
* **Name:** `baseURL`
* **Value:** `https://echo.usebruno.com`
 5. Click the **Save** button.
6. Go back to `02-echo-bru` request and set the `URL` to `{{baseURL}}` and select the `local` environment from the environment dropdown.
5. Click the **Save** button.
6. Go back to `02-echo-bru` request and set the `URL` to `{{baseURL}}` and select the `local` environment from the environment dropdown.
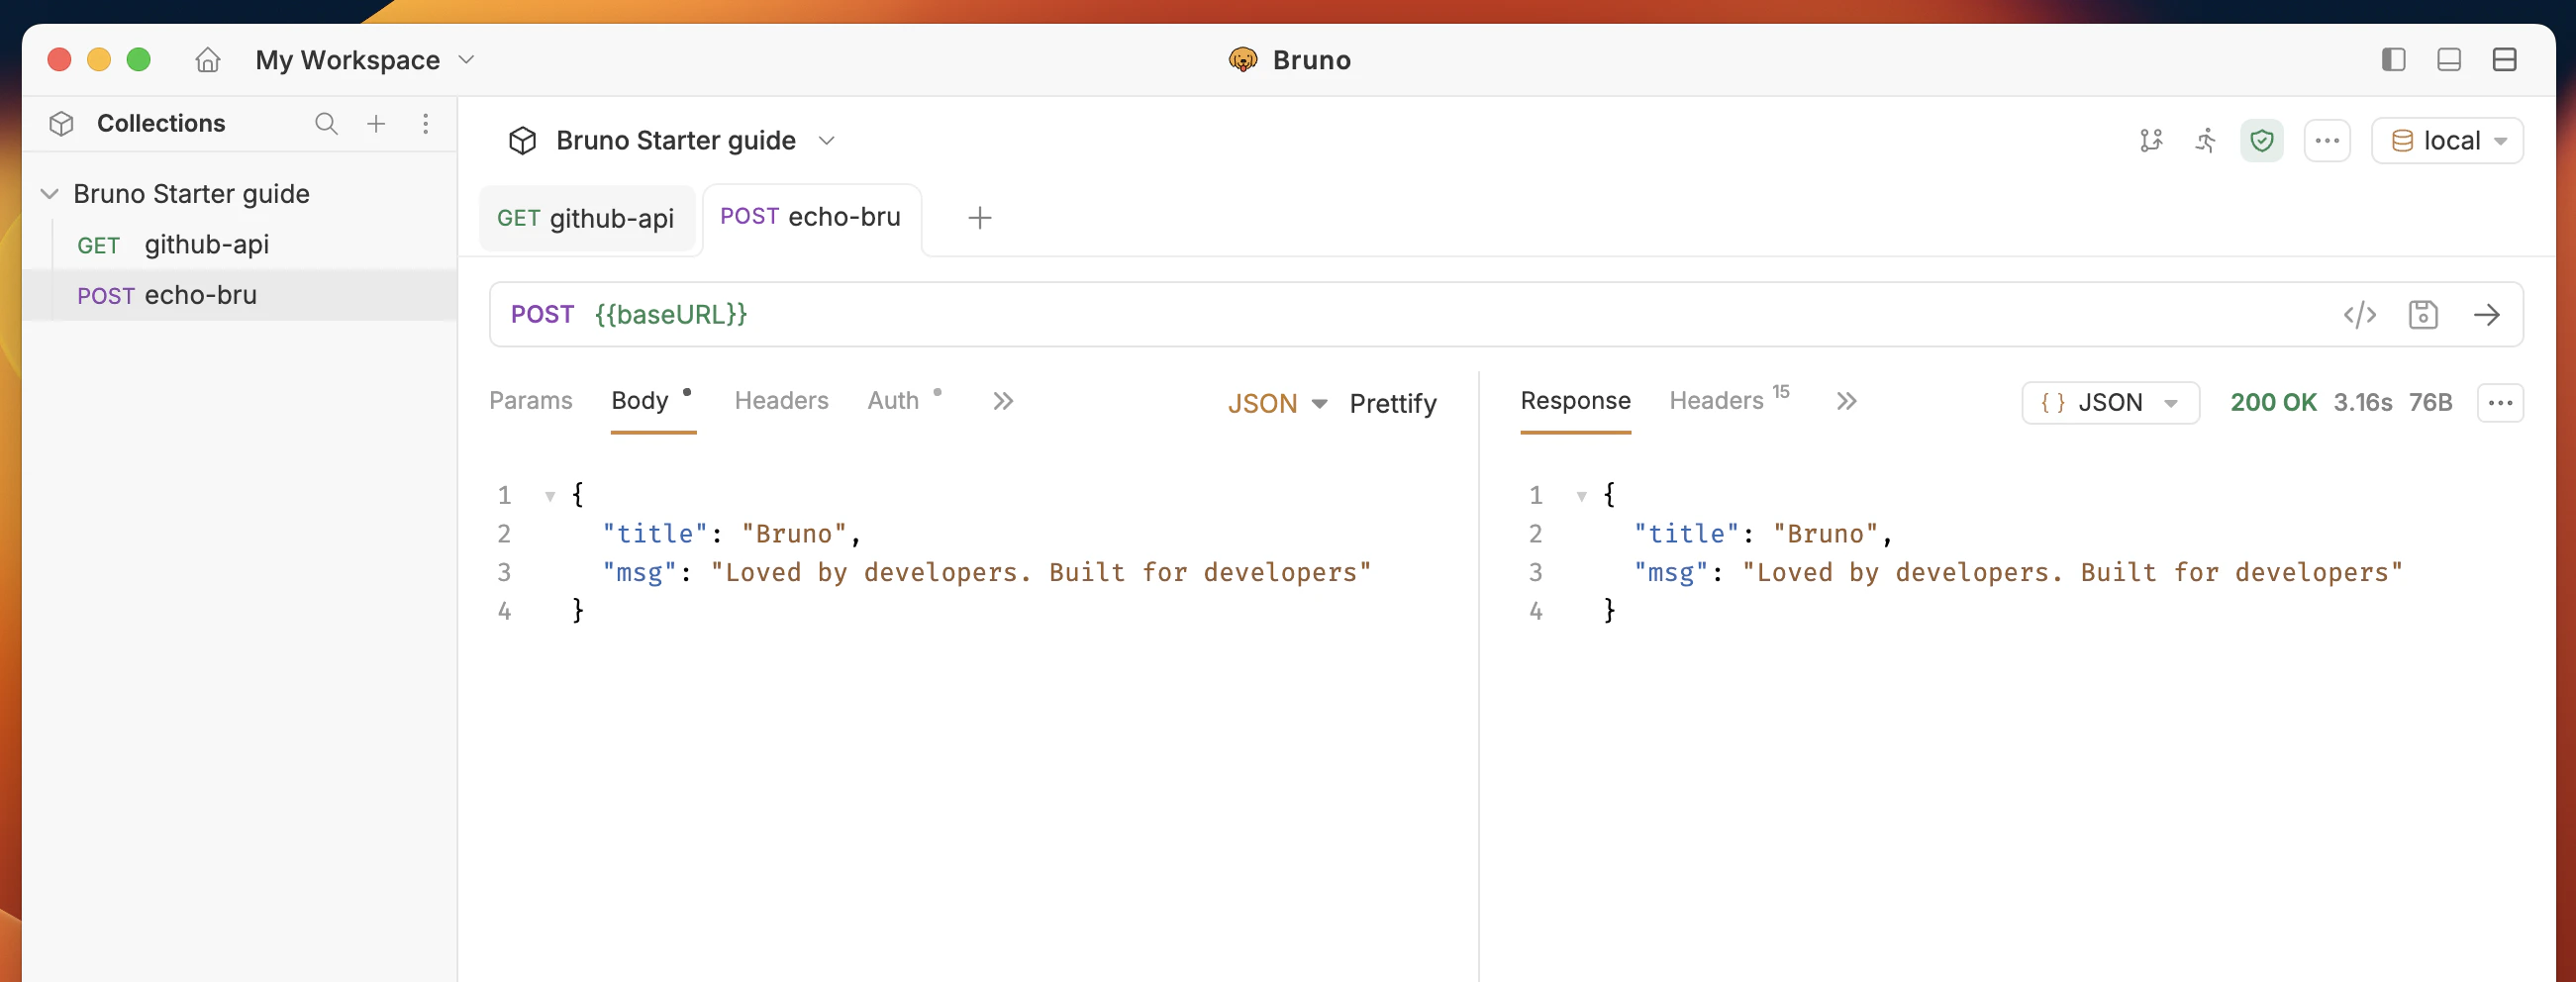 You have successfully created your first environment variable and reused it in the request. Bruno supports multiple types of variables; read more about them: [Environment variables](/variables/overview)
**Success Criteria:**
* Environment is created with the name `local`.
* Environment variable `baseURL` is added with the value `https://echo.usebruno.com`.
* Request `02-echo-bru` is executed successfully with the `URL` set to `{{baseURL}}`
* Response status is **200**.
***
## 5. Write a test case
**Objective:** Write an assertion and test script to validate the response of the request.
1. Open your **02-echo-bru** request.
2. Go to the **Assert** tab and enter the following details:
| Expression | Operator | Value |
| ---------------- | -------- | ------- |
| `res.status` | `equals` | `200` |
| `res.body.title` | `equals` | `Bruno` |
3. Execute the request and go to the **Tests** tab in the response section to confirm the assertion passes (green).
You have successfully created your first environment variable and reused it in the request. Bruno supports multiple types of variables; read more about them: [Environment variables](/variables/overview)
**Success Criteria:**
* Environment is created with the name `local`.
* Environment variable `baseURL` is added with the value `https://echo.usebruno.com`.
* Request `02-echo-bru` is executed successfully with the `URL` set to `{{baseURL}}`
* Response status is **200**.
***
## 5. Write a test case
**Objective:** Write an assertion and test script to validate the response of the request.
1. Open your **02-echo-bru** request.
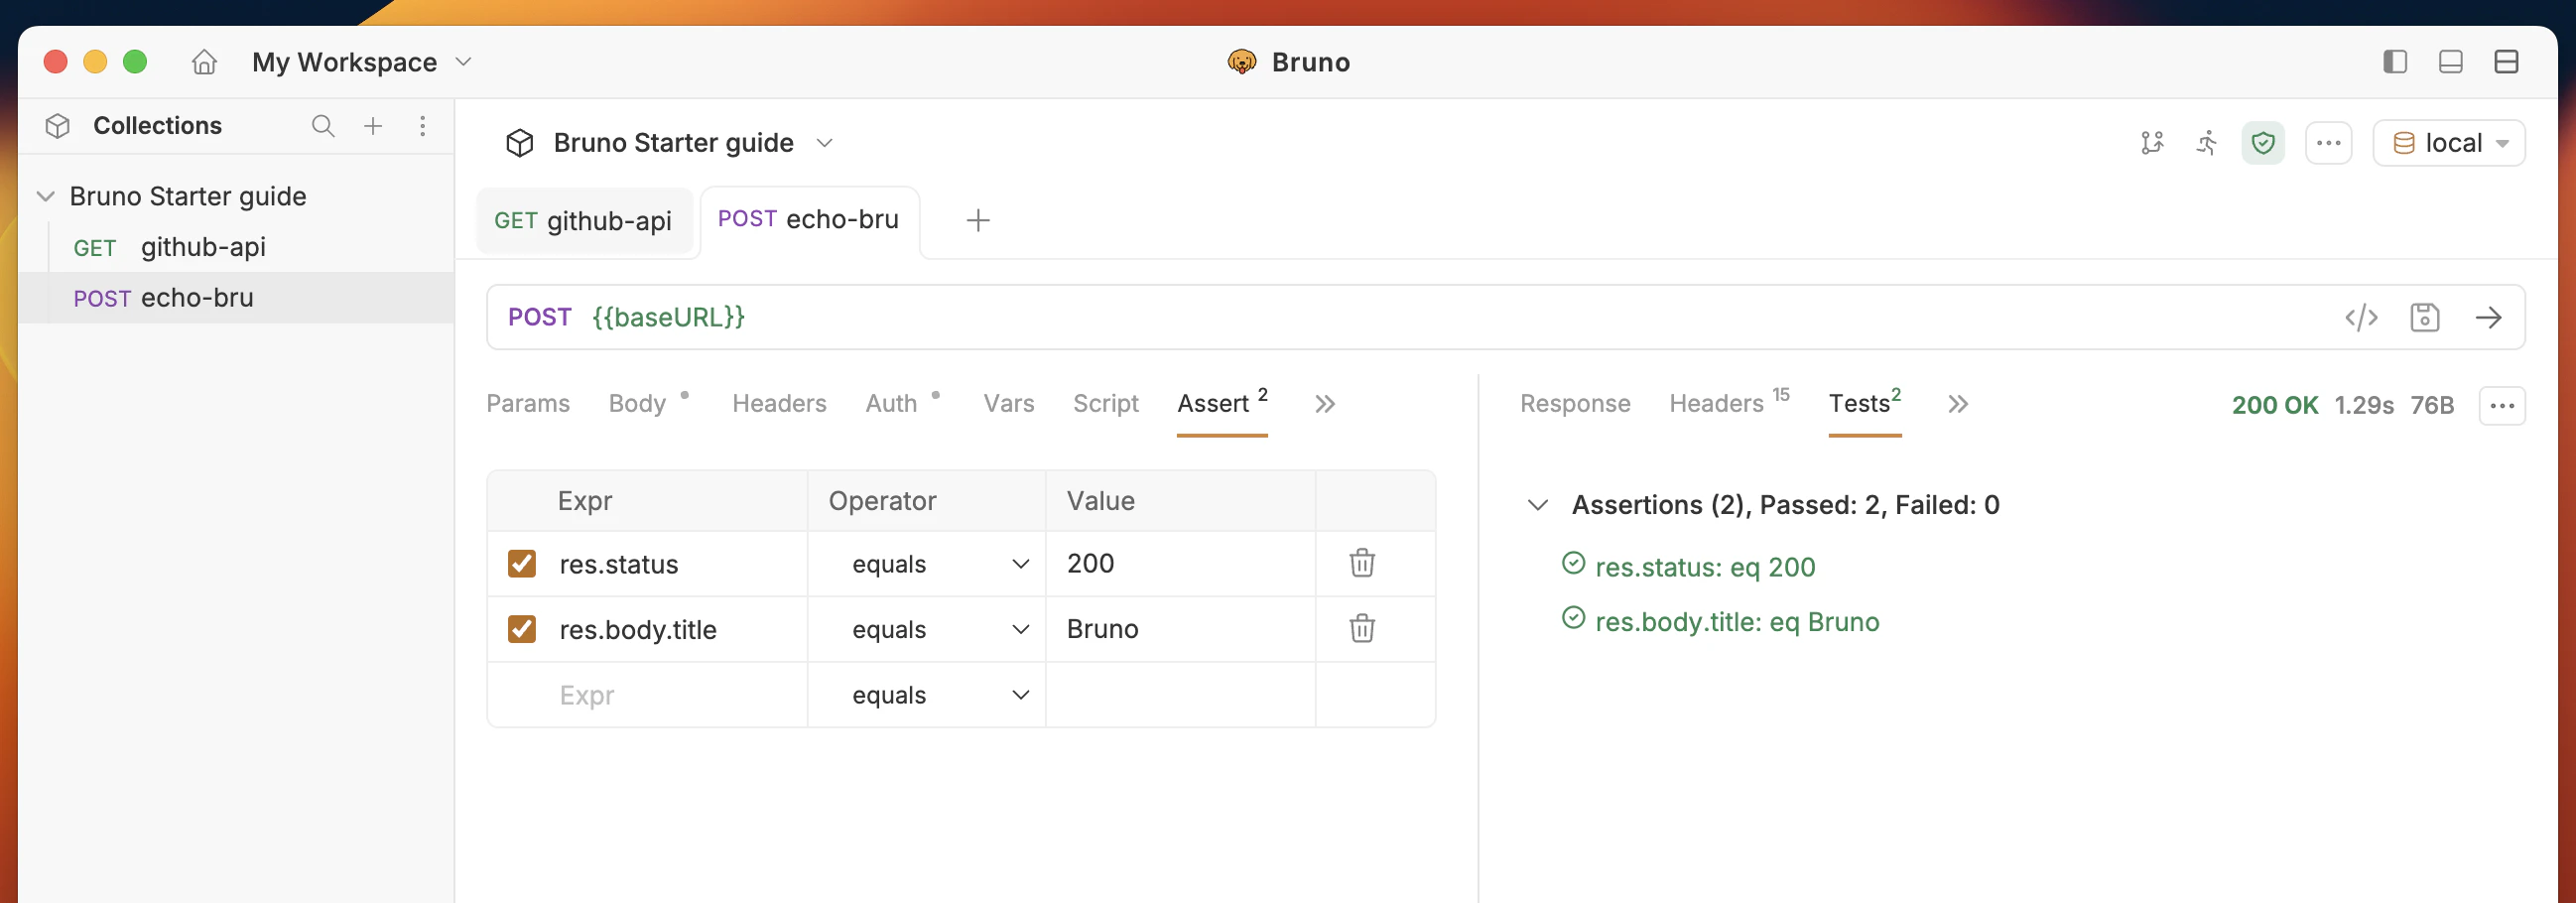
2. Go to the **Assert** tab and enter the following details:
| Expression | Operator | Value |
| ---------------- | -------- | ------- |
| `res.status` | `equals` | `200` |
| `res.body.title` | `equals` | `Bruno` |
3. Execute the request and go to the **Tests** tab in the response section to confirm the assertion passes (green).
 4. Go to the **Tests** tab in the request section and copy and paste the snippet below:
```javascript theme={null}
test("body has title", function () {
expect(res.getBody()).to.have.property("title");
});
test("200 status code", function () {
expect(res.getStatus()).to.eql(200);
});
```
5. Execute the request (Cmd/Ctrl + Enter) and confirm tests pass (green).
4. Go to the **Tests** tab in the request section and copy and paste the snippet below:
```javascript theme={null}
test("body has title", function () {
expect(res.getBody()).to.have.property("title");
});
test("200 status code", function () {
expect(res.getStatus()).to.eql(200);
});
```
5. Execute the request (Cmd/Ctrl + Enter) and confirm tests pass (green).
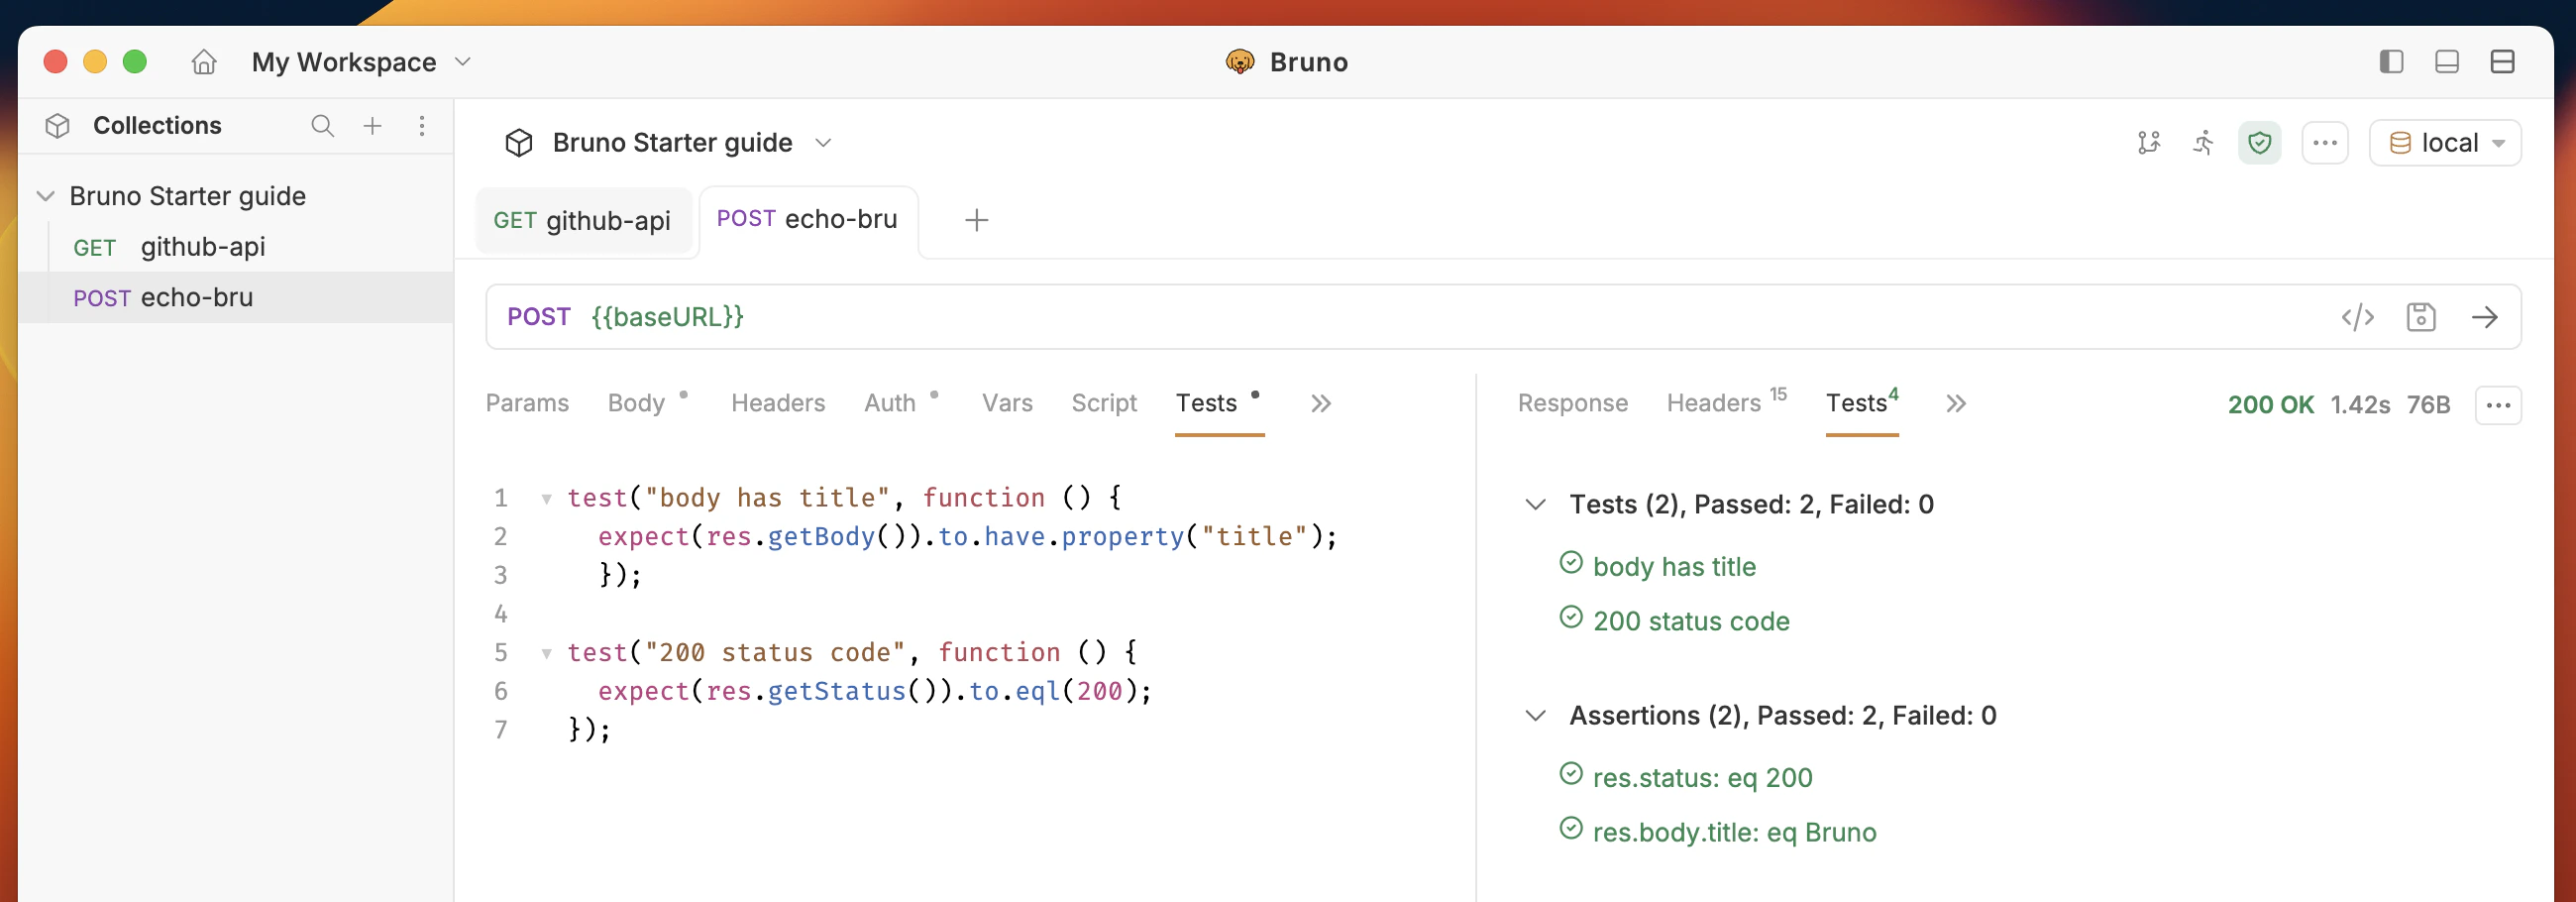 **Success Criteria:**
* **Assert** and **Tests** pass (green) without any errors.
Read more about test and assertions: [Tests introduction](/testing/tests/introduction)
***
## 6. Write a script
**Objective:** Send request with pre-request script to set the body of the request.
`req` object is only available in pre-request script.
1. Create a new request with:
* Request type as **HTTP**
* Request name as `03-script-request`
* method as **POST**
* URL as `https://echo.usebruno.com`
**Success Criteria:**
* **Assert** and **Tests** pass (green) without any errors.
Read more about test and assertions: [Tests introduction](/testing/tests/introduction)
***
## 6. Write a script
**Objective:** Send request with pre-request script to set the body of the request.
`req` object is only available in pre-request script.
1. Create a new request with:
* Request type as **HTTP**
* Request name as `03-script-request`
* method as **POST**
* URL as `https://echo.usebruno.com`
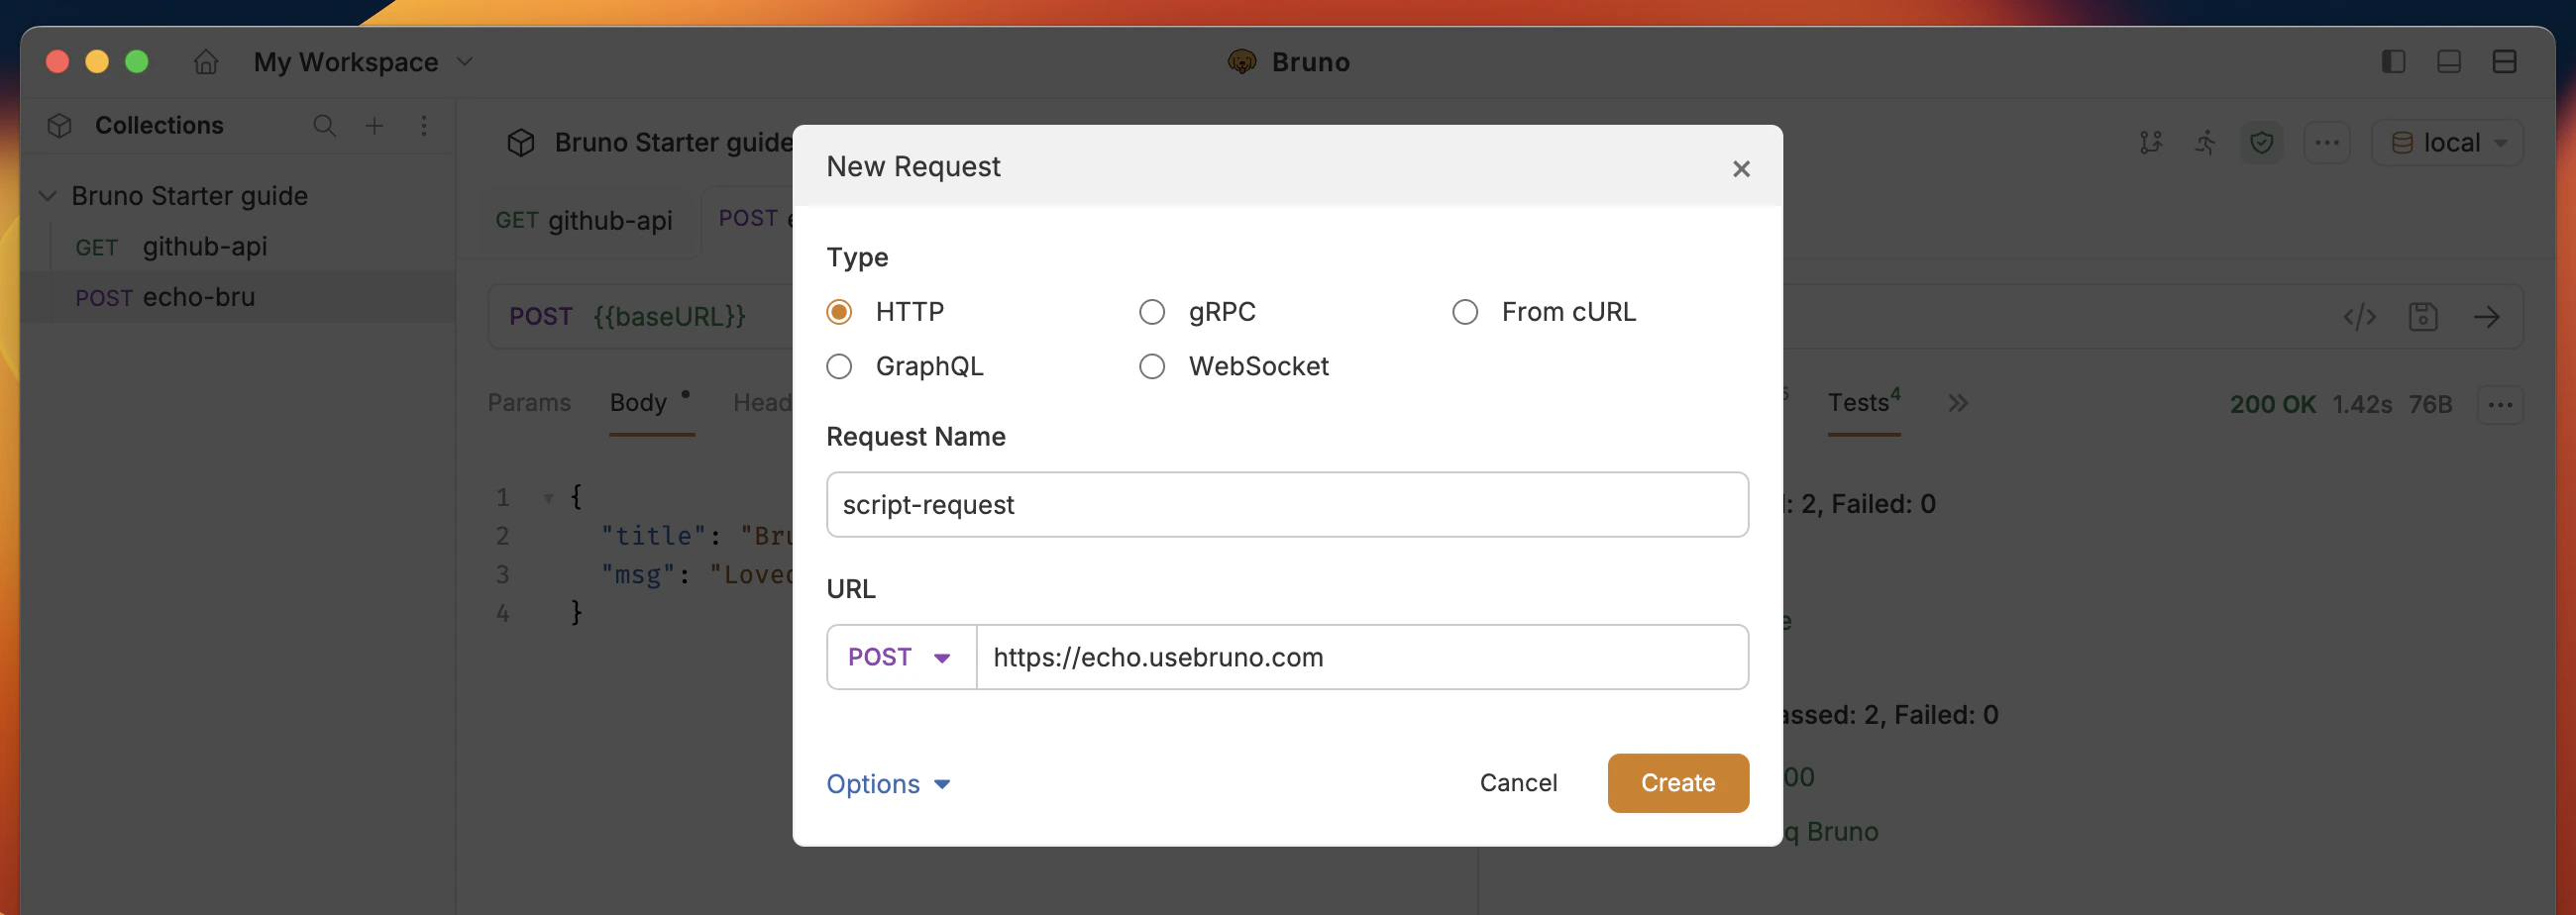 2. Go to the **Script** → **Pre-request** tab and enter the snippet below:
```javascript theme={null}
const body = {
name: "Bruno",
msg: "I love opensource devtools"
};
req.setHeader("Content-Type", "application/json");
req.setBody(body);
console.log(req.getName());
```
3. Execute the request and verify that the response body matches the body of the request.
2. Go to the **Script** → **Pre-request** tab and enter the snippet below:
```javascript theme={null}
const body = {
name: "Bruno",
msg: "I love opensource devtools"
};
req.setHeader("Content-Type", "application/json");
req.setBody(body);
console.log(req.getName());
```
3. Execute the request and verify that the response body matches the body of the request.
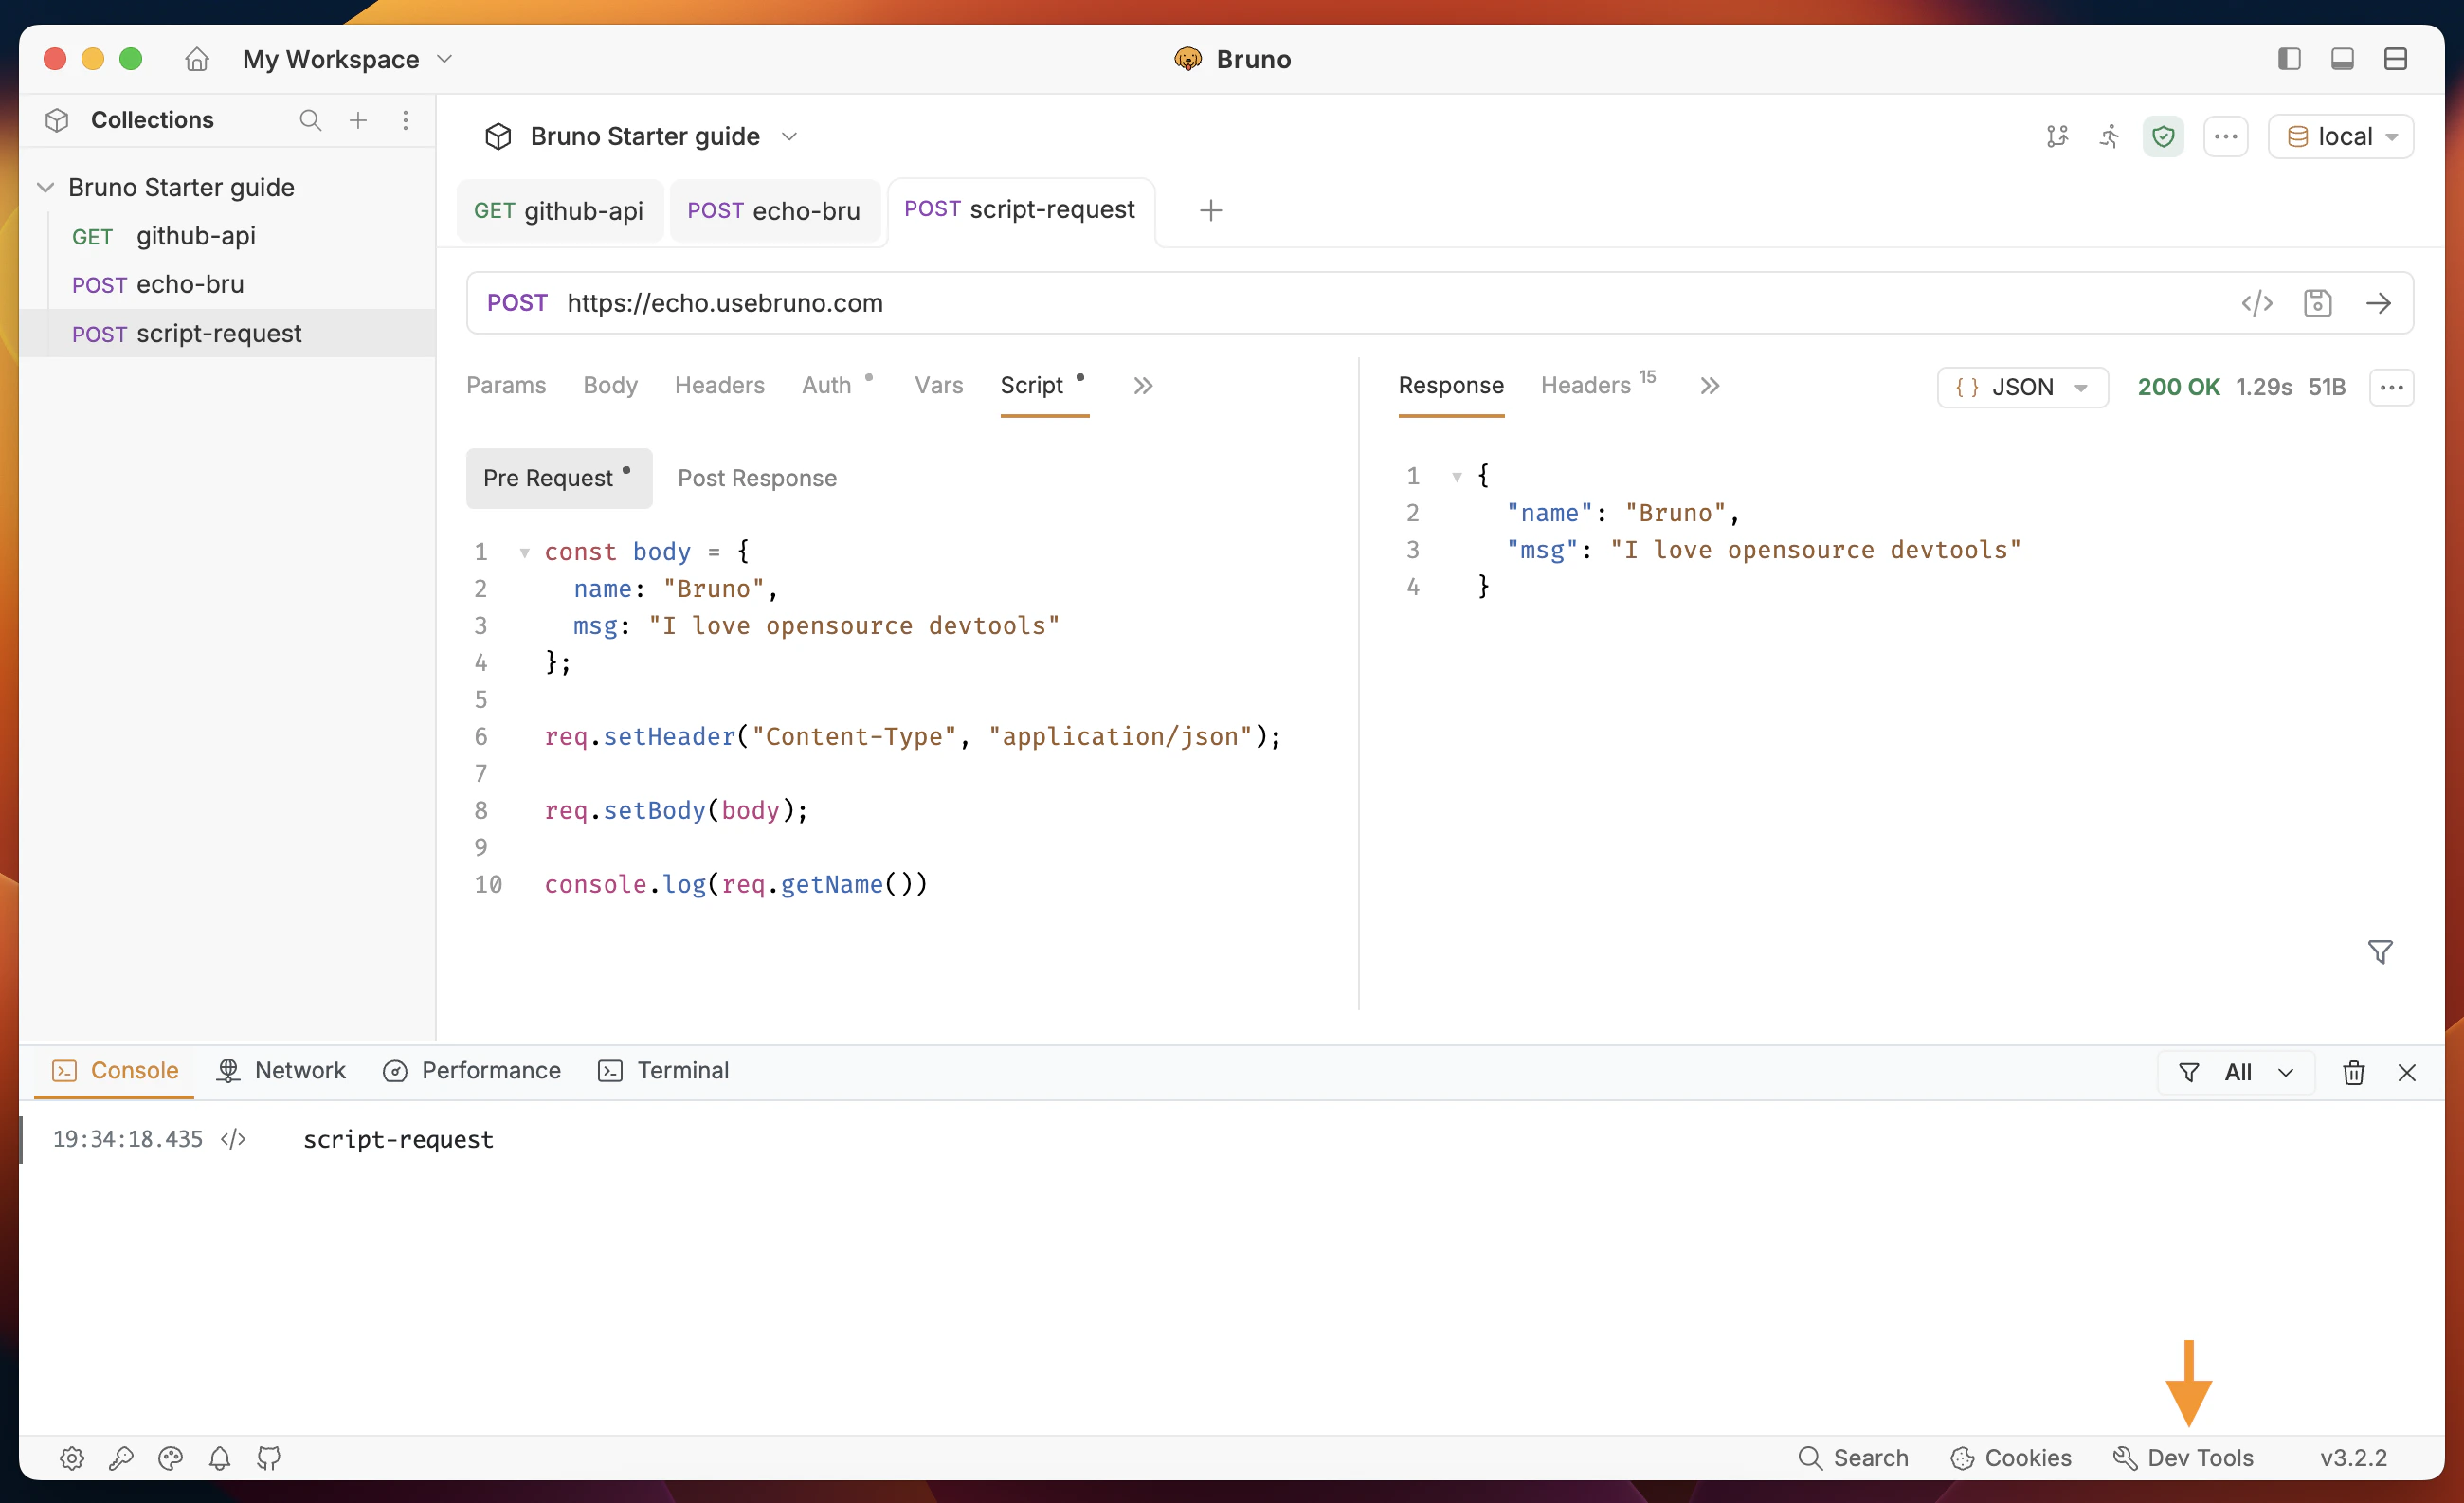 Open **Dev Tools** from the bottom-right corner and you will see the console output of the script.
Congratulations, you have successfully written a script to set the body of the request with header values and console logs visible in **Dev Tools**.
**Success Criteria:**
* Script is executed successfully and console output is visible in the **Dev Tools**.
* Response body is set to the body of the request with `req.setBody()` function.
* Header is set to the json content type with `req.setHeader()` function.
Read more about script: [JavaScript Reference](/testing/script/javascript-reference)
***
## 7. Authentication
**Objective:** Send a request with authentication to the API.
1. Create a new request with:
* Request type as **HTTP**
* Request name as `04-auth-request`
* method as **GET**
* URL as `https://httpbin.org/basic-auth/usebruno/1234`
Open **Dev Tools** from the bottom-right corner and you will see the console output of the script.
Congratulations, you have successfully written a script to set the body of the request with header values and console logs visible in **Dev Tools**.
**Success Criteria:**
* Script is executed successfully and console output is visible in the **Dev Tools**.
* Response body is set to the body of the request with `req.setBody()` function.
* Header is set to the json content type with `req.setHeader()` function.
Read more about script: [JavaScript Reference](/testing/script/javascript-reference)
***
## 7. Authentication
**Objective:** Send a request with authentication to the API.
1. Create a new request with:
* Request type as **HTTP**
* Request name as `04-auth-request`
* method as **GET**
* URL as `https://httpbin.org/basic-auth/usebruno/1234`
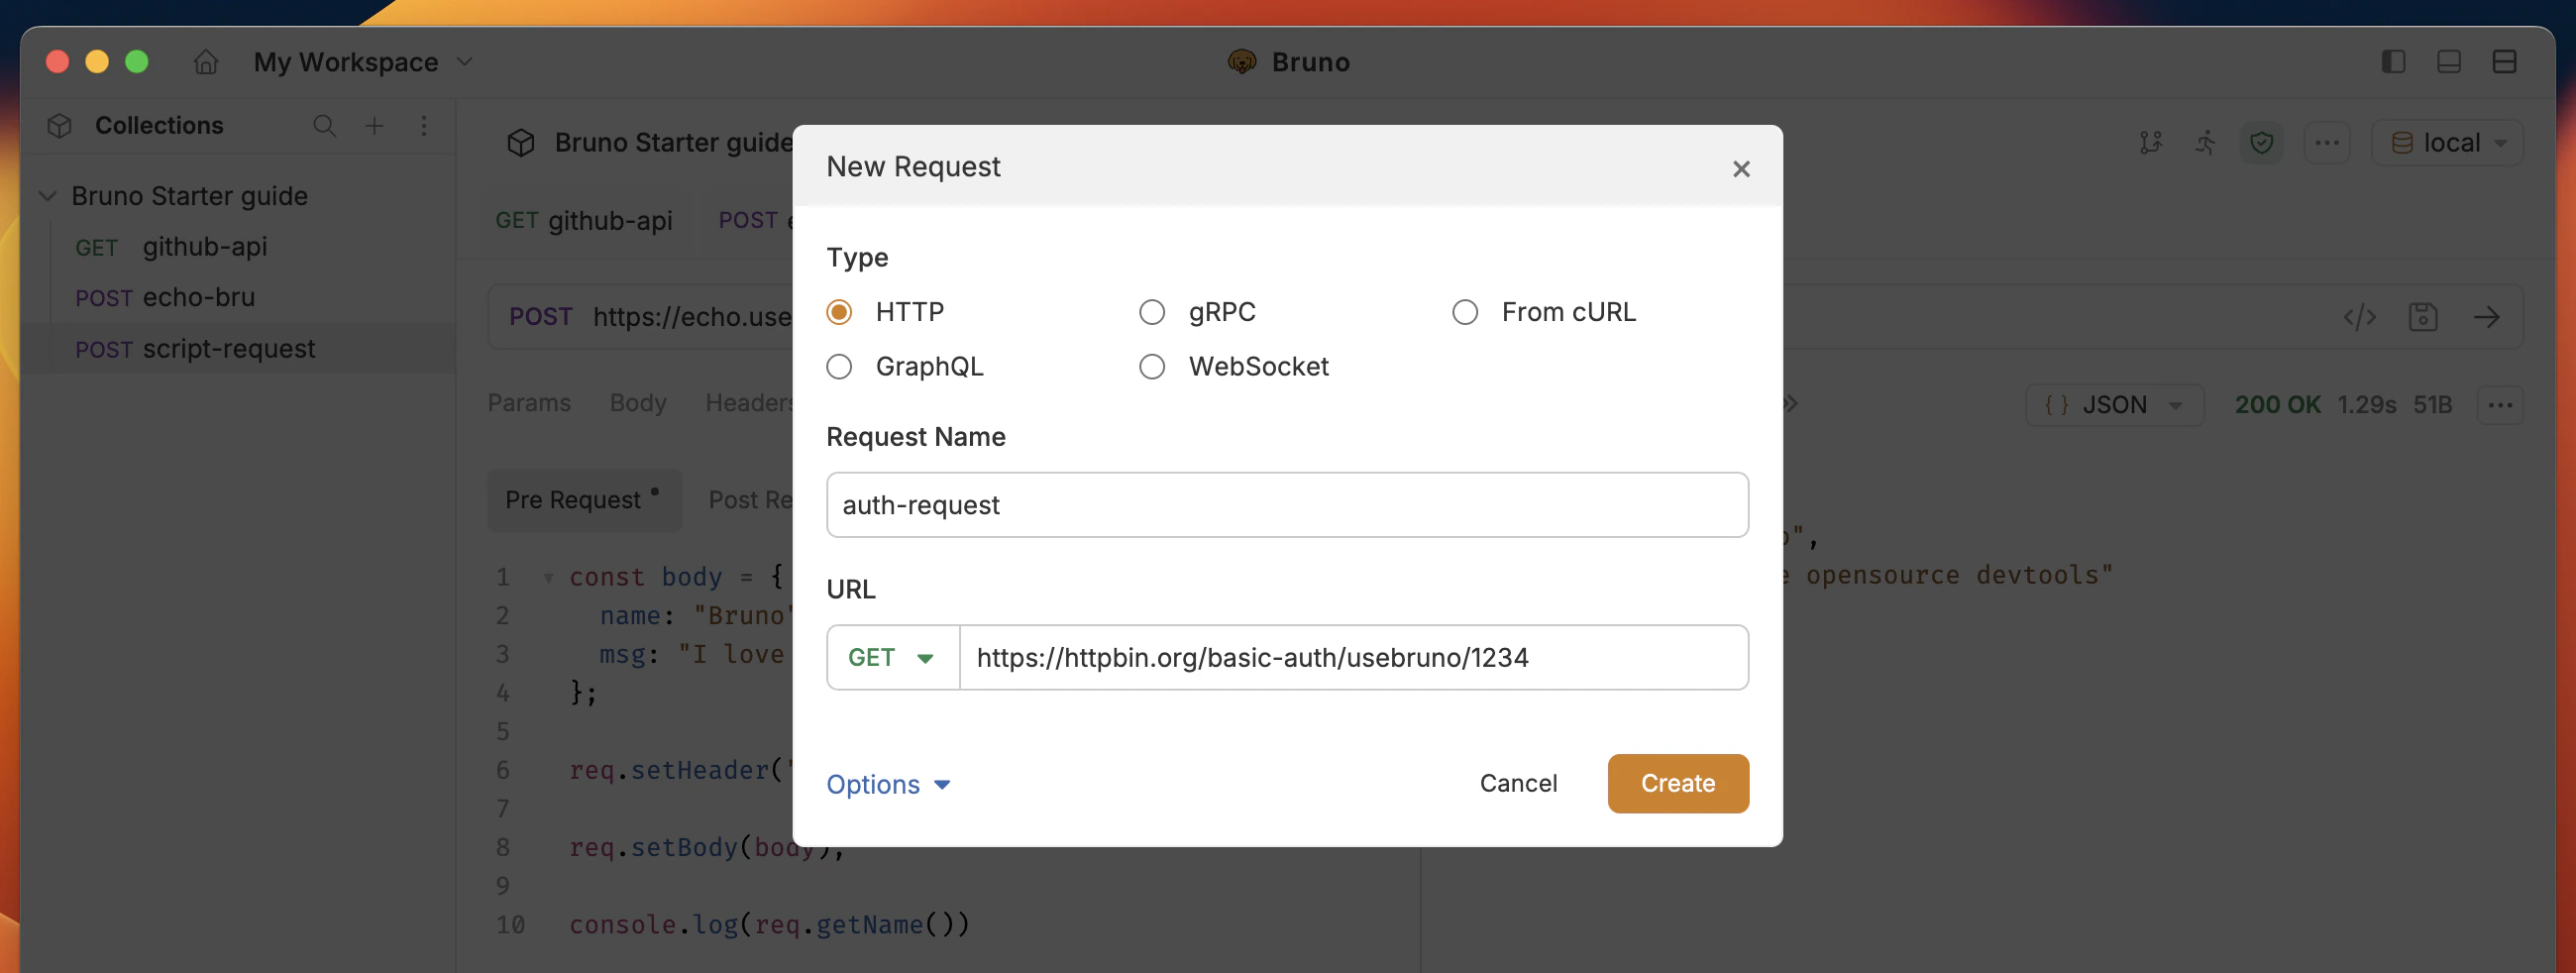 2. Go to request **Auth** tab and select **Basic Auth** from the Auth Type dropdown list.
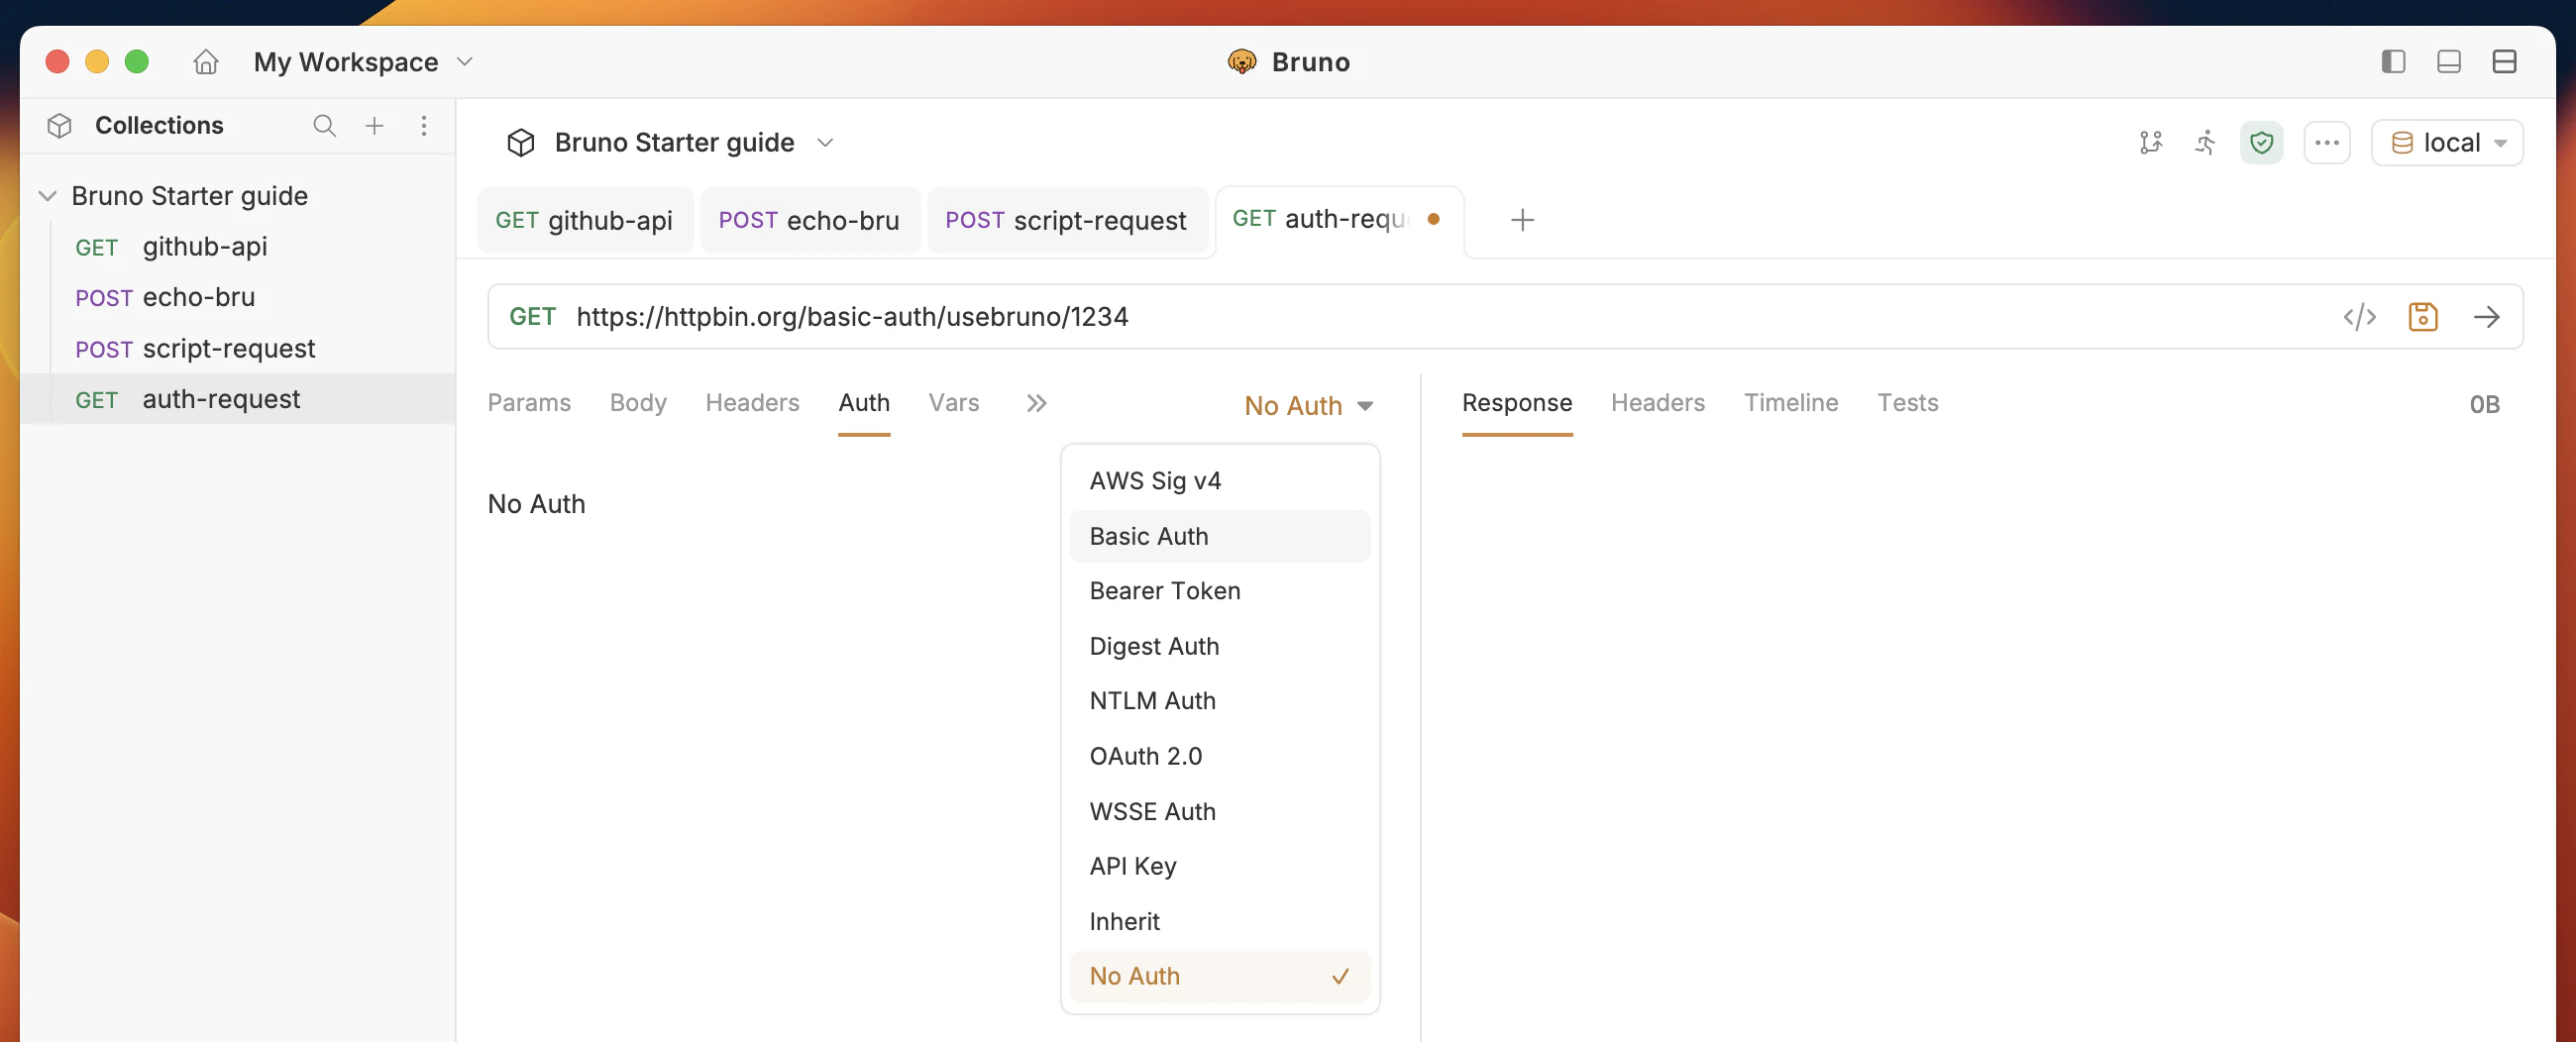 3. Enter the username and password as `usebruno` and `1234` respectively.
4. Execute the request (Cmd/Ctrl + Enter).
3. Enter the username and password as `usebruno` and `1234` respectively.
4. Execute the request (Cmd/Ctrl + Enter).
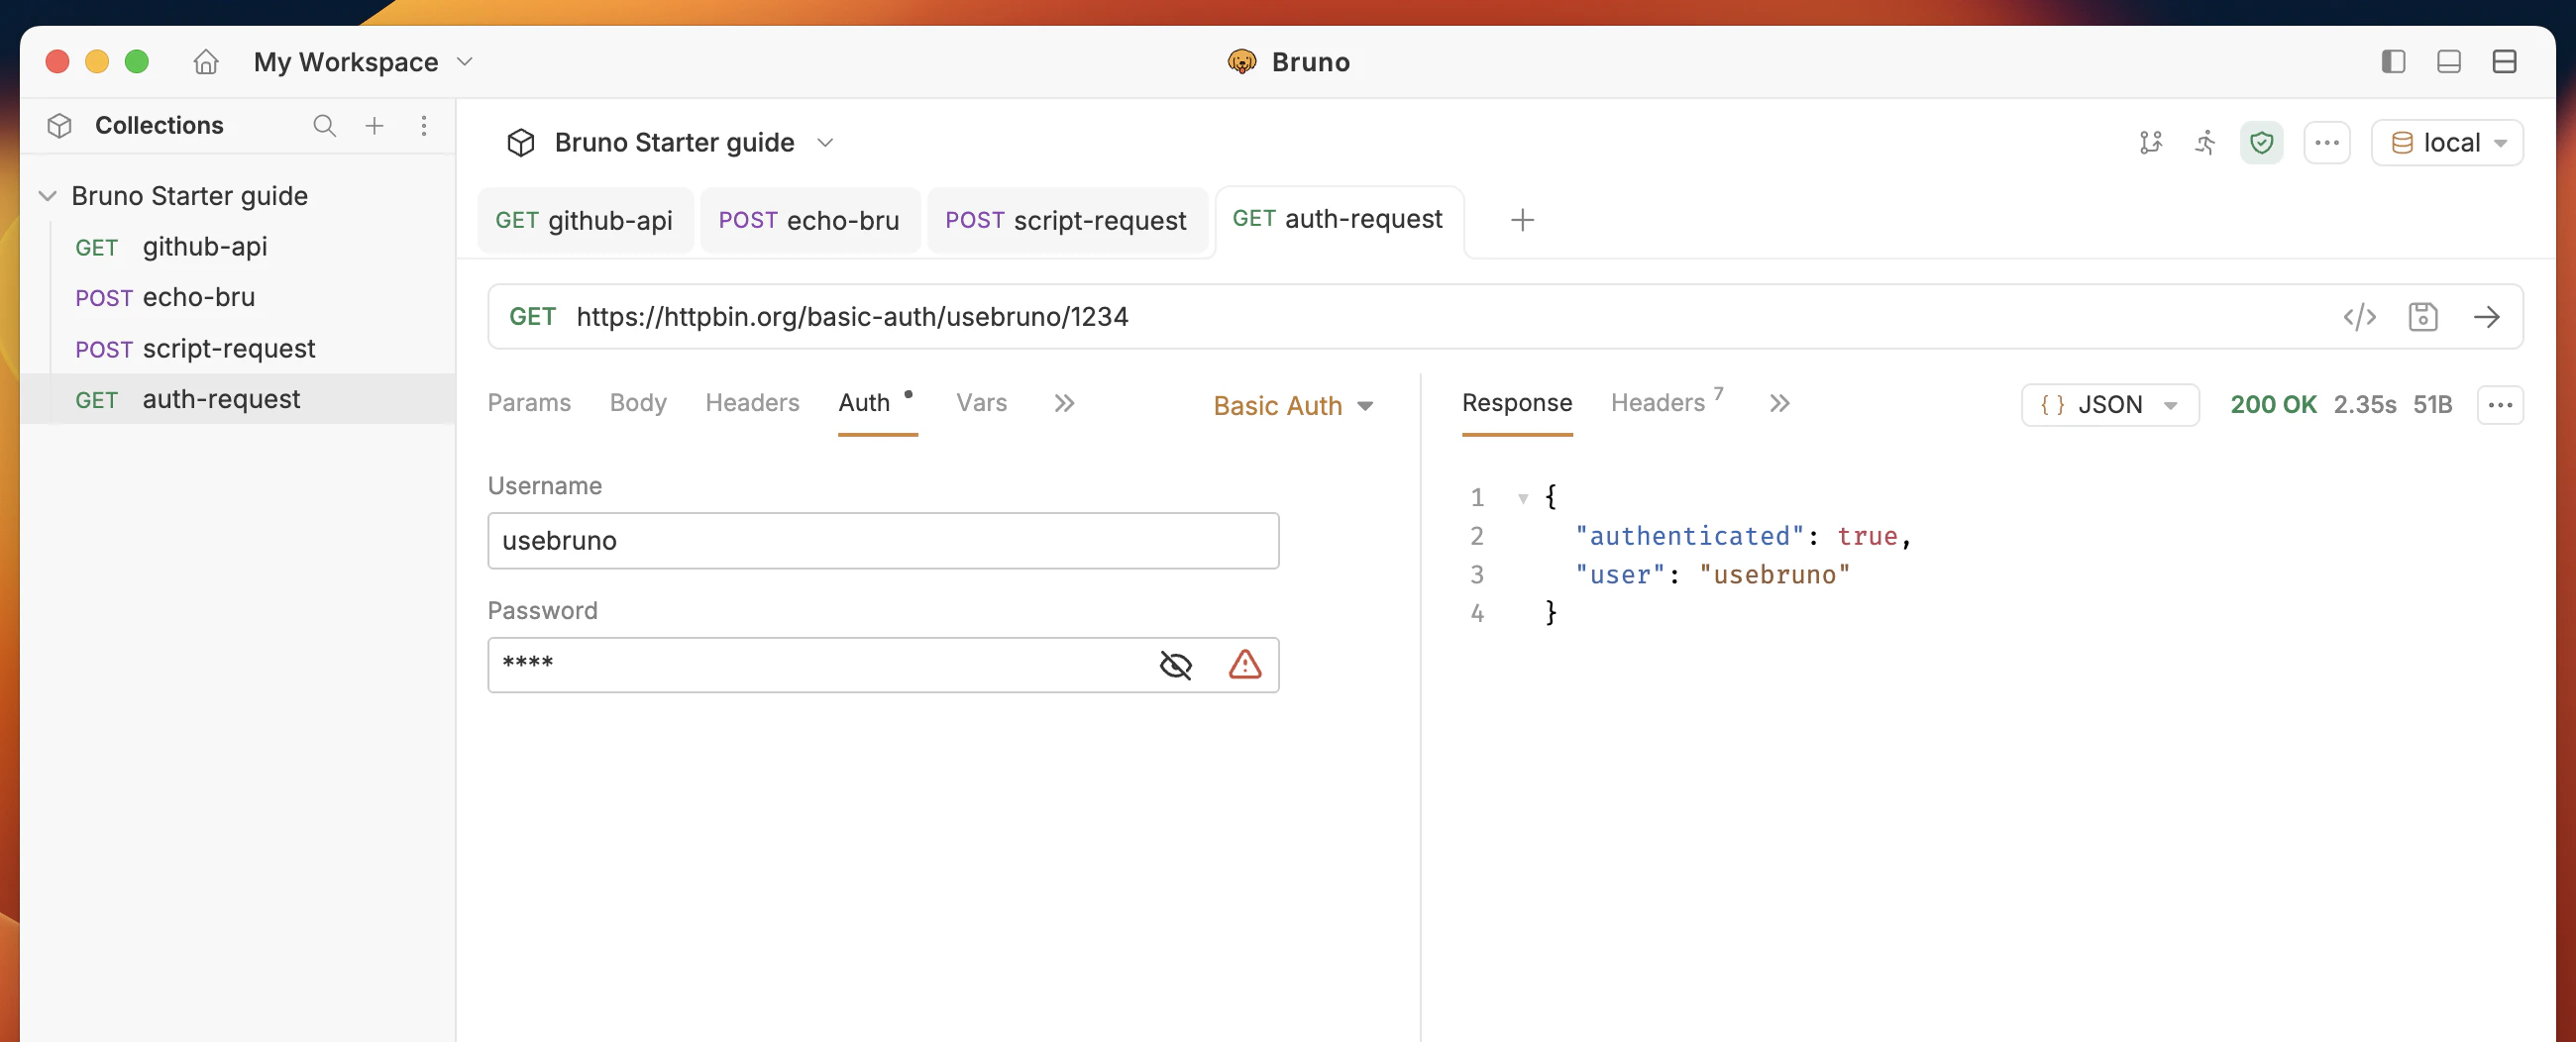 You'll see `authenticated` set to `true` in the response body.
You have successfully sent a request with authentication to the API.
**Success Criteria:**
* Authentication is set to Basic Auth with the username and password.
* Response body contains `authenticated` set to `true`.
Read more about authentication: [Authentication](/auth/overview)
## 8. Collection Runner
**Objective:** Run all requests in the collection using collection runner.
1. Go to the collection context menu (...) and click **Run**.
You'll see `authenticated` set to `true` in the response body.
You have successfully sent a request with authentication to the API.
**Success Criteria:**
* Authentication is set to Basic Auth with the username and password.
* Response body contains `authenticated` set to `true`.
Read more about authentication: [Authentication](/auth/overview)
## 8. Collection Runner
**Objective:** Run all requests in the collection using collection runner.
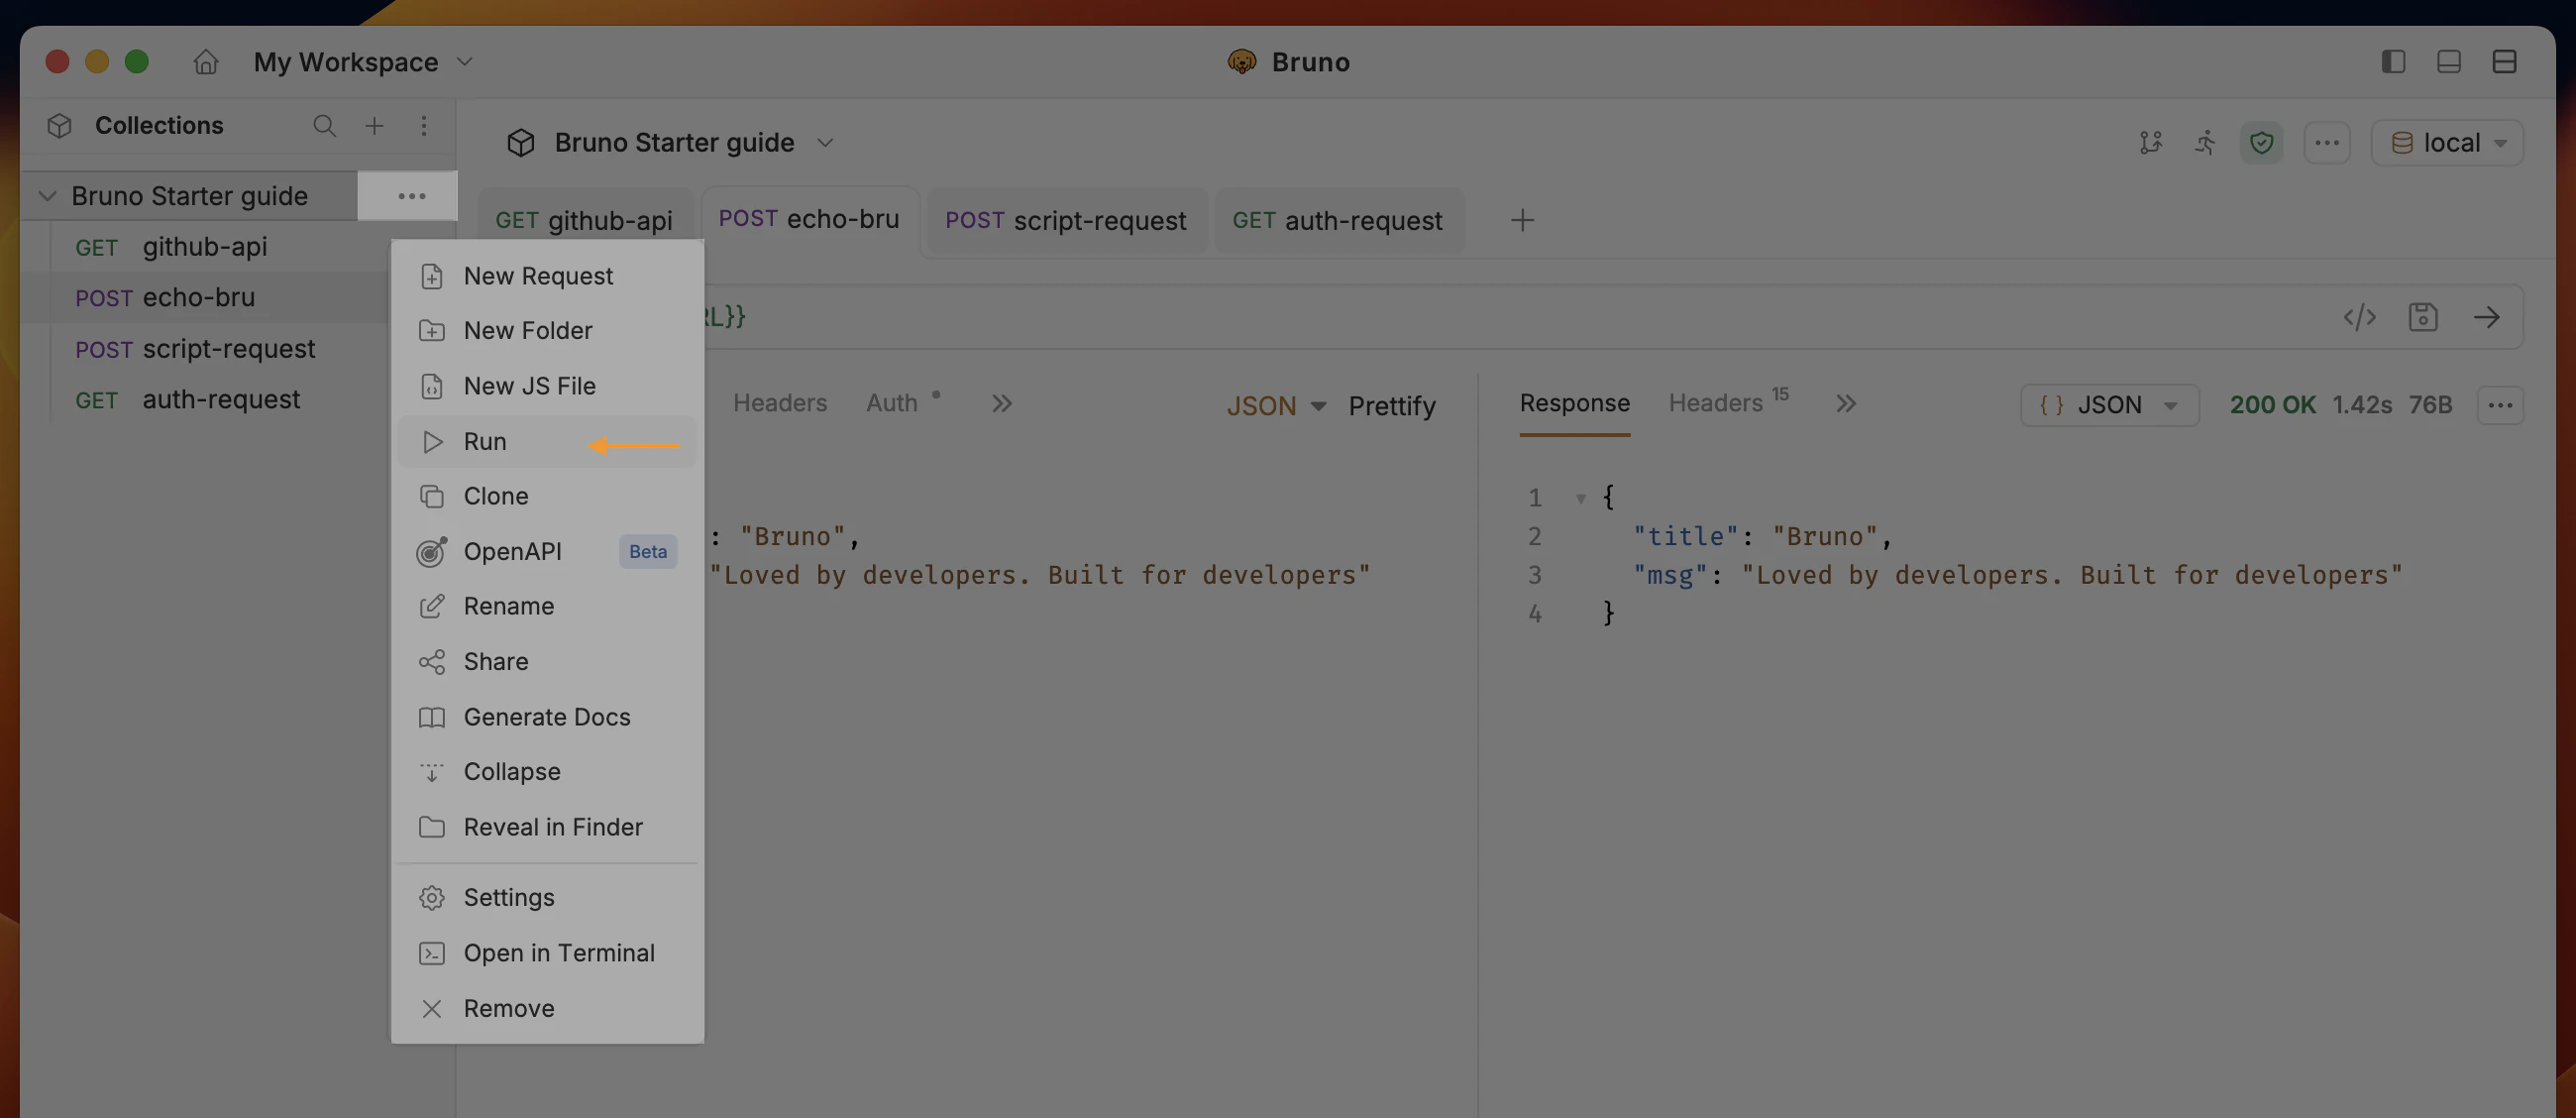
1. Go to the collection context menu (...) and click **Run**.
 2. Click on **Configure requests to run** and select all requests in the collection.
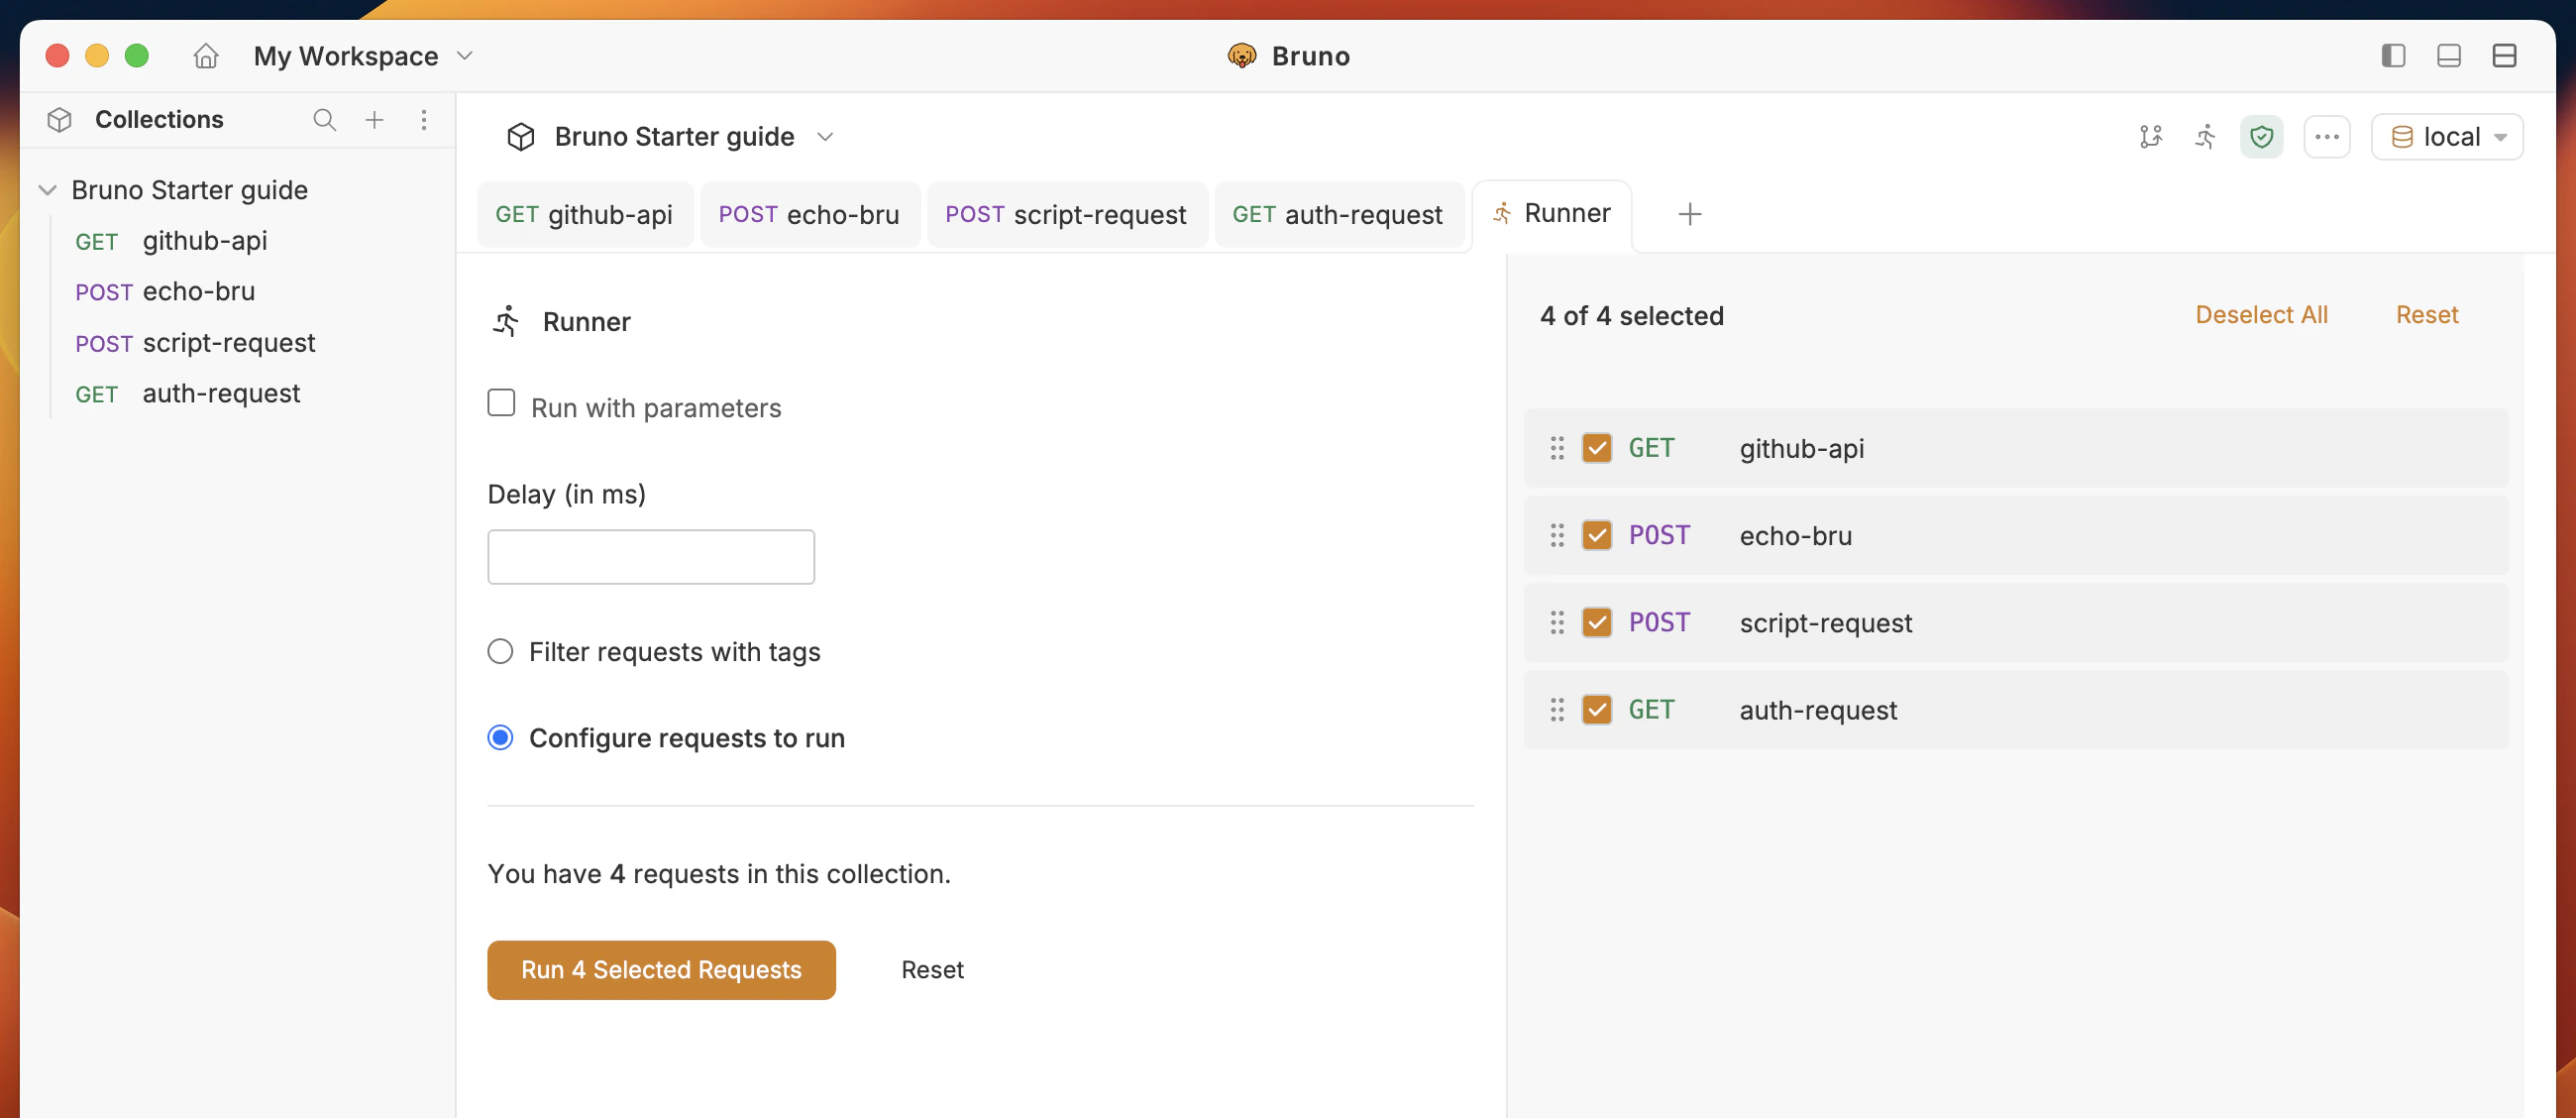 3. Click **Run Selected Requests** button to start the run.
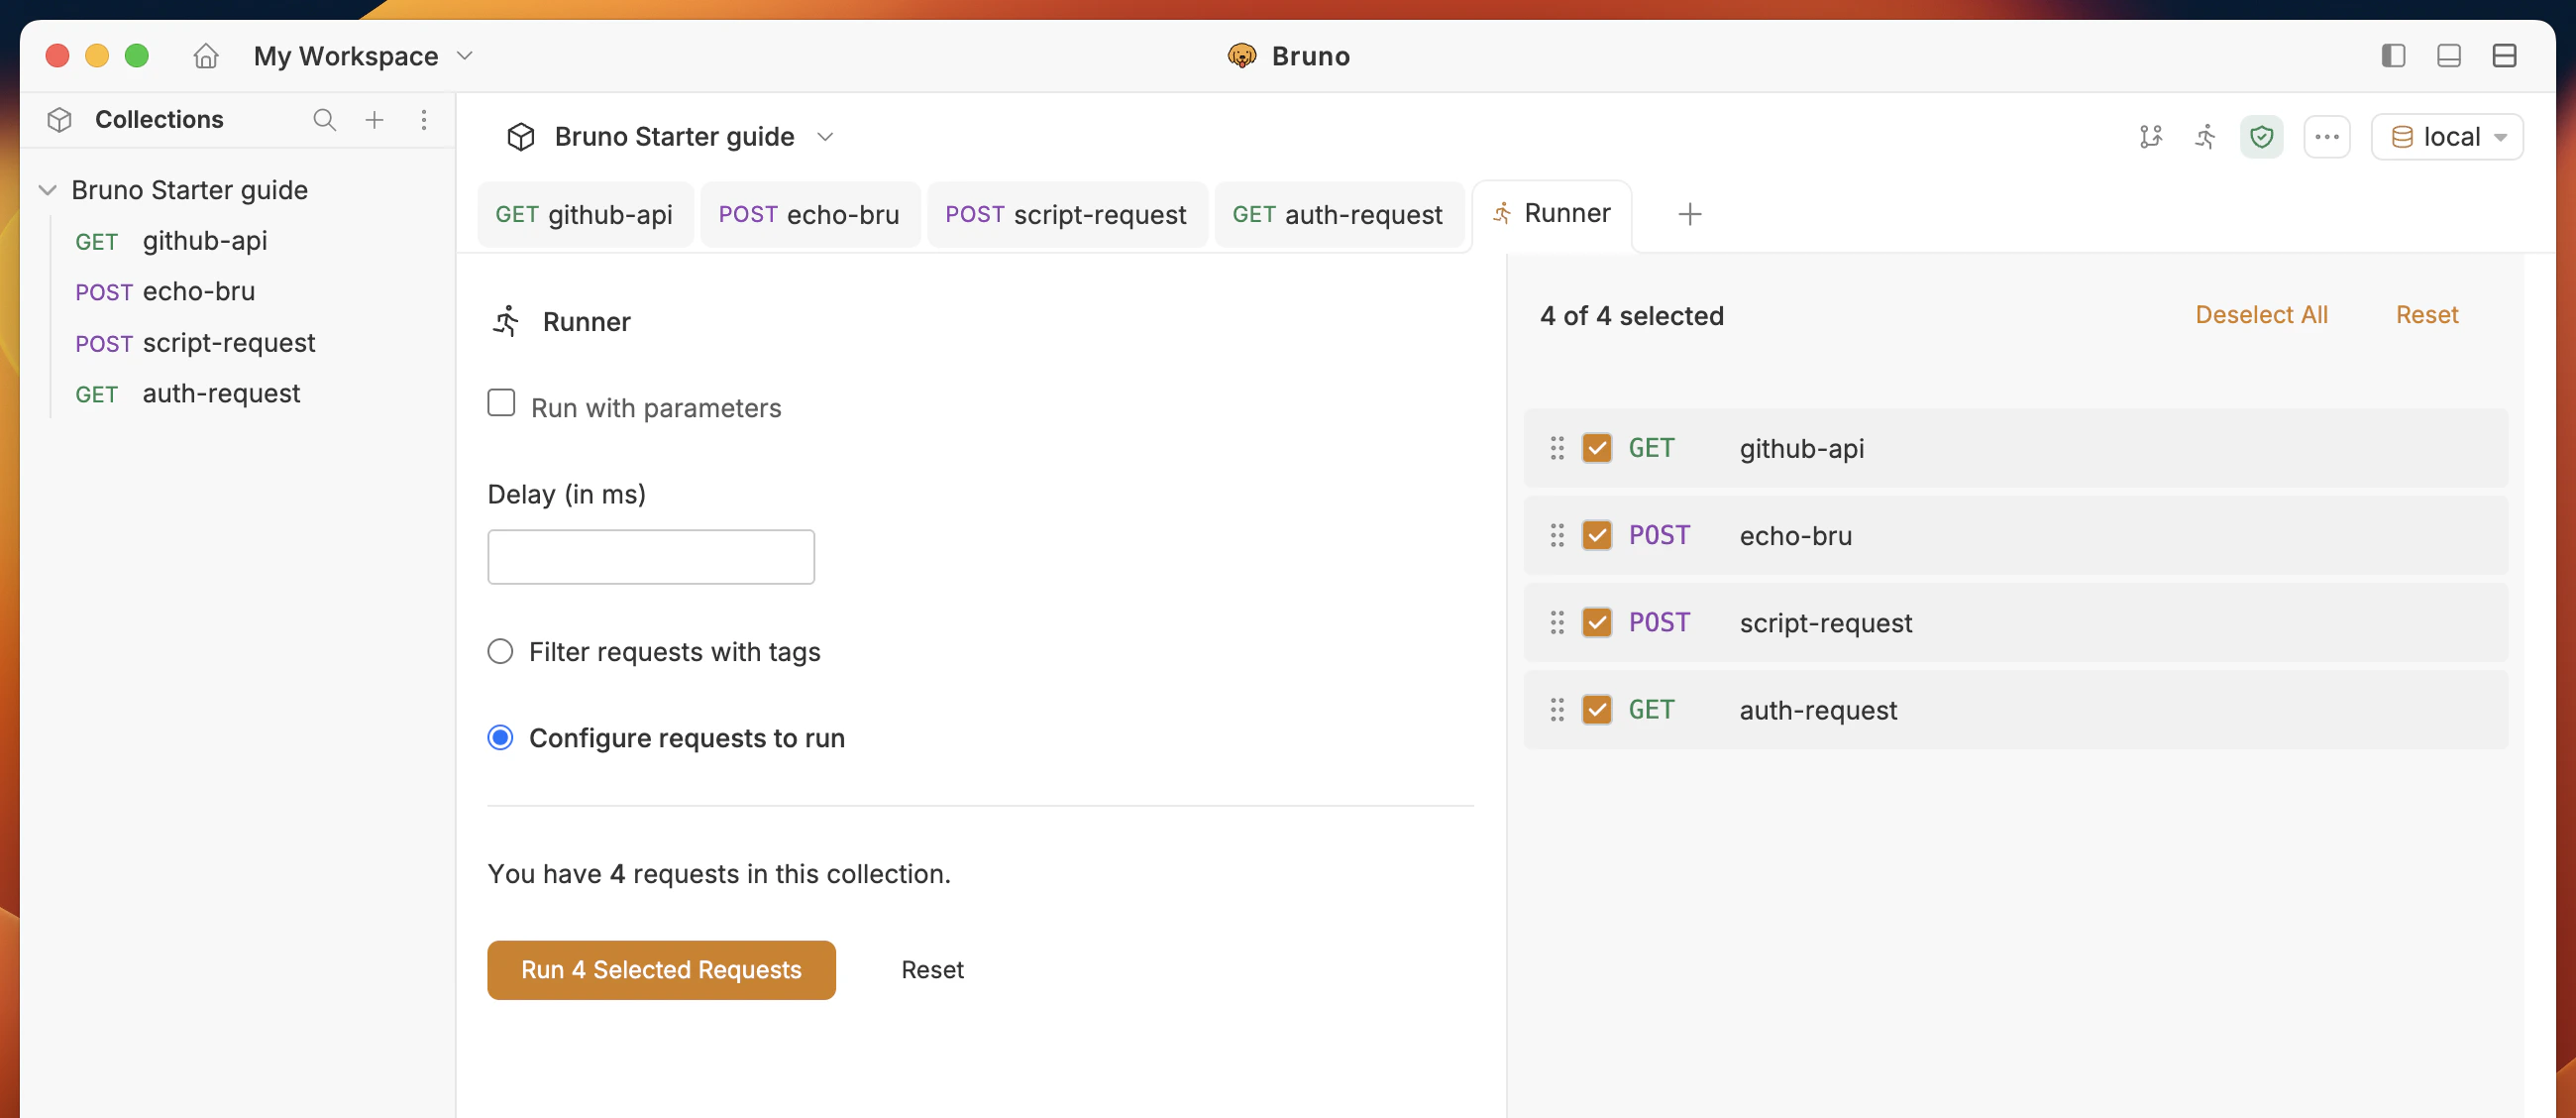 You'll see all requests running one by one in the collection runner.
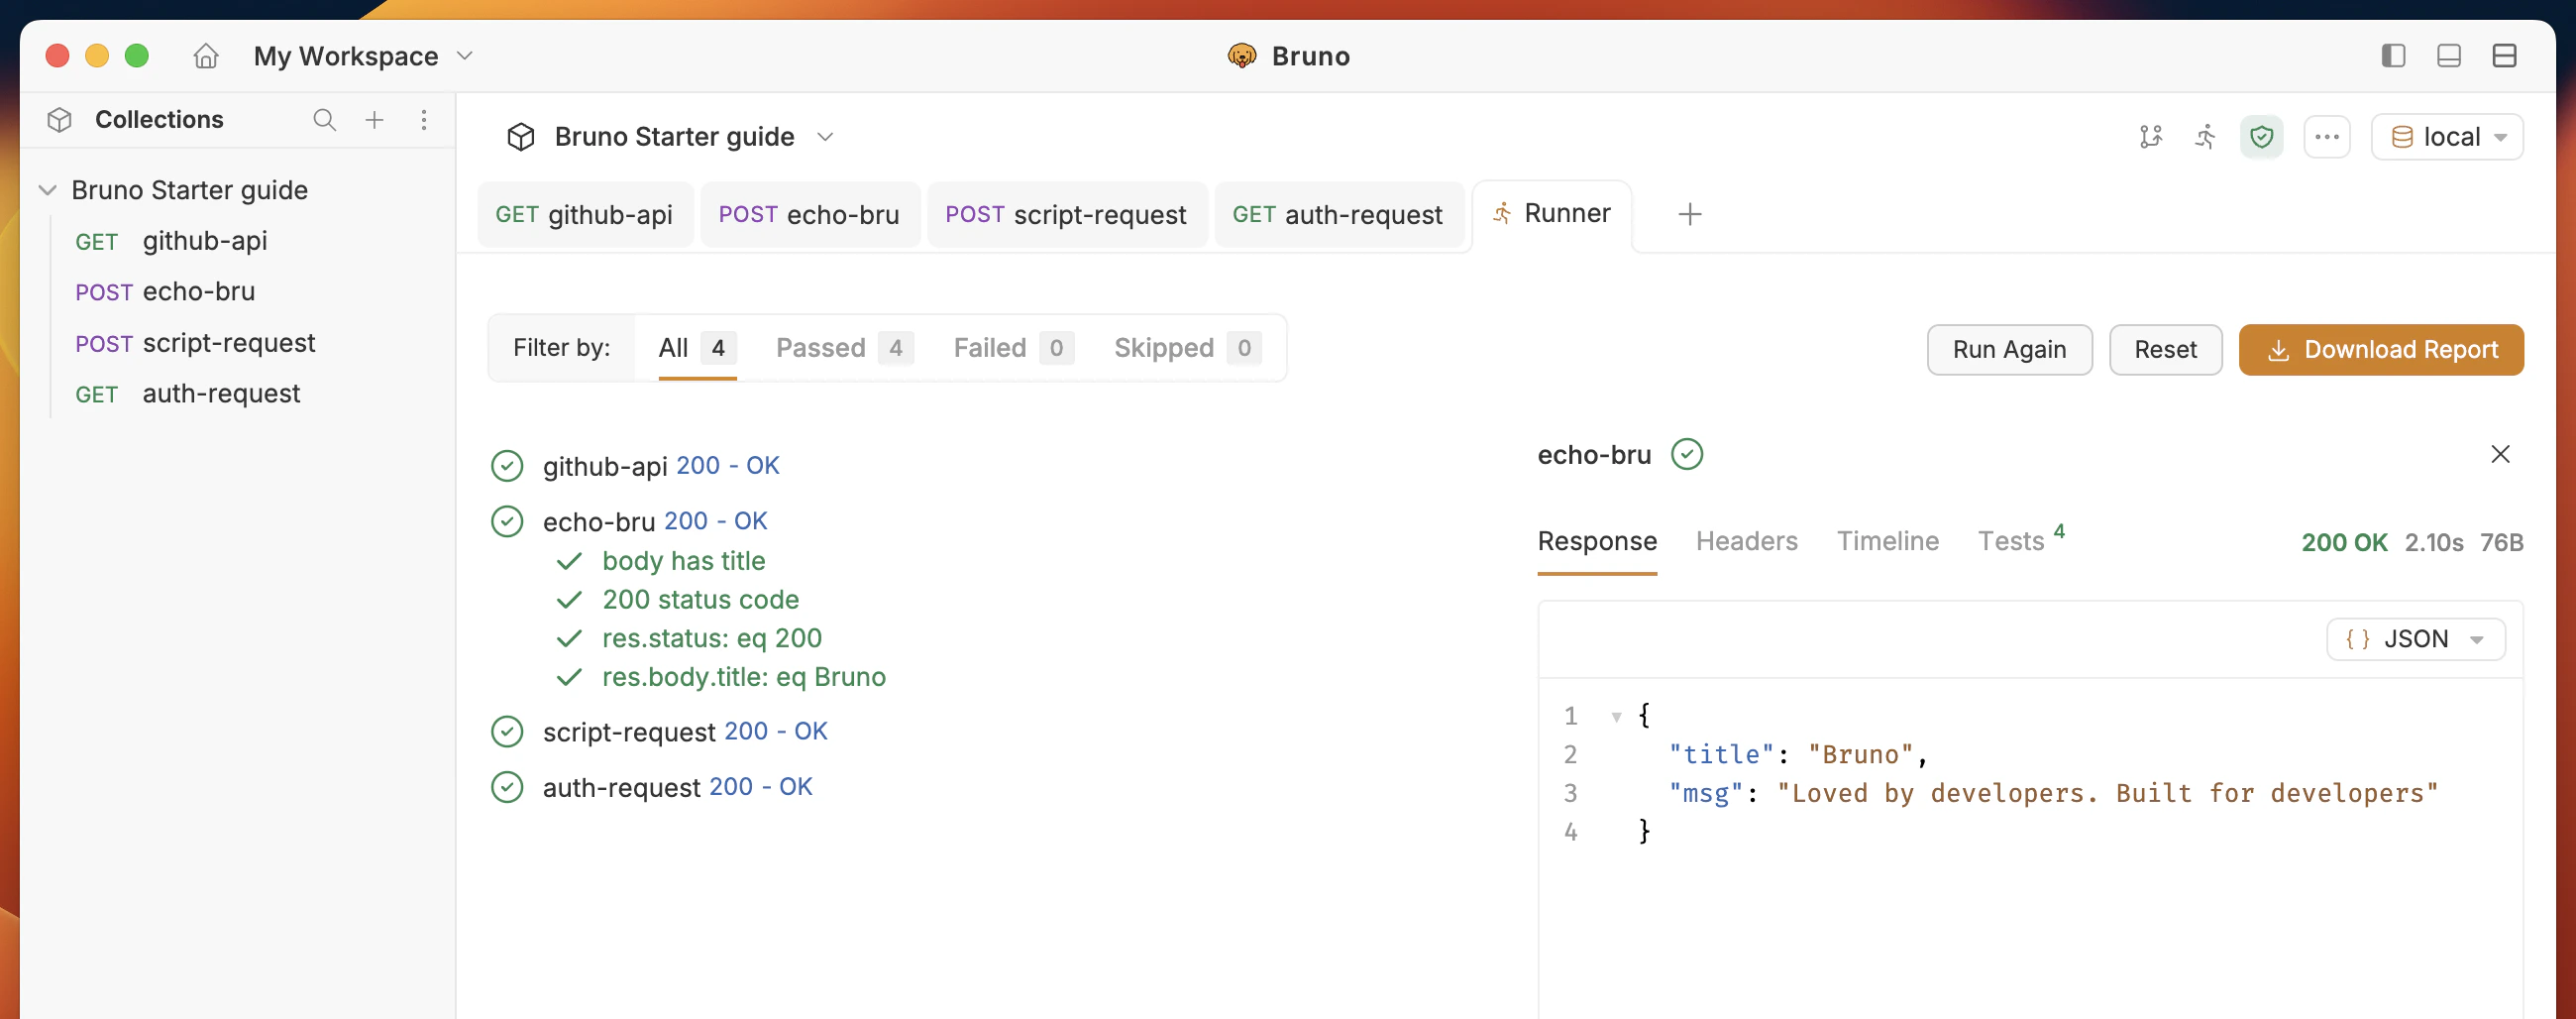 **Success Criteria:**
* All requests are running one by one in the collection runner.
* Response status is **200** for all requests.
* Response body contains the data of the request.
Read more about collection runner: [Collection Runner](/testing/automate-test/data-driven-testing)
***
## 9. API Documentation
**Objective:** Create automated API documentation for the collection.
1. Go to collection context menu (...) and select **Generate Docs**.
**Success Criteria:**
* All requests are running one by one in the collection runner.
* Response status is **200** for all requests.
* Response body contains the data of the request.
Read more about collection runner: [Collection Runner](/testing/automate-test/data-driven-testing)
***
## 9. API Documentation
**Objective:** Create automated API documentation for the collection.
1. Go to collection context menu (...) and select **Generate Docs**.
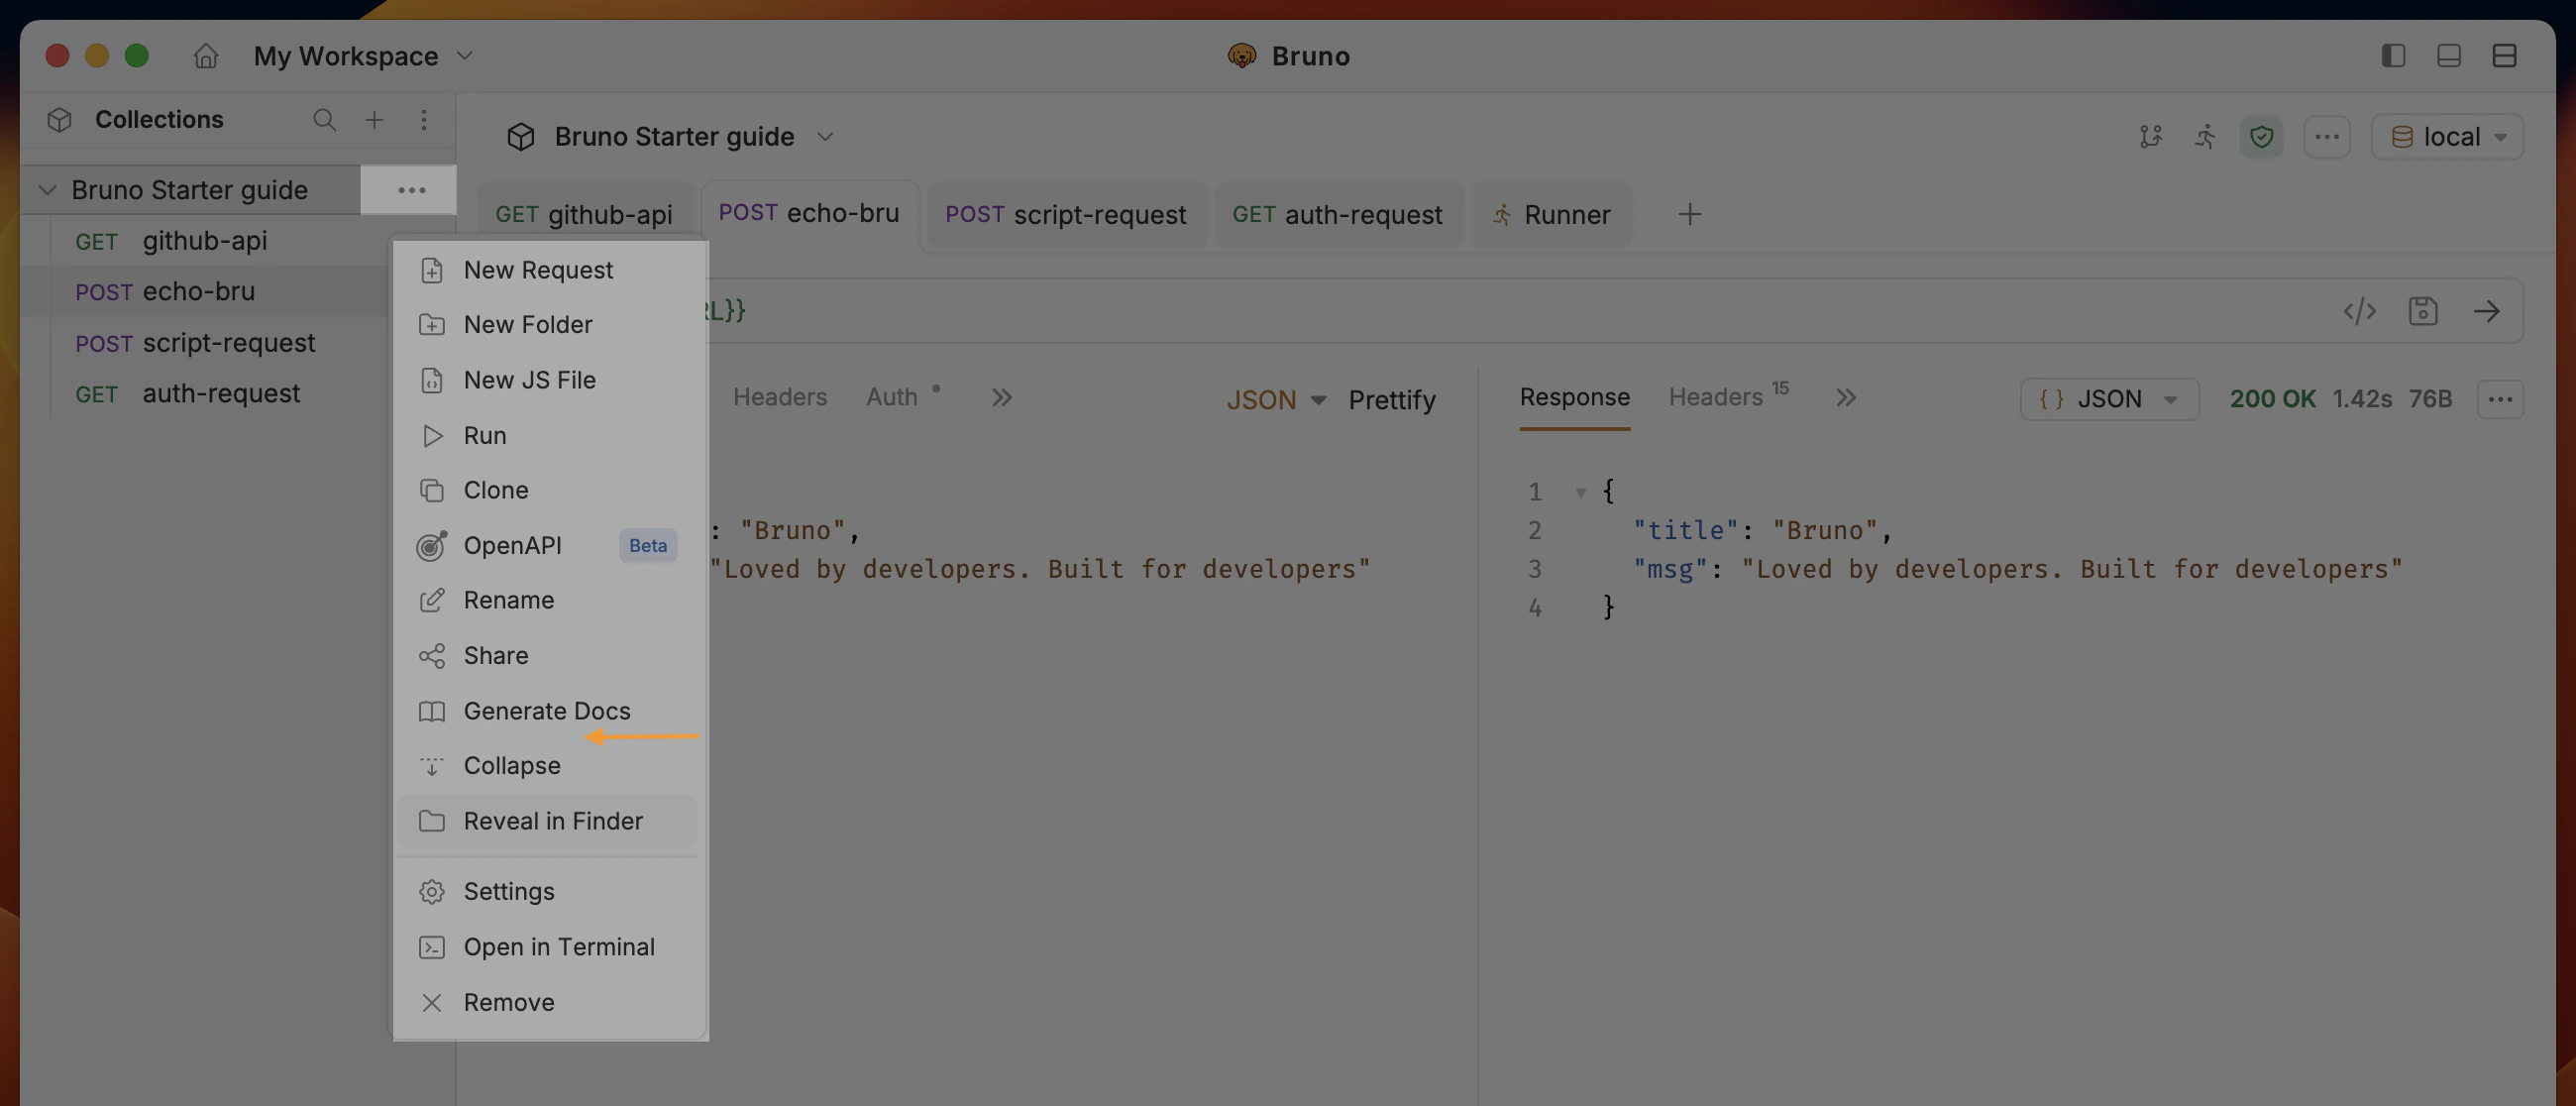 2. Click on the **Generate** button to generate automated API documentation.
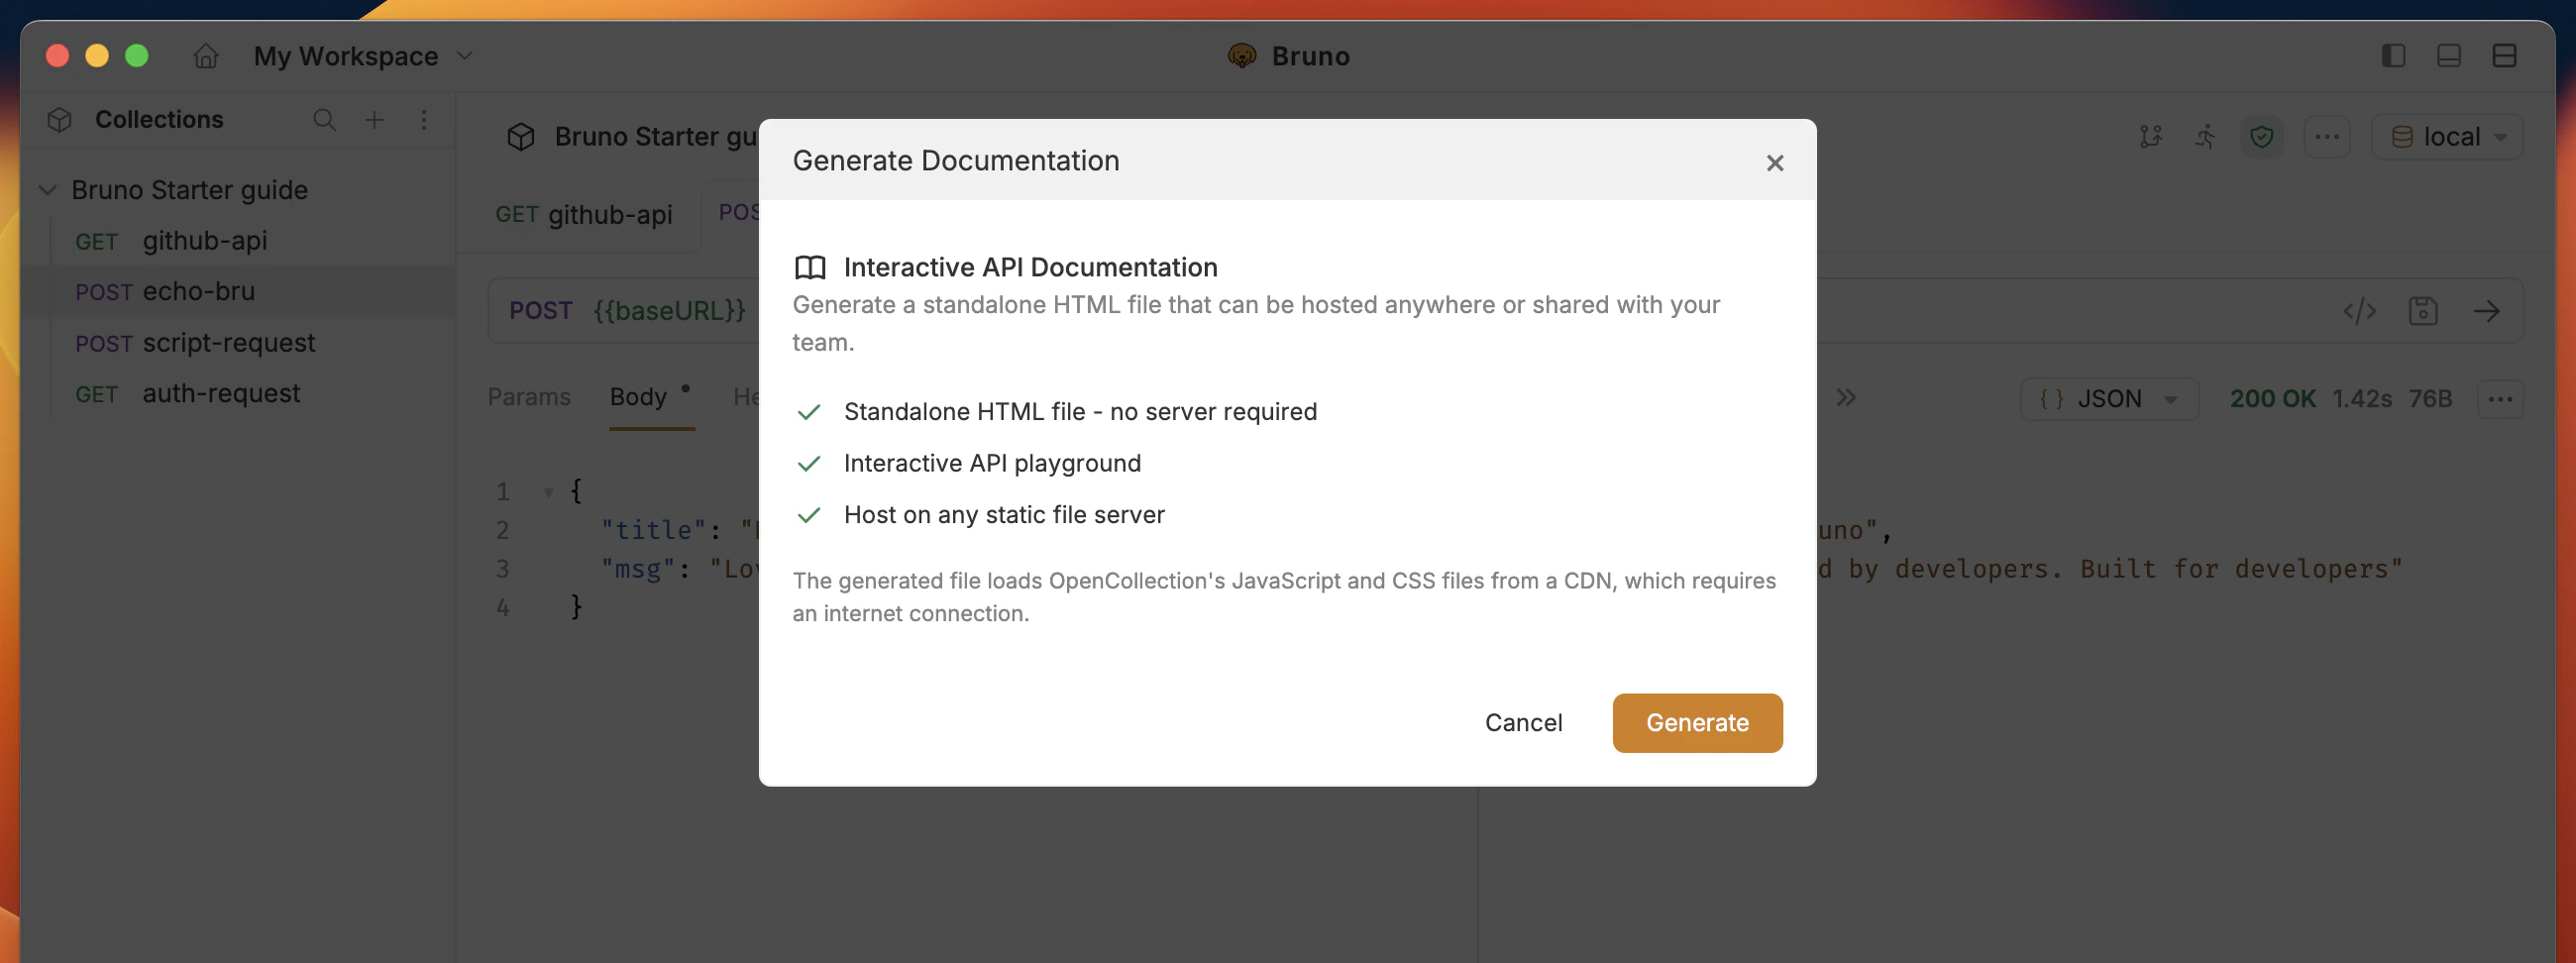 3. Save the documentation file (html) to your desired location.
You have successfully generated API documentation for the collection. The generated documentation is in html format and can be opened in any browser.
You can share it with your team or deploy it to your own server.
3. Save the documentation file (html) to your desired location.
You have successfully generated API documentation for the collection. The generated documentation is in html format and can be opened in any browser.
You can share it with your team or deploy it to your own server.
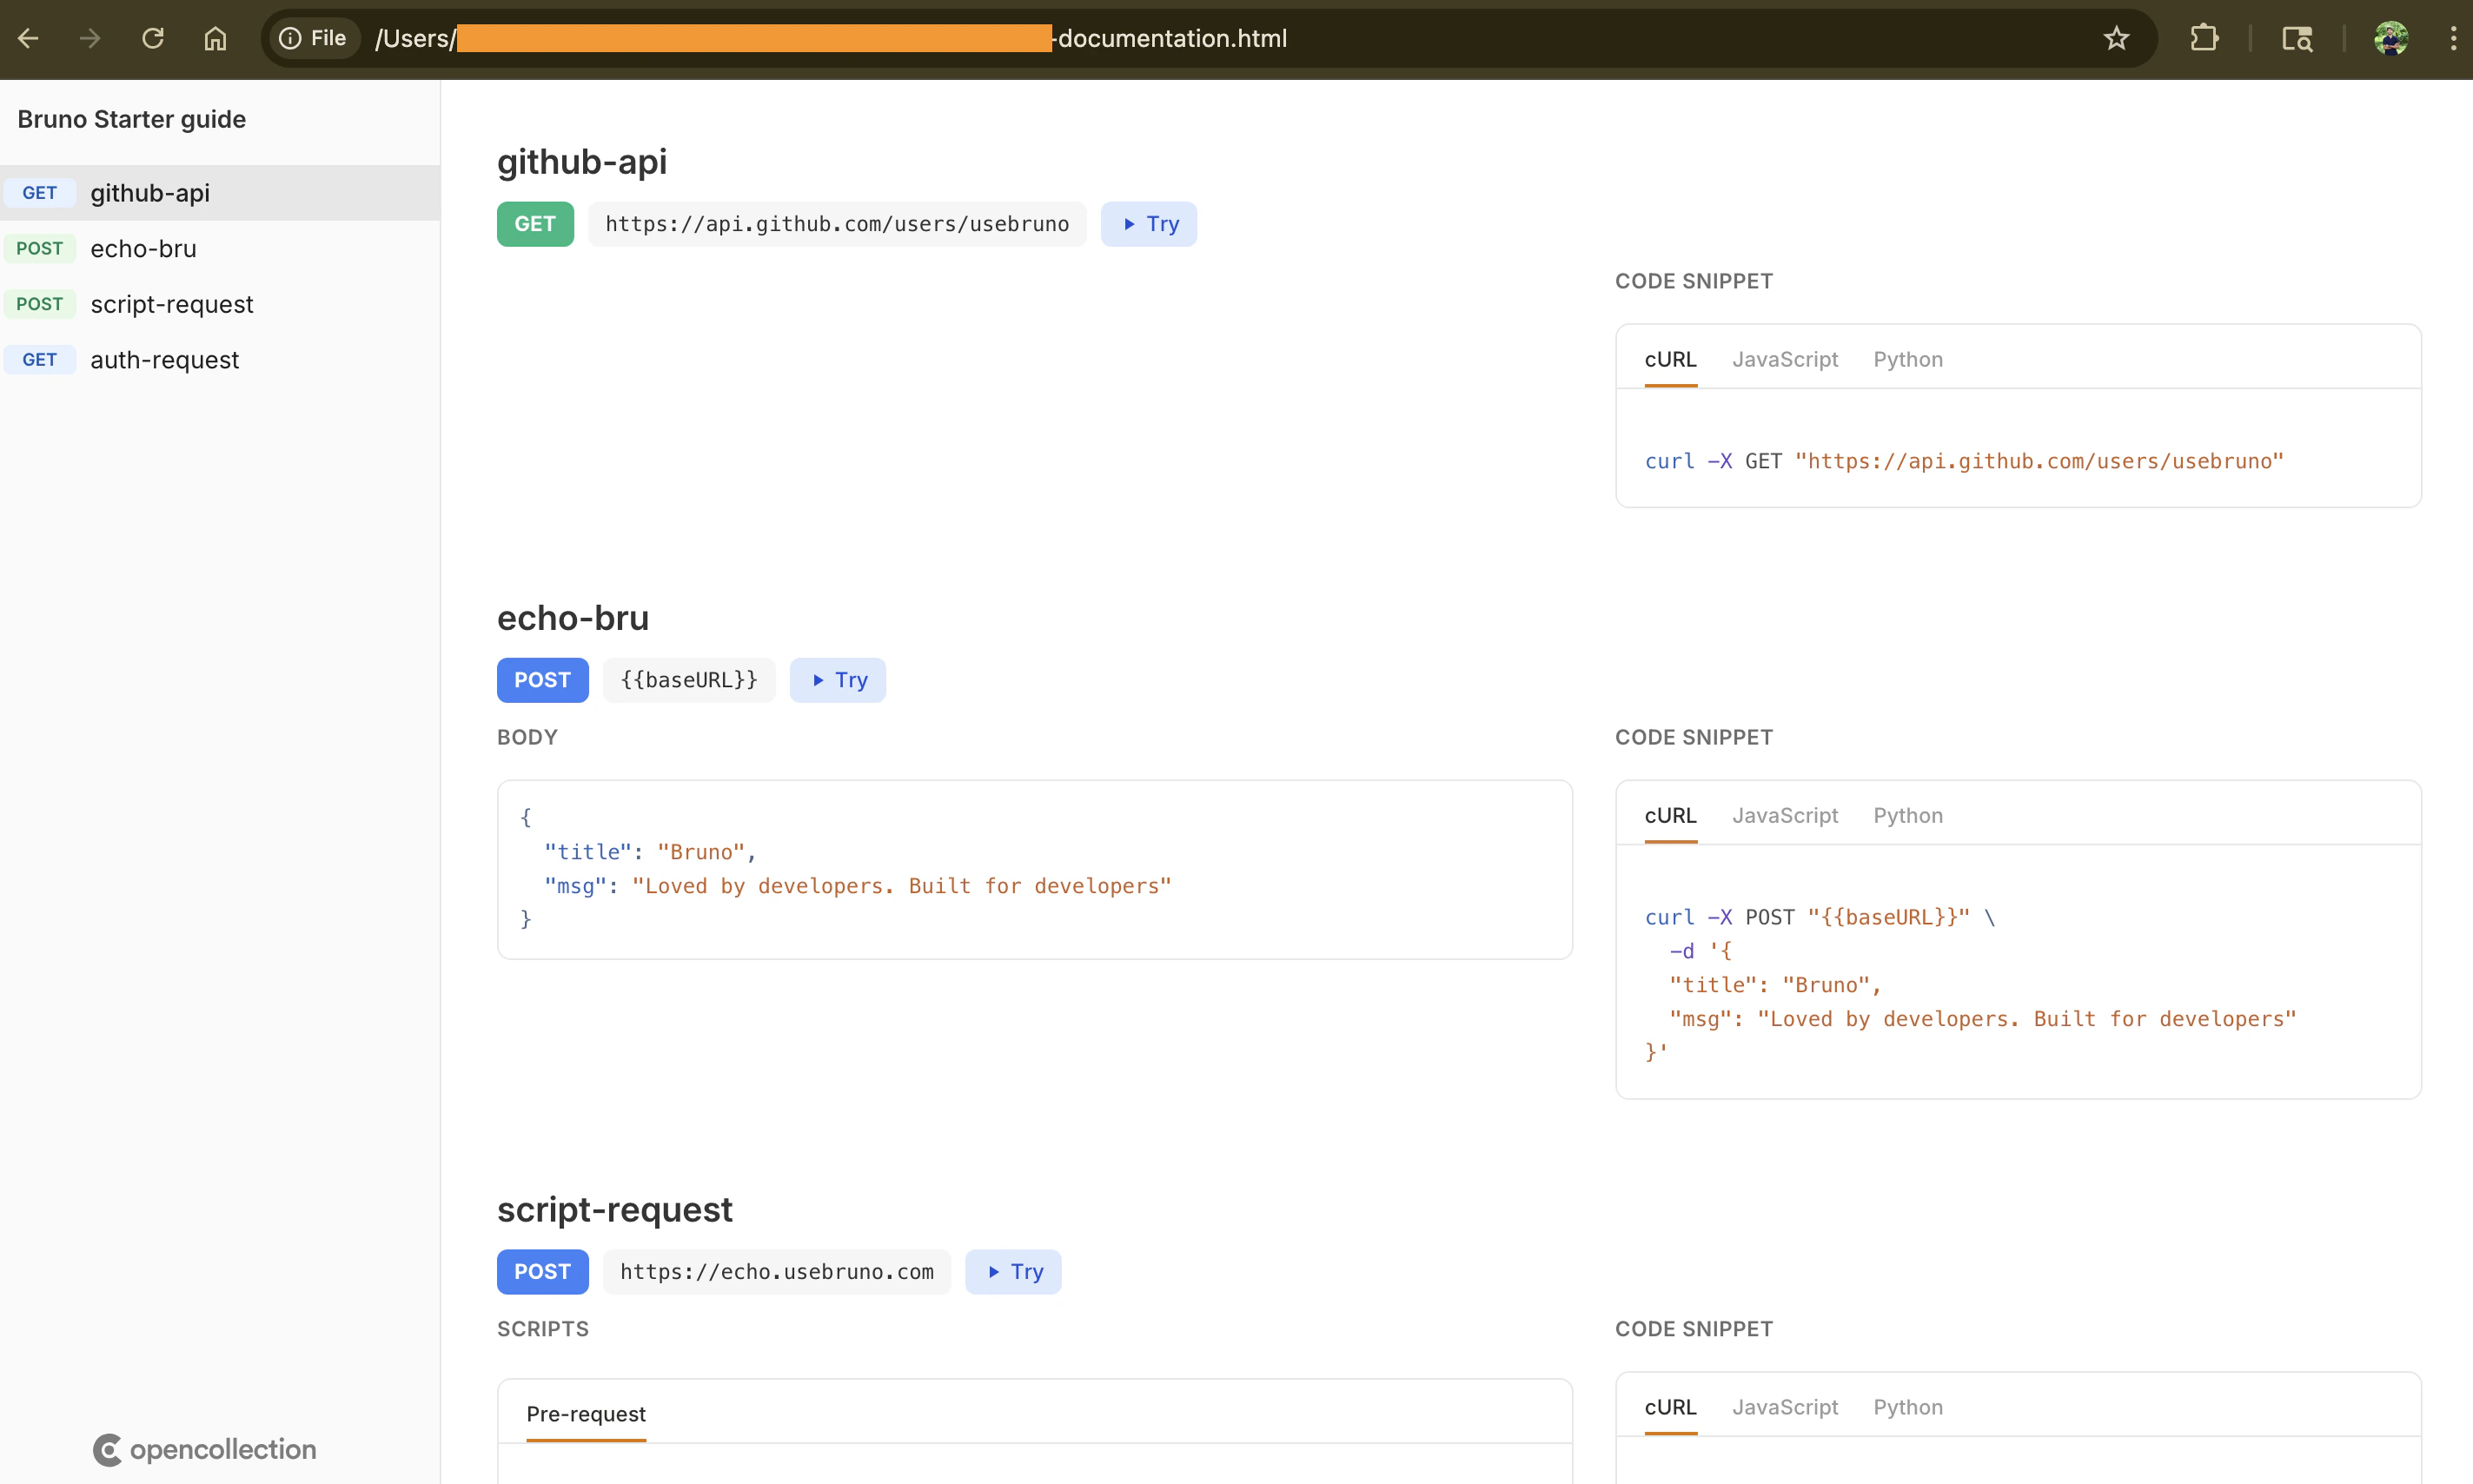 Click on **Try** button to open it as API playground.
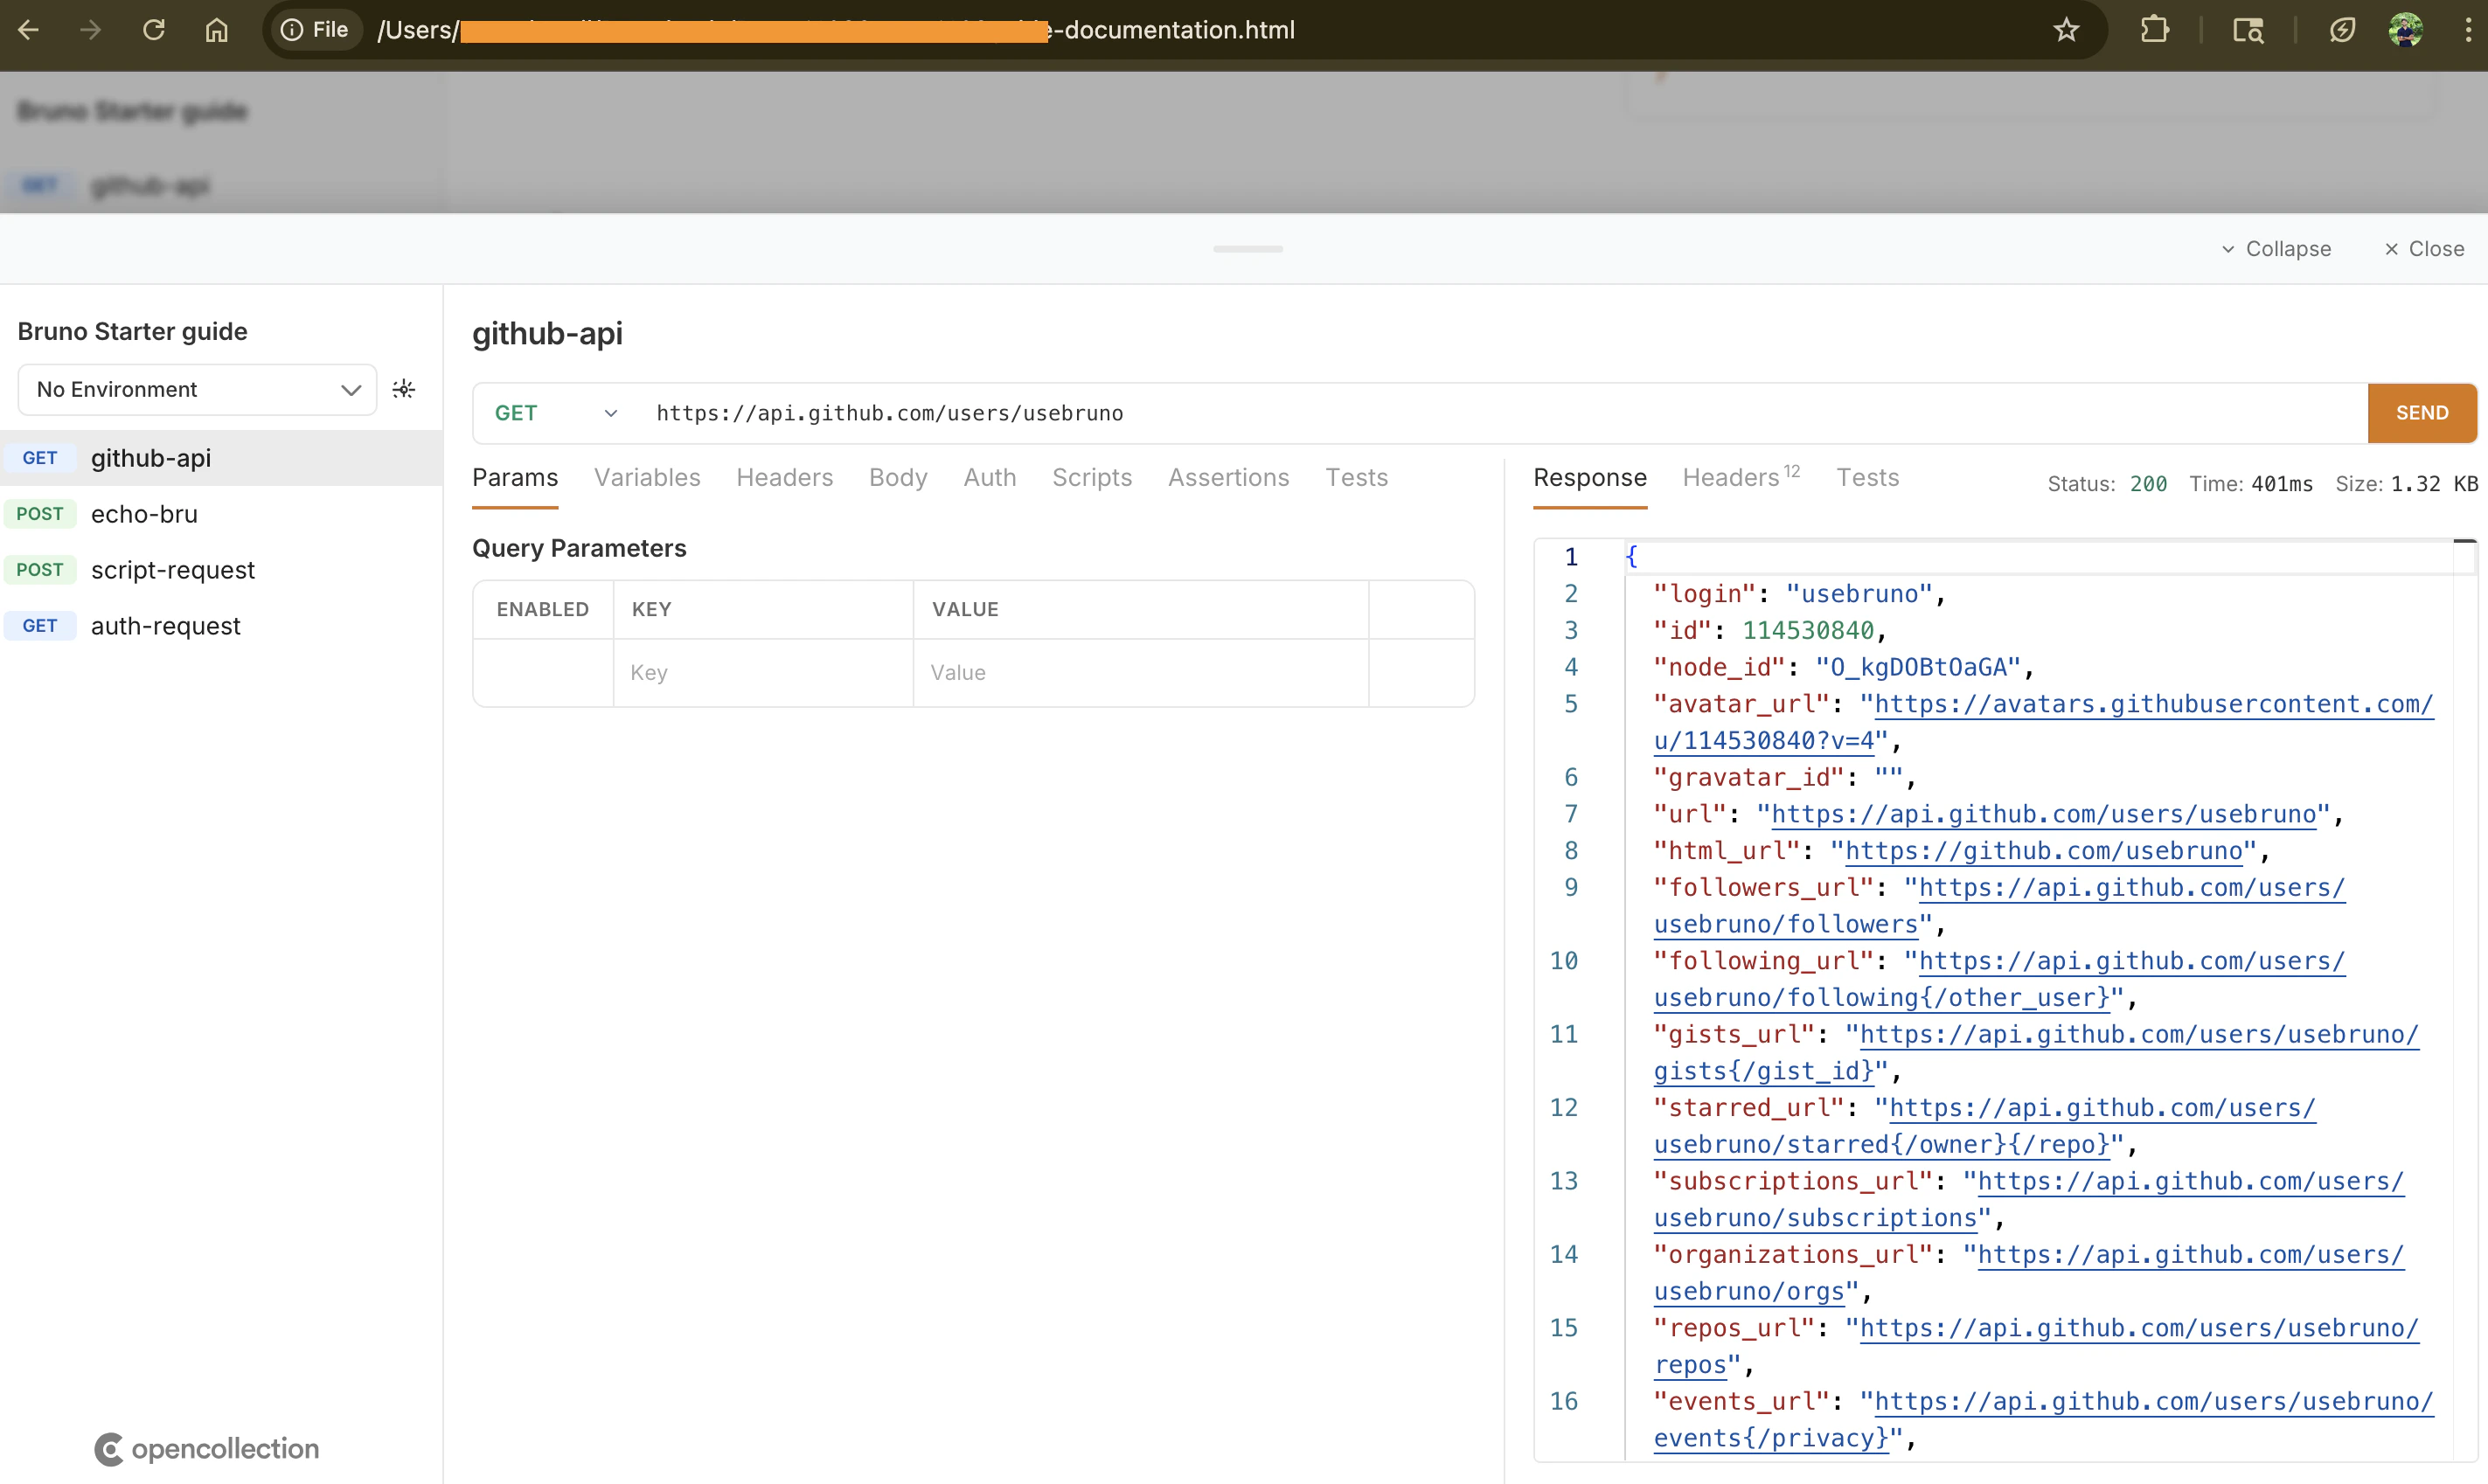 **Success Criteria:**
* API documentation is created for the collection.
* HTML file is generated with the content of the collection.
Read more about API documentation: [API Documentation](/api-docs/overview)
## 10. Git collaboration
**Objective:** Initialize Bruno collection as a Git repository, push it to GitHub.
**Bruno 3.0+:** Git basic UI features are available in the open-source app. See [Git integration (GUI)](/git-integration/using-gui/intro).
1. Open the **Git** panel (top bar) and click **Initialize** to turn the collection folder into a repository.
**Success Criteria:**
* API documentation is created for the collection.
* HTML file is generated with the content of the collection.
Read more about API documentation: [API Documentation](/api-docs/overview)
## 10. Git collaboration
**Objective:** Initialize Bruno collection as a Git repository, push it to GitHub.
**Bruno 3.0+:** Git basic UI features are available in the open-source app. See [Git integration (GUI)](/git-integration/using-gui/intro).
1. Open the **Git** panel (top bar) and click **Initialize** to turn the collection folder into a repository.
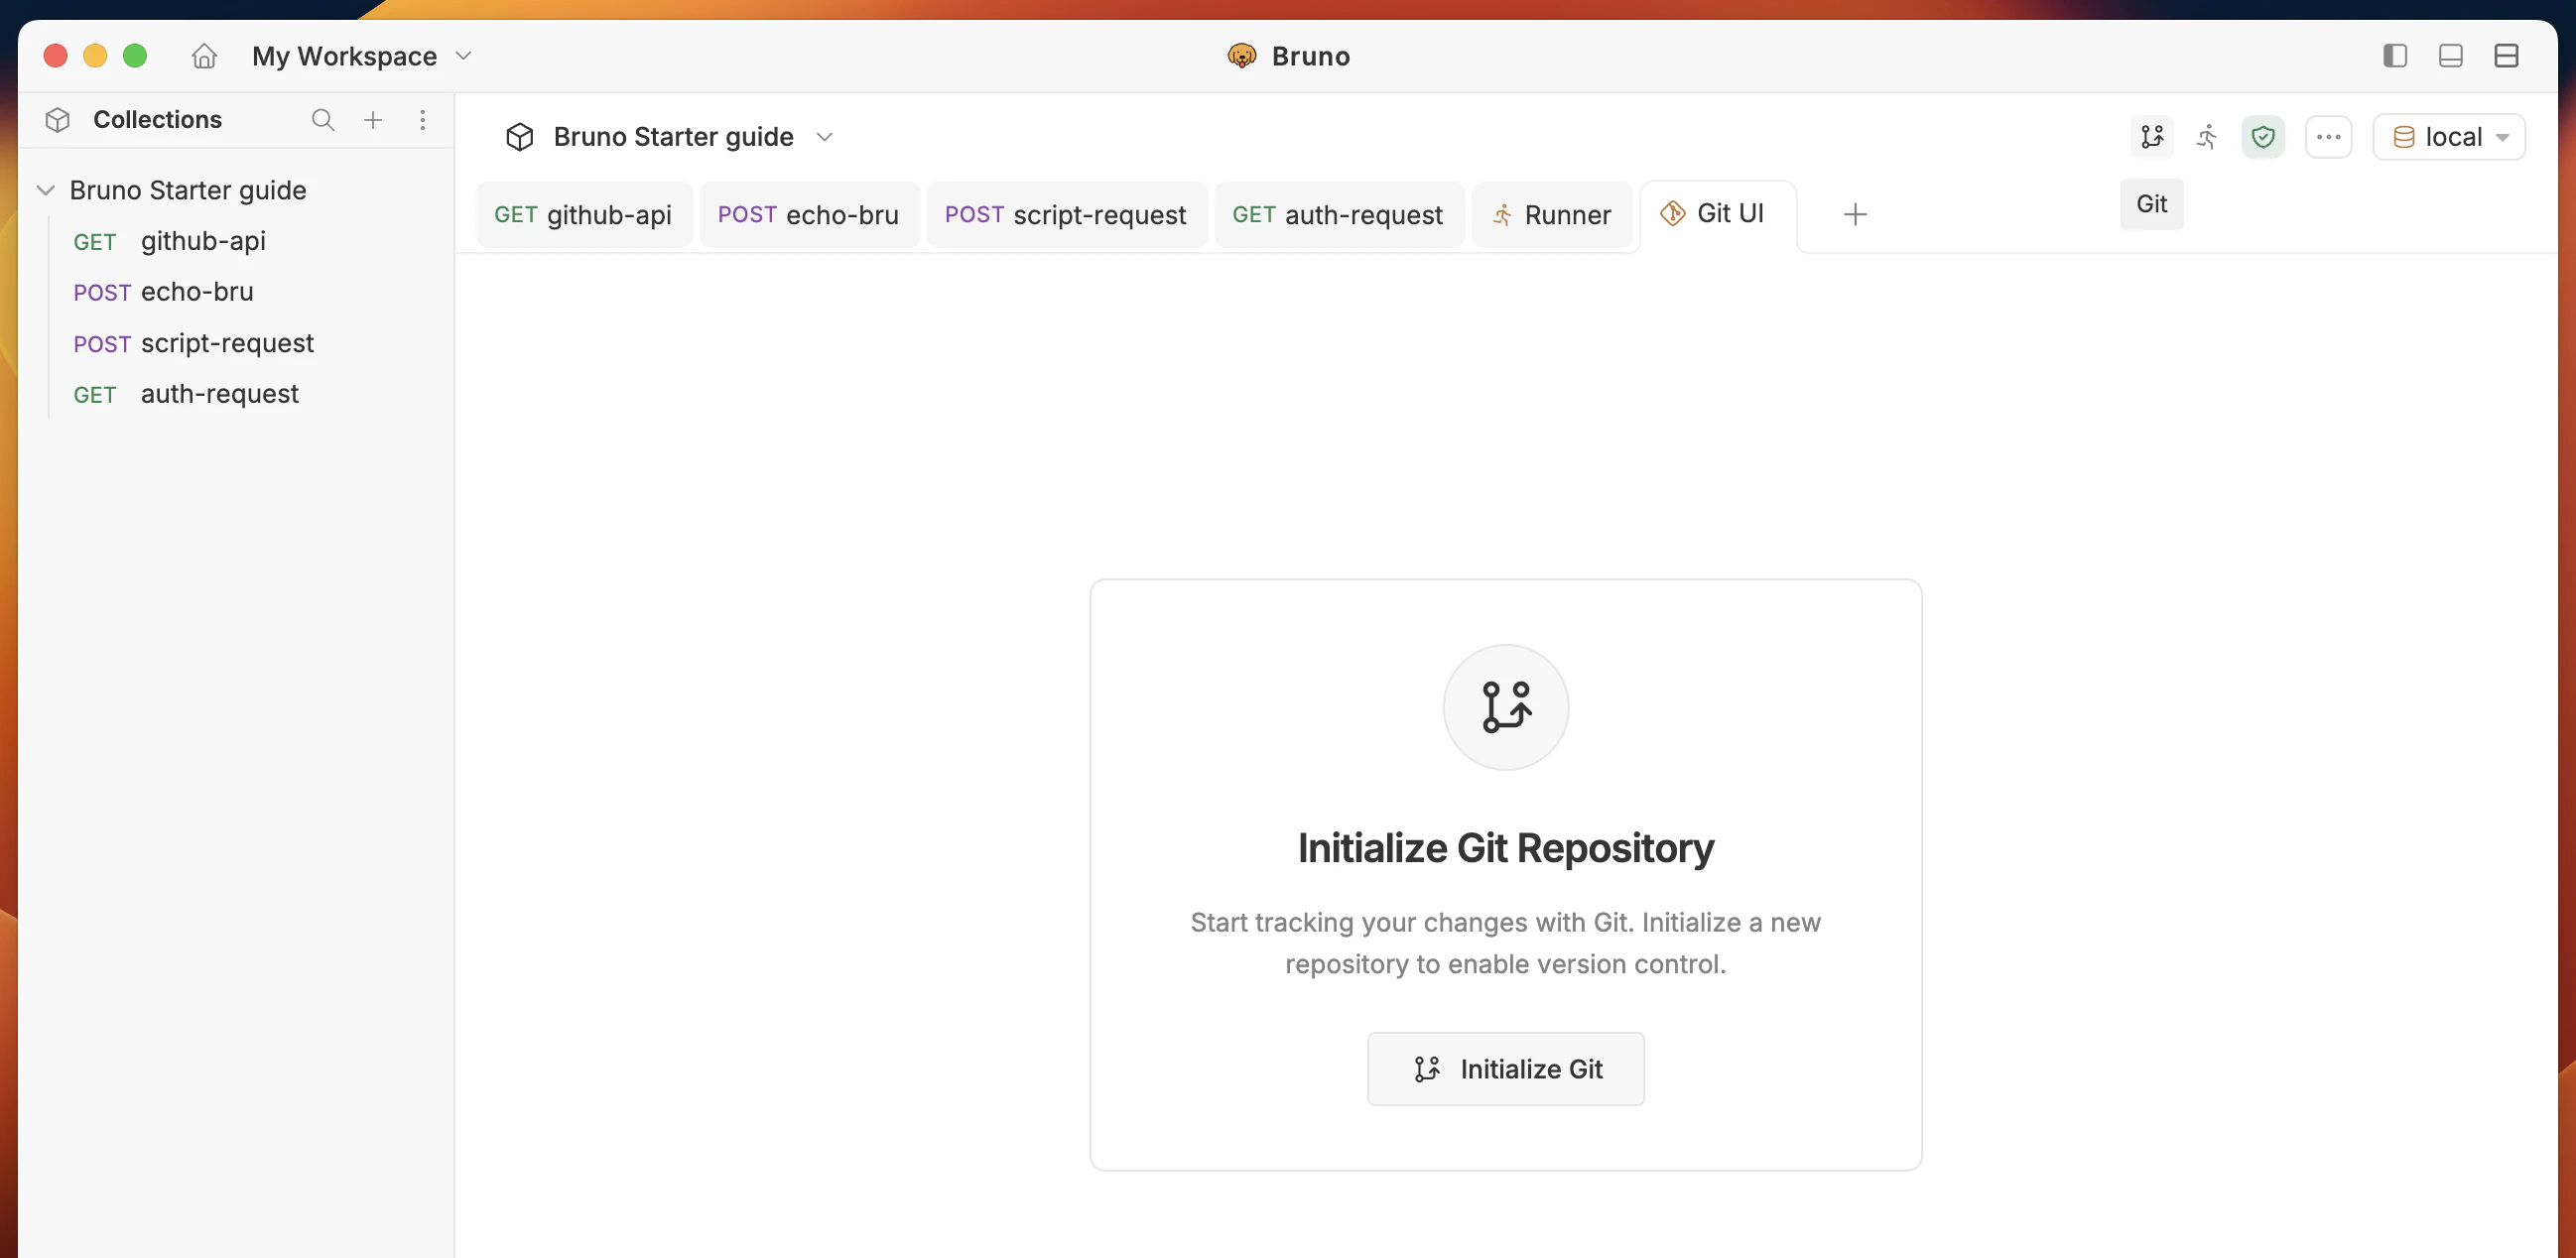 2. Stage and commit your changes from the Git panel (or use `git add` and `git commit` commands in a terminal).
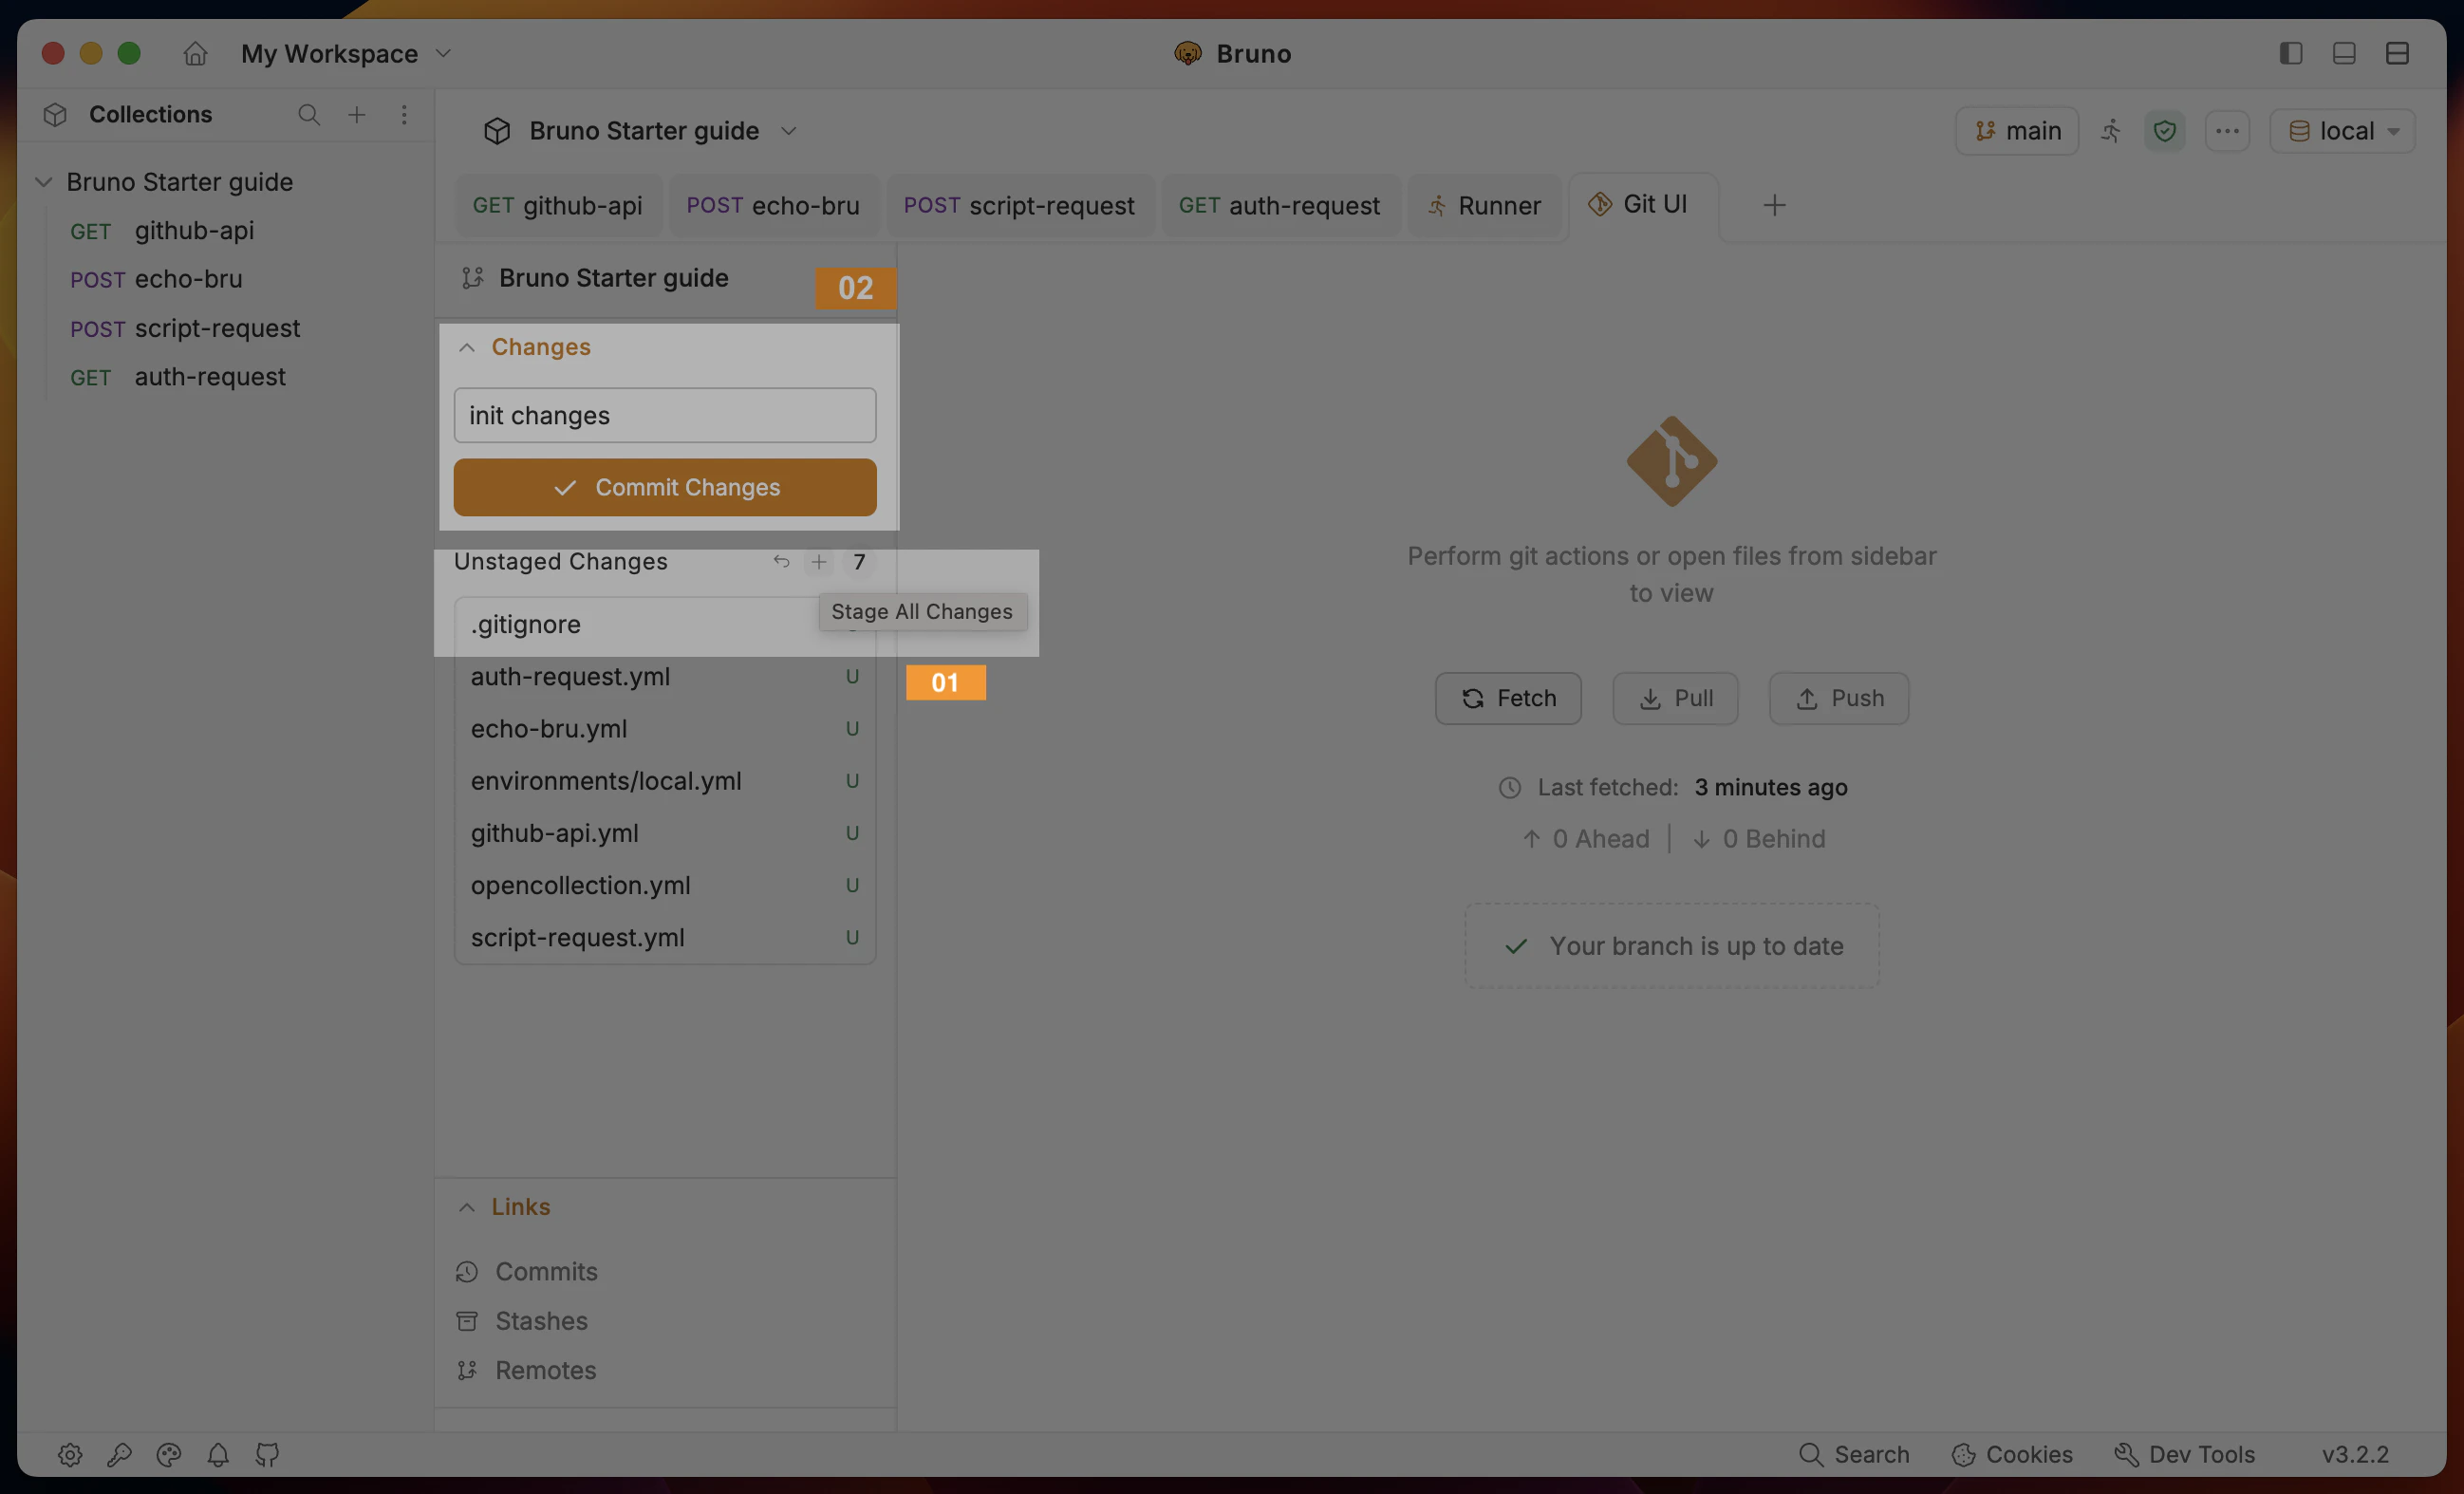 3. Go to [GitHub](https://github.com/)
* Create an empty repository (click on the **+** button and select **New repository**)
* Enter name **bruno-starter-guide** and other details and copy the HTTPS URL
```bash theme={null}
https://github.com/<>/bruno-starter-guide.git
```
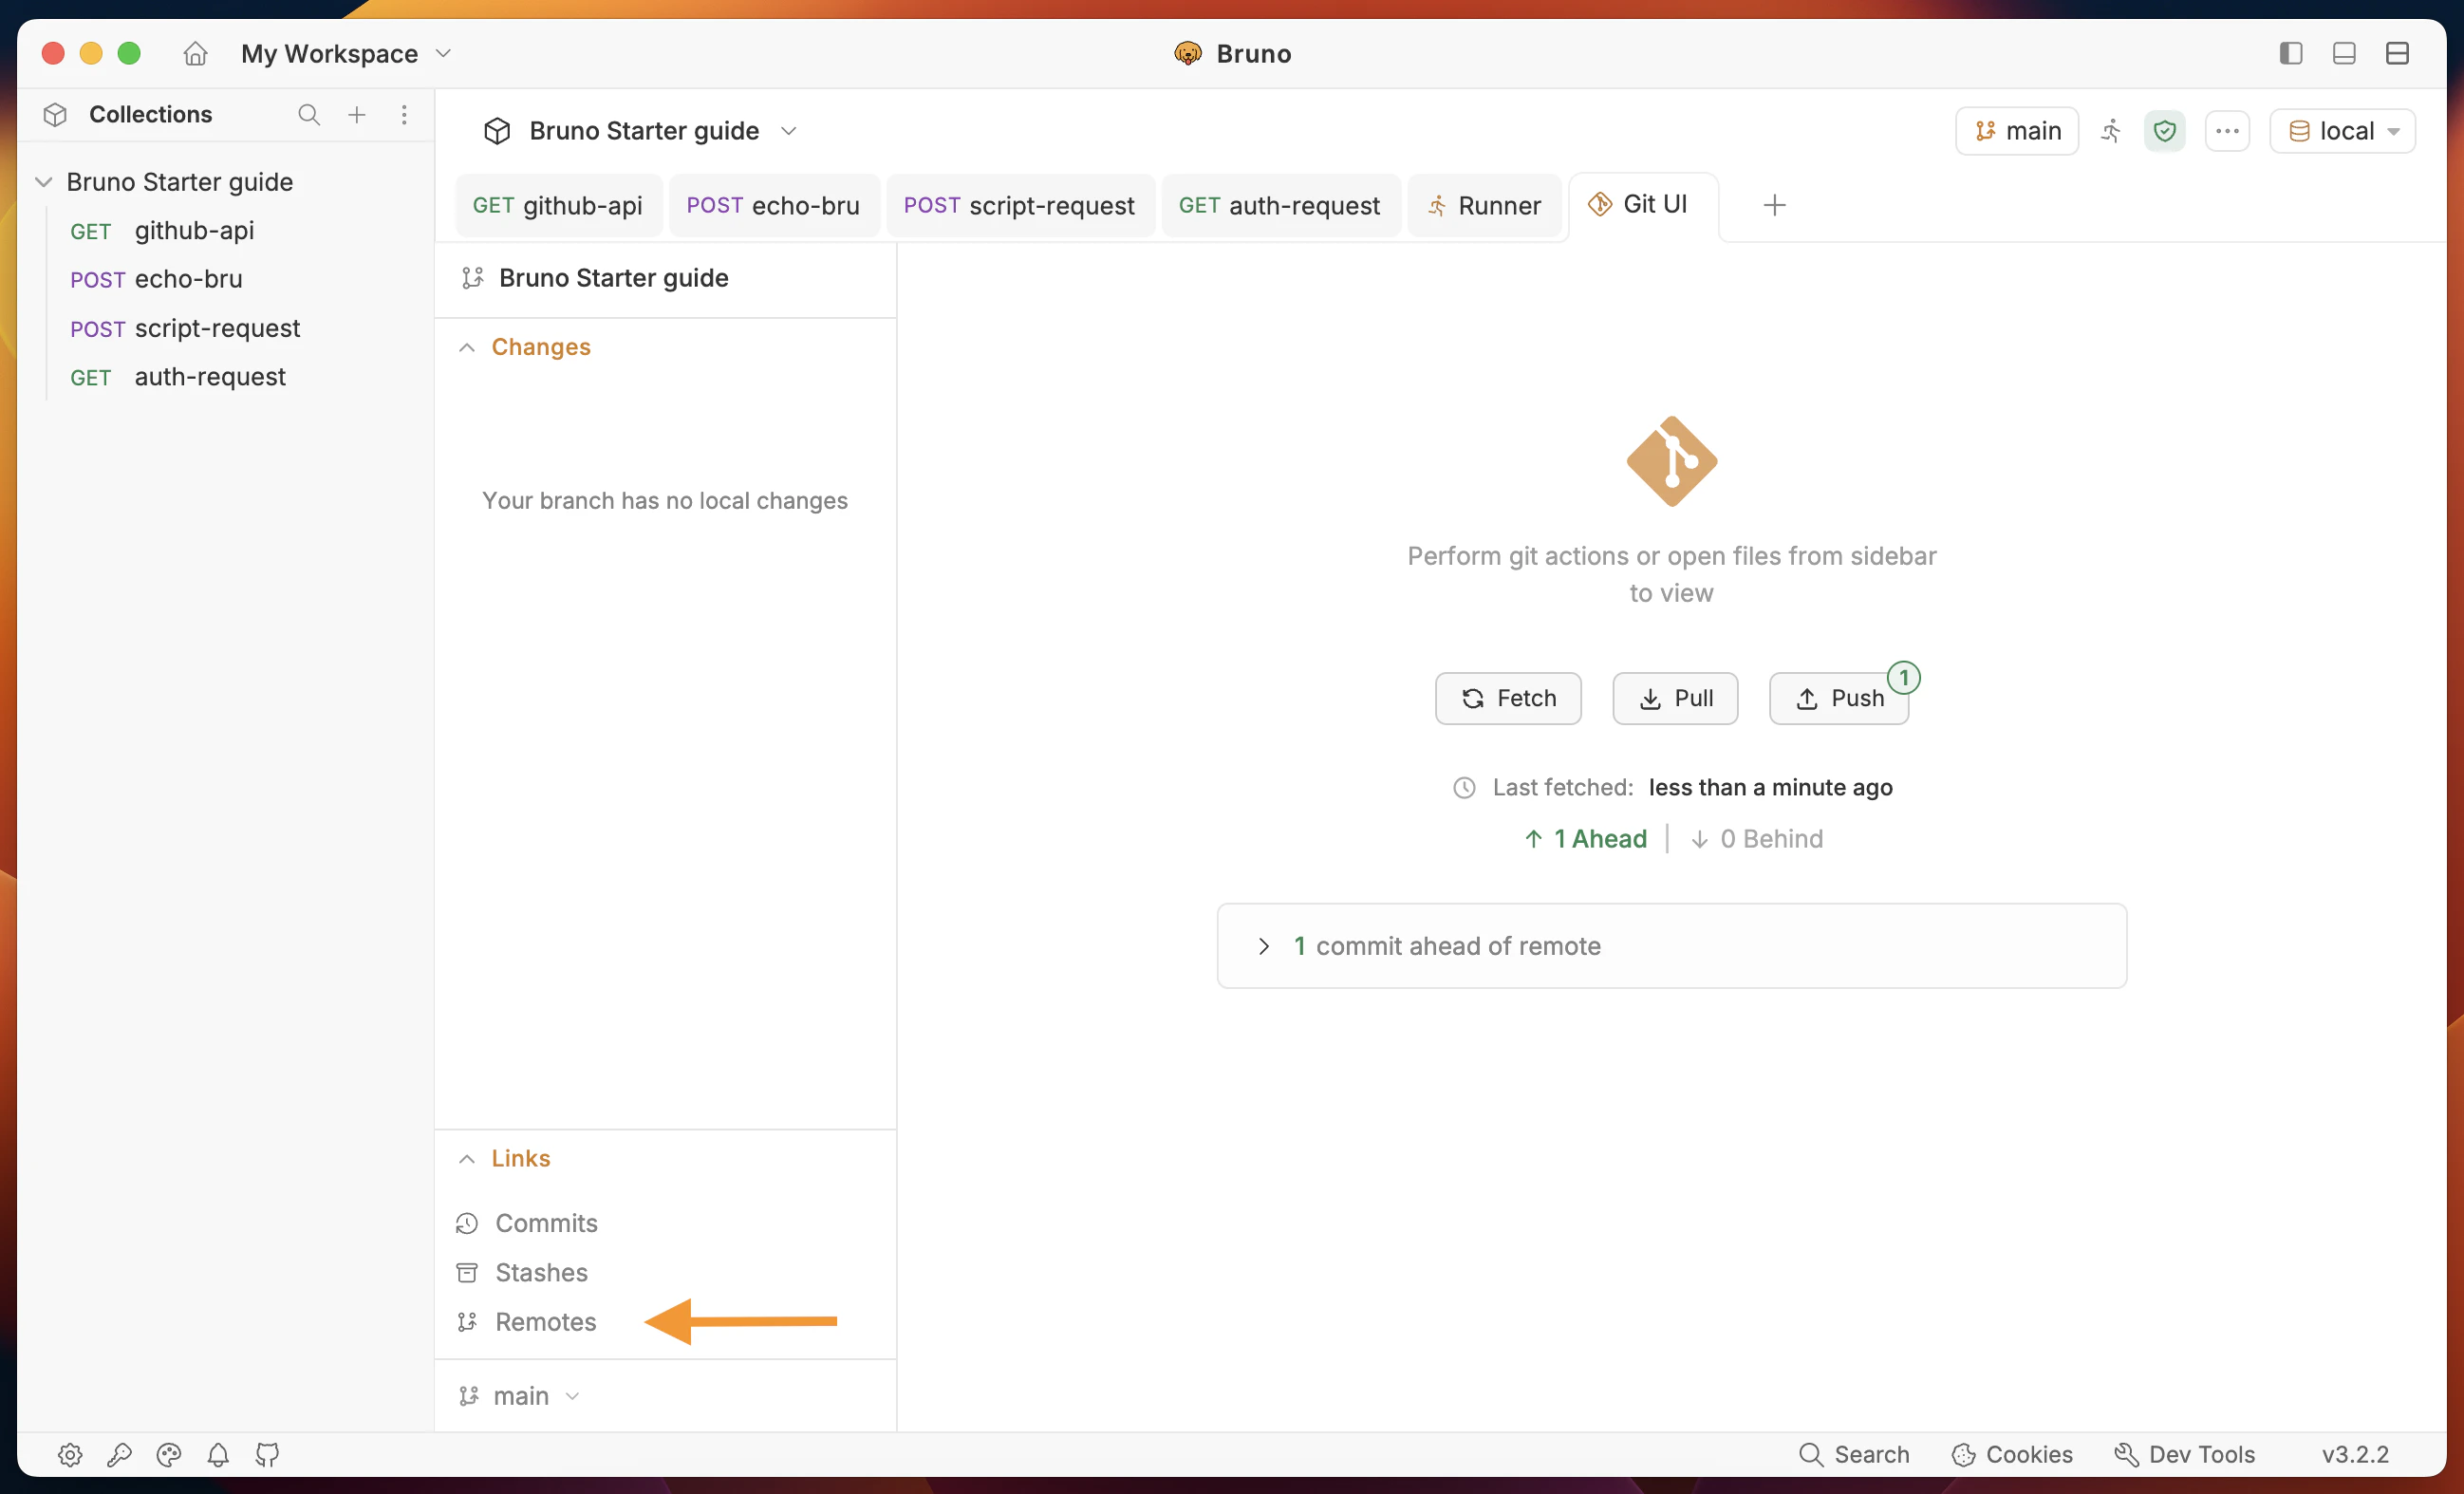
4. Go to collection **Git** panel and click on **Remotes** from bottom-left corner.
3. Go to [GitHub](https://github.com/)
* Create an empty repository (click on the **+** button and select **New repository**)
* Enter name **bruno-starter-guide** and other details and copy the HTTPS URL
```bash theme={null}
https://github.com/<>/bruno-starter-guide.git
```
4. Go to collection **Git** panel and click on **Remotes** from bottom-left corner.
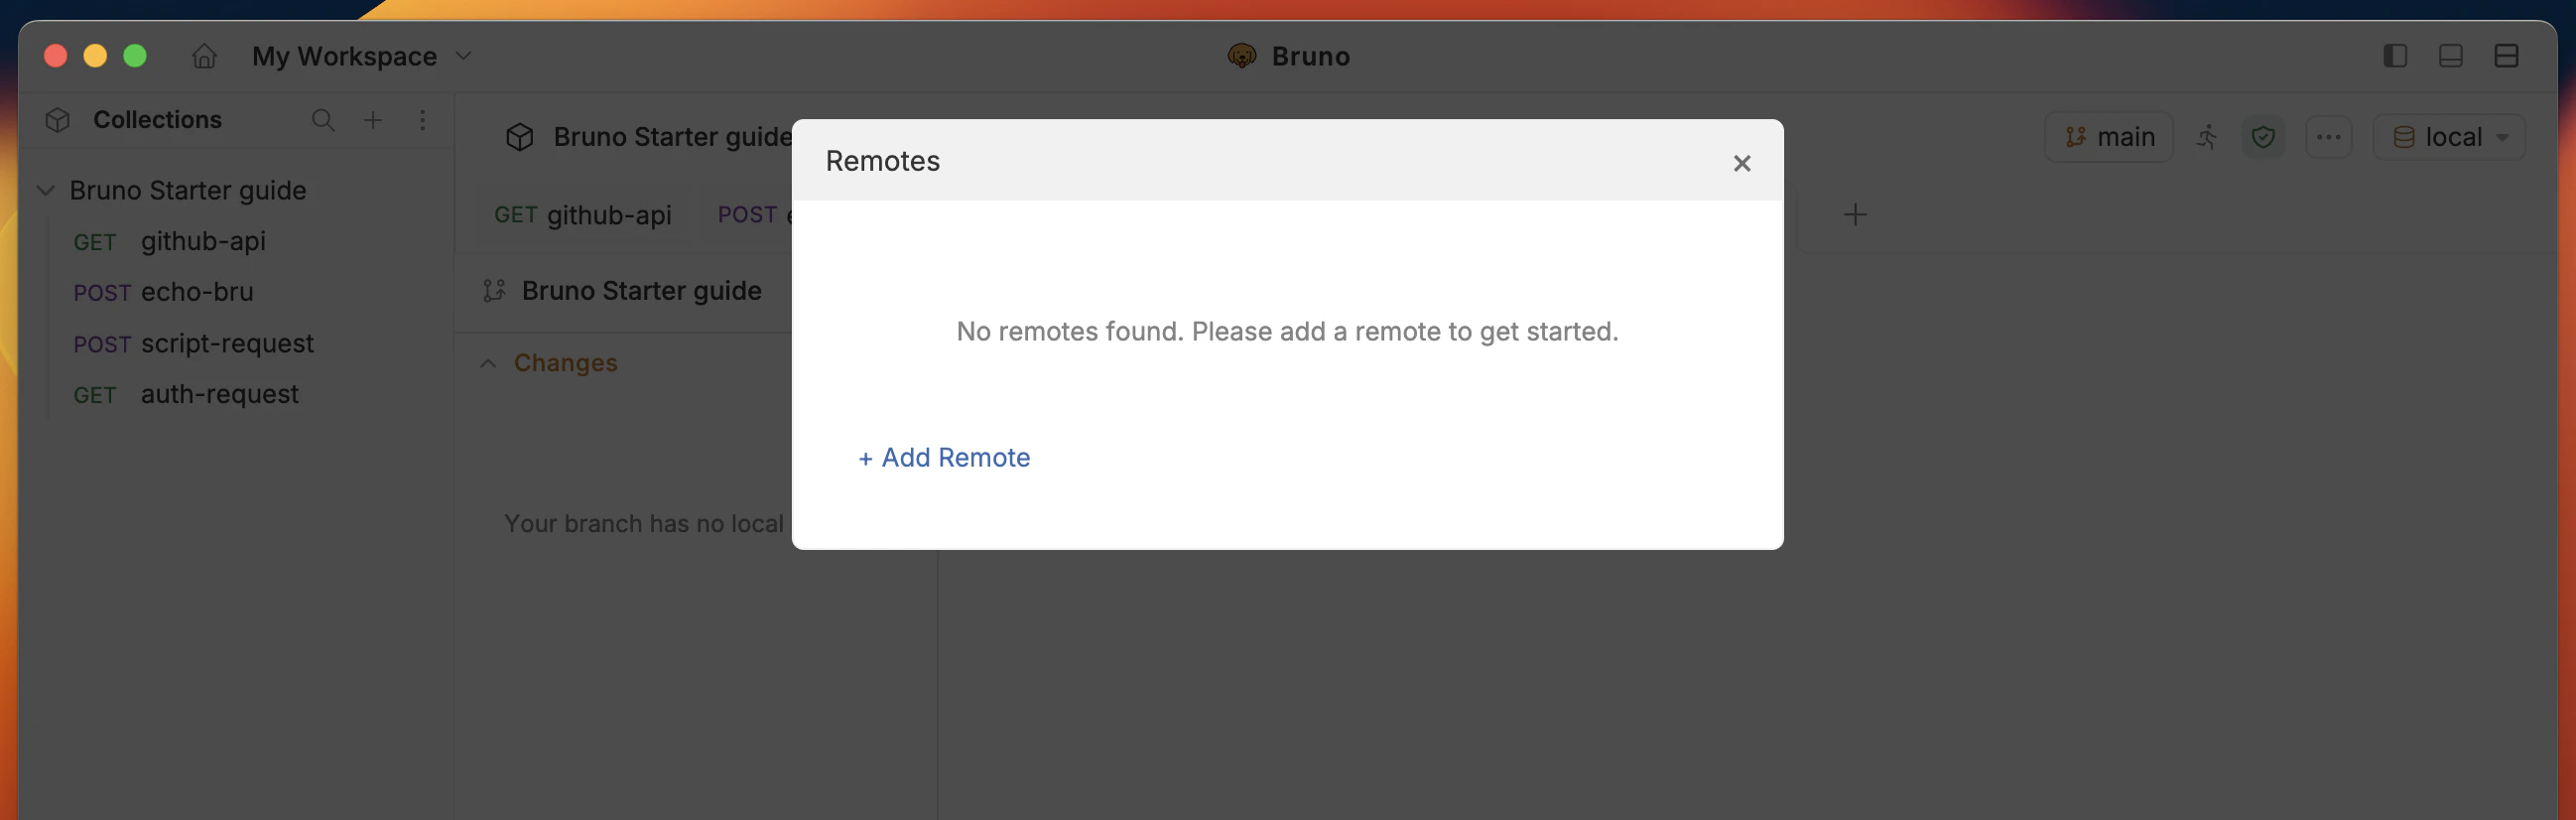
 5. Click the **Add Remote** button and enter the following details:
* **Remote Name:** `origin`
* **URL:** `https://github.com/<>/bruno-starter-guide.git`
5. Click the **Add Remote** button and enter the following details:
* **Remote Name:** `origin`
* **URL:** `https://github.com/<>/bruno-starter-guide.git`
 6. Push your default (main) branch to the remote repository.
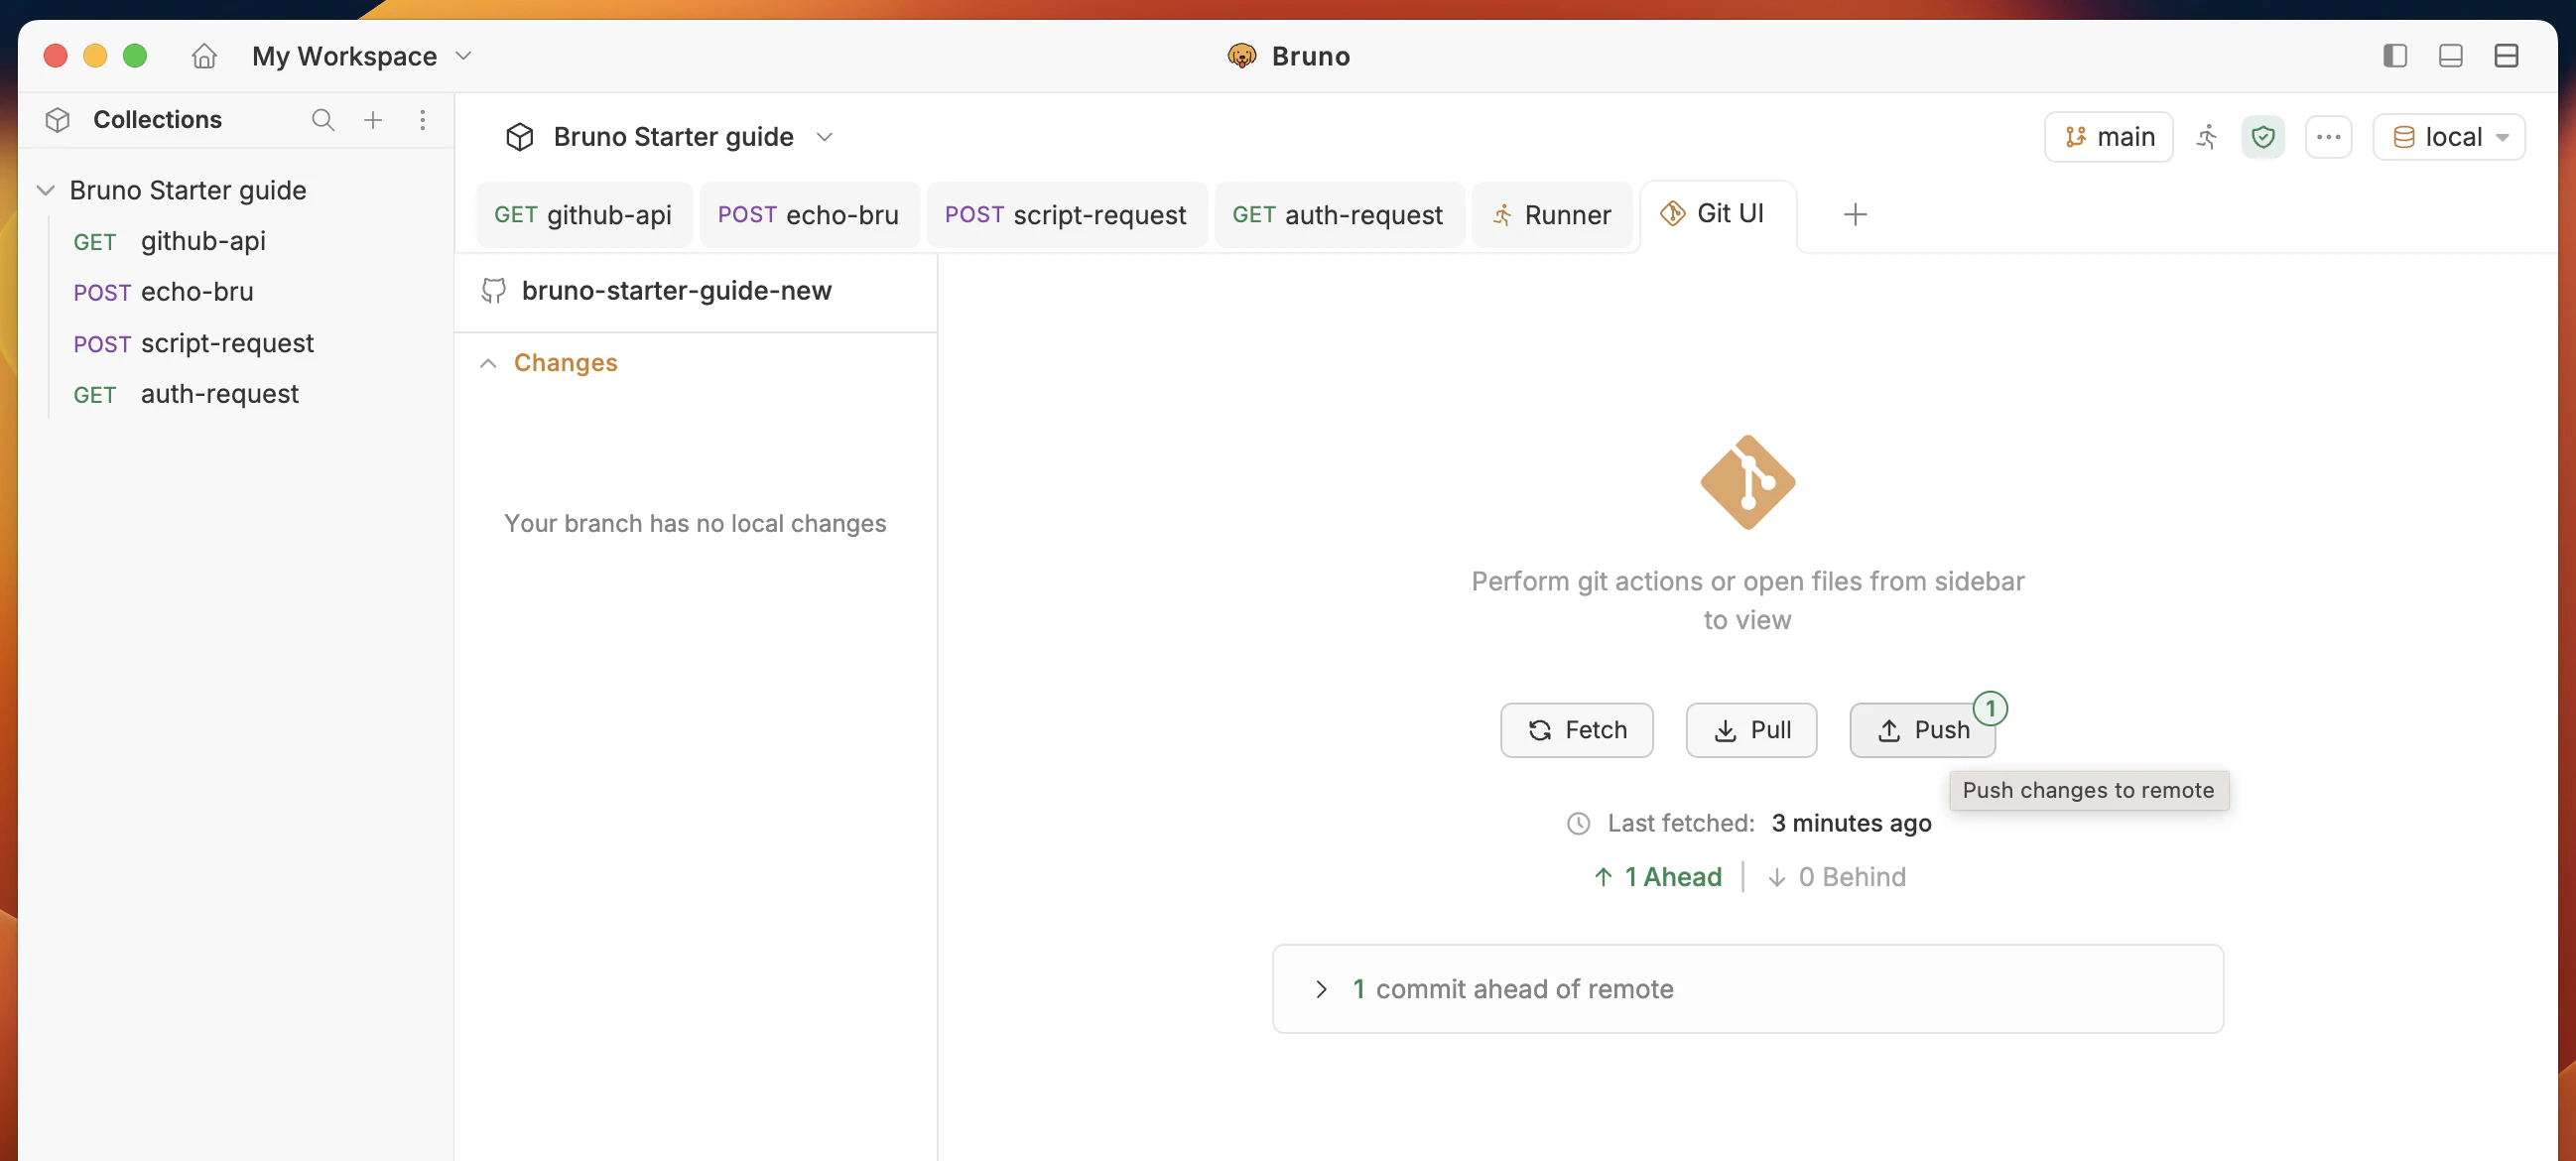 Go to your remote repository and you will see the collection is pushed to the remote repository. You can share it with your team and collaborate on it.
**Success Criteria:**
* Git repository is initialized for the collection.
* Remote repository is created and connected.
* Collection is pushed to the remote repository.
More: [Using the Git UI](/git-integration/using-gui/intro)
***
## 11. Run a request through the CLI
**Objective:** Install **Bruno CLI** and run all requests in the collection from a terminal.
Make sure you have Node.js installed on your system.
1. Install Bruno CLI:
```bash theme={null}
npm install -g @usebruno/cli
```
2. Open a terminal and navigate to the **Bruno Starter Guide** collection (folder with `bruno.json`).
```bash theme={null}
cd path/to/bruno-starter-guide
```
3. Run all requests:
```bash theme={null}
bru run
```
4. Optional: run with a named environment, e.g.:
```bash theme={null}
bru run --env local
```
You will see all requests running one by one in the collection runner, along with an execution summary table showing metrics and results.
**Success Criteria:**
* All requests are running one by one in the collection runner.
* Response status is **200** for all requests.
* Response body contains the data of the request.
More: [Bruno CLI](/bru-cli/overview)
***
## 12. OpenAPI specification
**Objective:** Export your collection as an **OpenAPI** document (shareable API description).
1. Open the collection context menu (...) and select the **Share** option.
Go to your remote repository and you will see the collection is pushed to the remote repository. You can share it with your team and collaborate on it.
**Success Criteria:**
* Git repository is initialized for the collection.
* Remote repository is created and connected.
* Collection is pushed to the remote repository.
More: [Using the Git UI](/git-integration/using-gui/intro)
***
## 11. Run a request through the CLI
**Objective:** Install **Bruno CLI** and run all requests in the collection from a terminal.
Make sure you have Node.js installed on your system.
1. Install Bruno CLI:
```bash theme={null}
npm install -g @usebruno/cli
```
2. Open a terminal and navigate to the **Bruno Starter Guide** collection (folder with `bruno.json`).
```bash theme={null}
cd path/to/bruno-starter-guide
```
3. Run all requests:
```bash theme={null}
bru run
```
4. Optional: run with a named environment, e.g.:
```bash theme={null}
bru run --env local
```
You will see all requests running one by one in the collection runner, along with an execution summary table showing metrics and results.
**Success Criteria:**
* All requests are running one by one in the collection runner.
* Response status is **200** for all requests.
* Response body contains the data of the request.
More: [Bruno CLI](/bru-cli/overview)
***
## 12. OpenAPI specification
**Objective:** Export your collection as an **OpenAPI** document (shareable API description).
1. Open the collection context menu (...) and select the **Share** option.
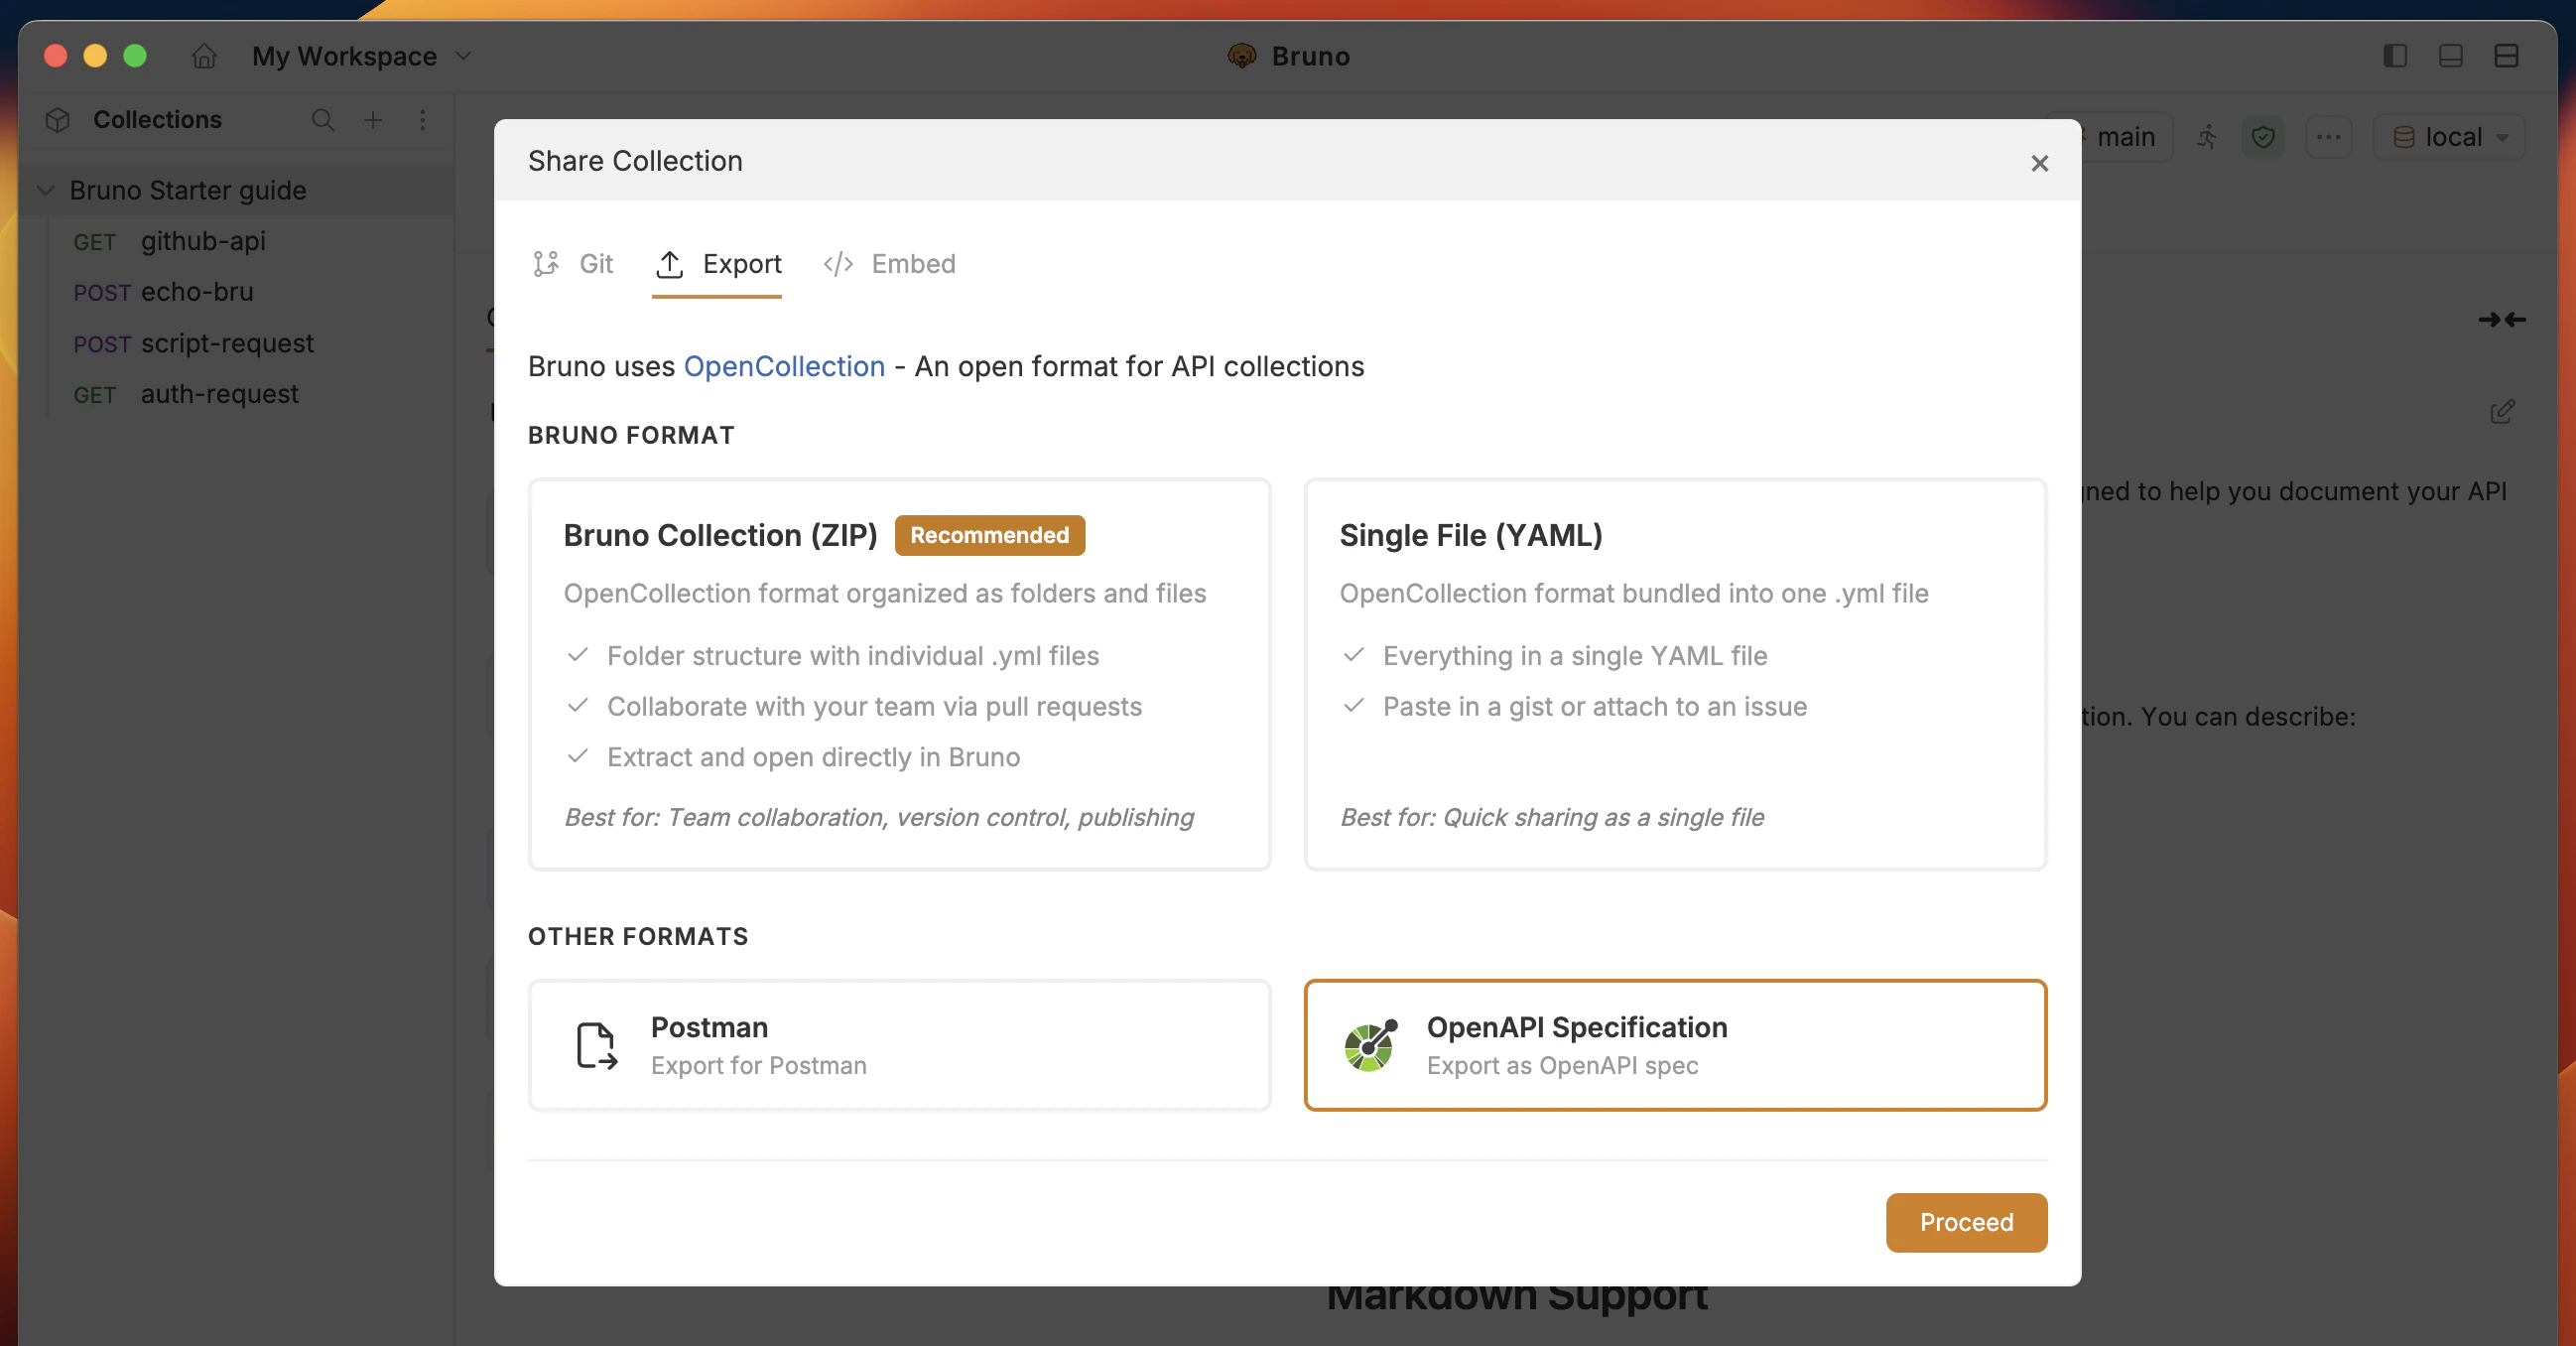
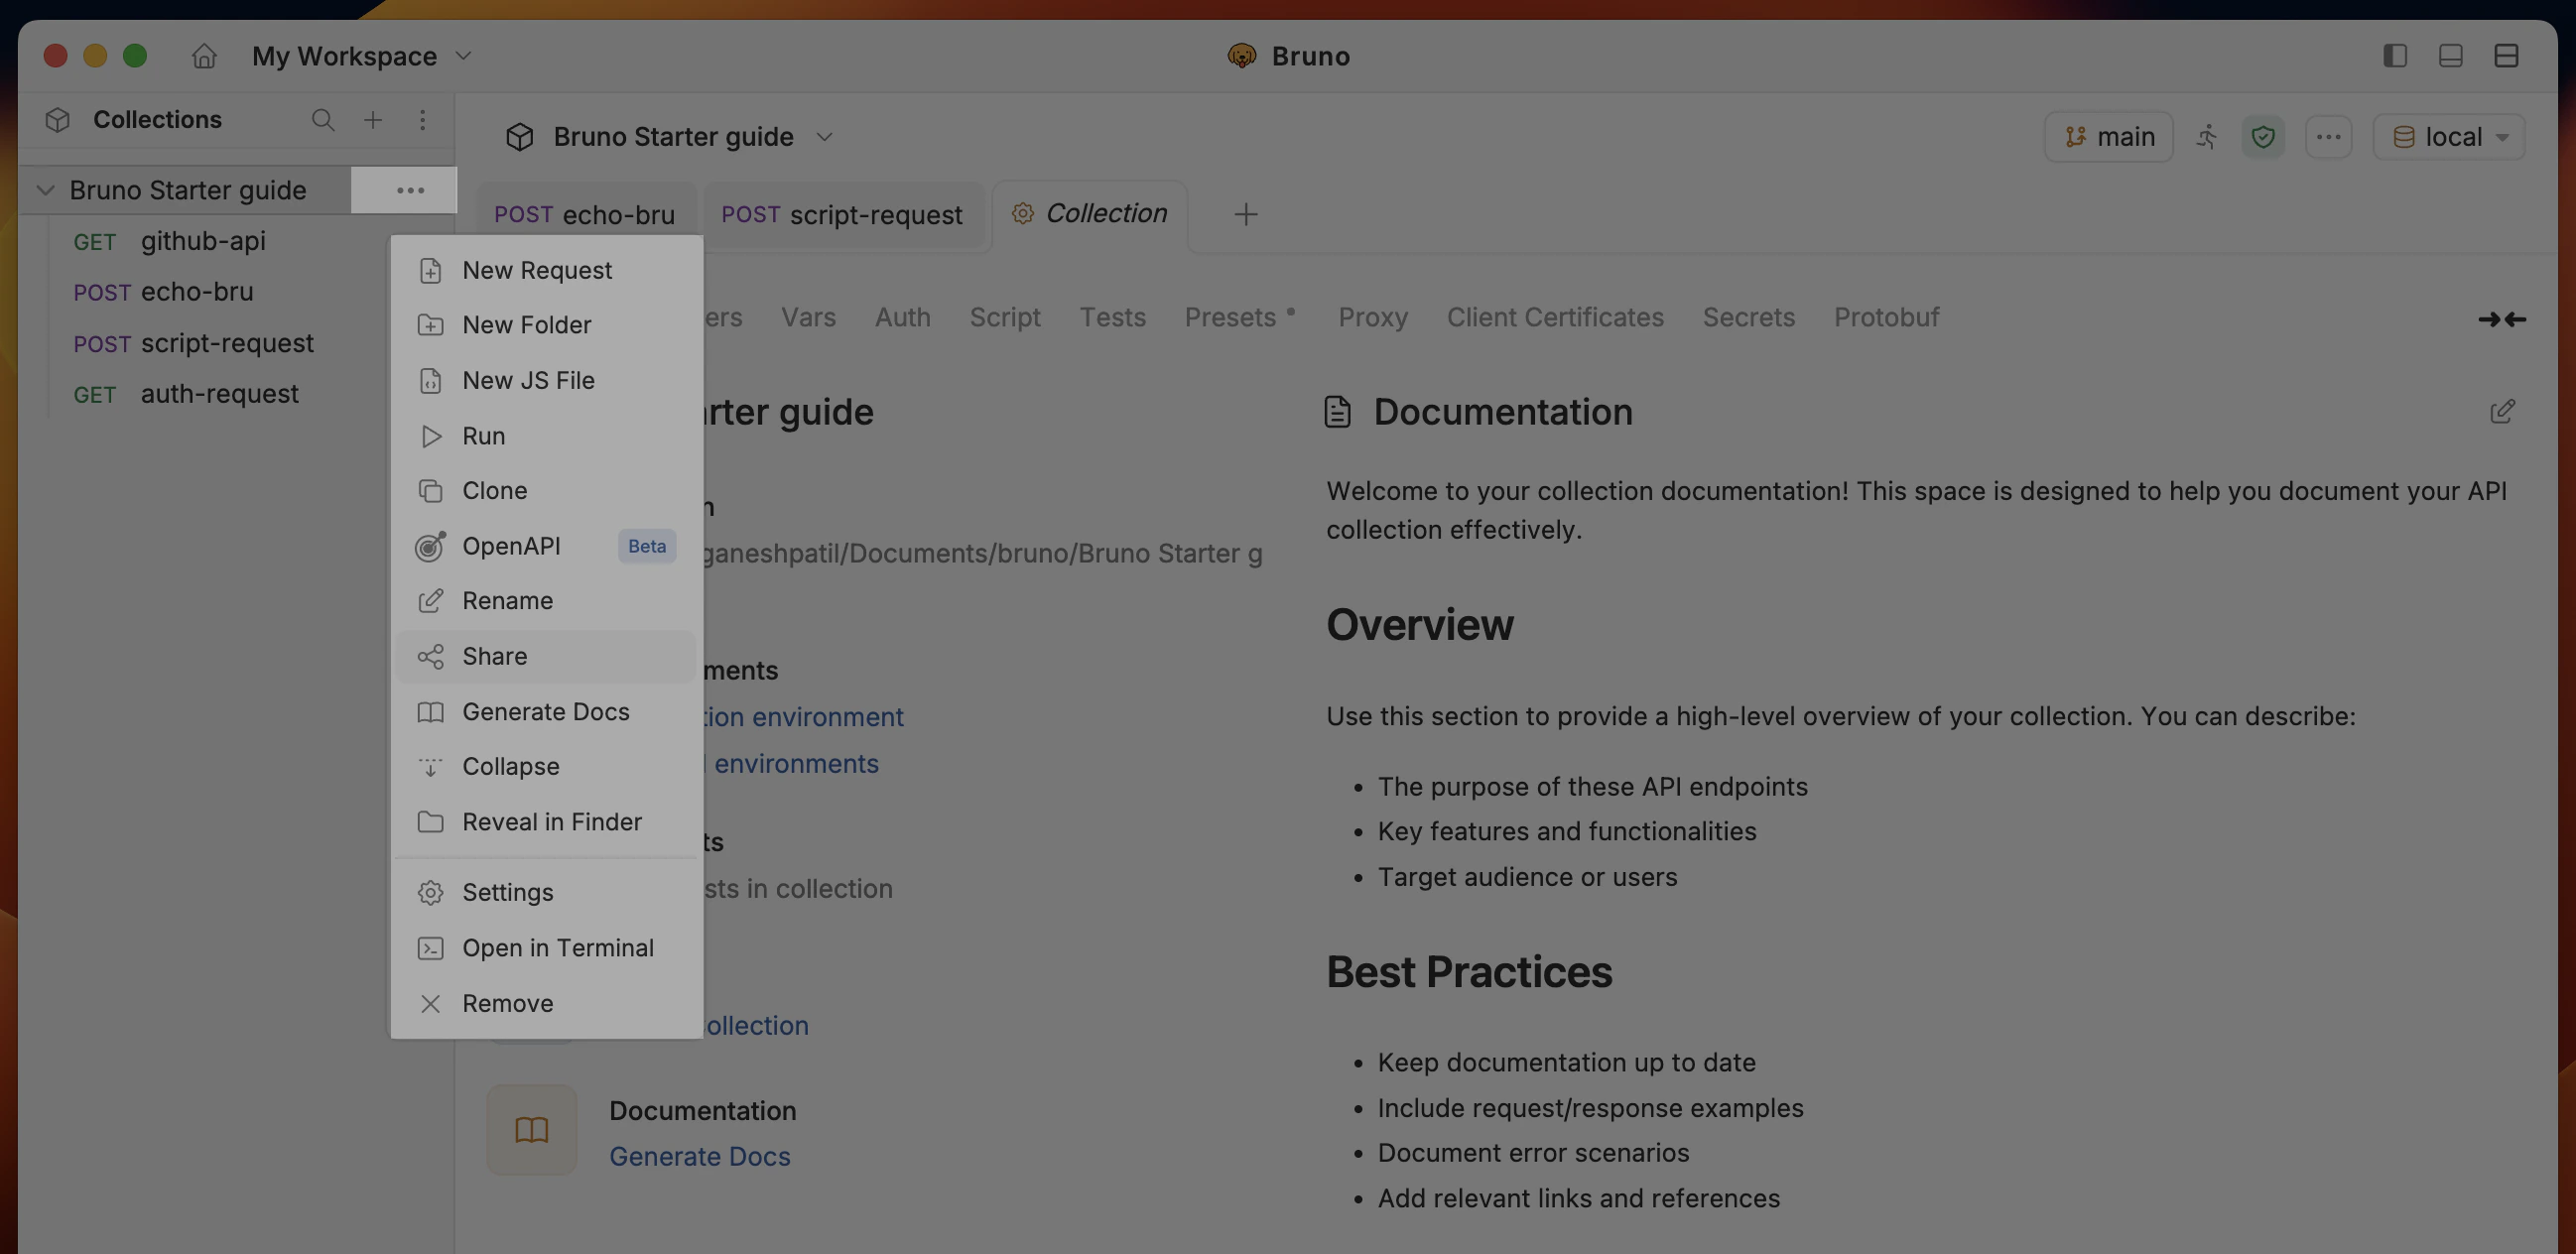 2. Go to the **Export** tab, select **OpenAPI Specification** and click the **Proceed** button.
 3. Enter the name of the file and location, then click the **Create** button.
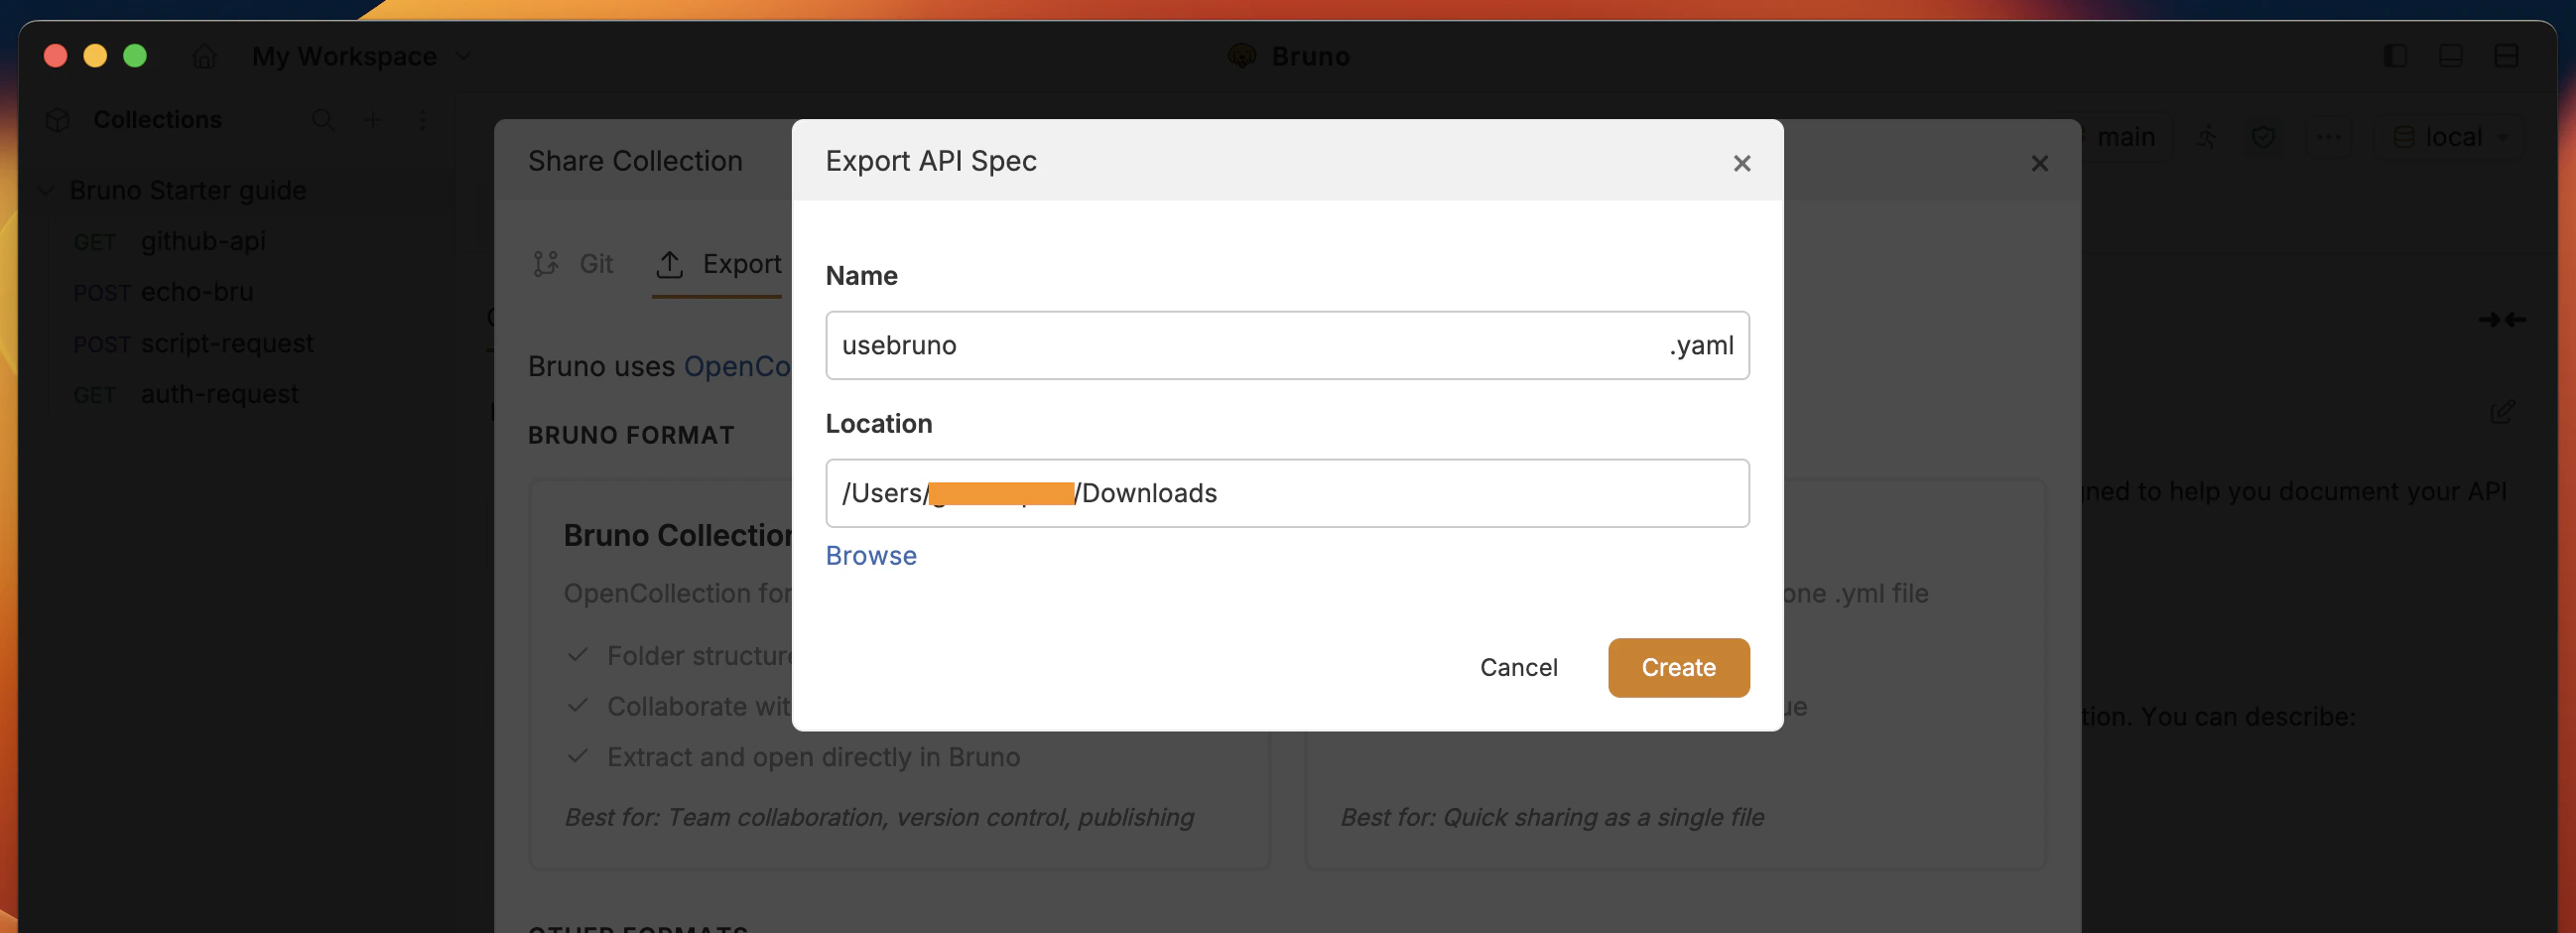 You have successfully exported your collection as an OpenAPI document. The OpenAPI file is created with a `.yaml` extension and stored in your file system.
You can view and import the OpenAPI file in Bruno. Please refer to [OpenAPI Specification](/open-api/overview) for more details.
**Success Criteria:**
* OpenAPI file is created where you chose and opens without errors
* Exported OpenAPI file has a `.yaml` extension.
More: [OpenAPI Specification](/open-api/overview)
***
## 13. Response Visualizer
**Objective:** Use Bruno's response visualizer to render API response data as an interactive table.
1. Create a new request with:
* Request type as **HTTP**
* Request name as `05-visualizer`
* method as **POST**
* URL as `https://echo.usebruno.com`
2. Go to the **Script** → **Post-response** tab and enter the snippet below:
```javascript theme={null}
const rowData = [
{ id: 1, name: "John", role: "Developer" },
{ id: 2, name: "Smith", role: "Designer" },
{ id: 3, name: "Harry", role: "Product Manager" }
];
const columnDefinitions = [
{ field: "id", filter: true, floatingFilter: true },
{ field: "name", filter: true, floatingFilter: true },
{ field: "role", filter: true, floatingFilter: true }
];
bru.visualize('table', {
name: 'tableEmp',
provider: 'ag-grid',
props: {
rowData,
columnDefinitions
}
});
```
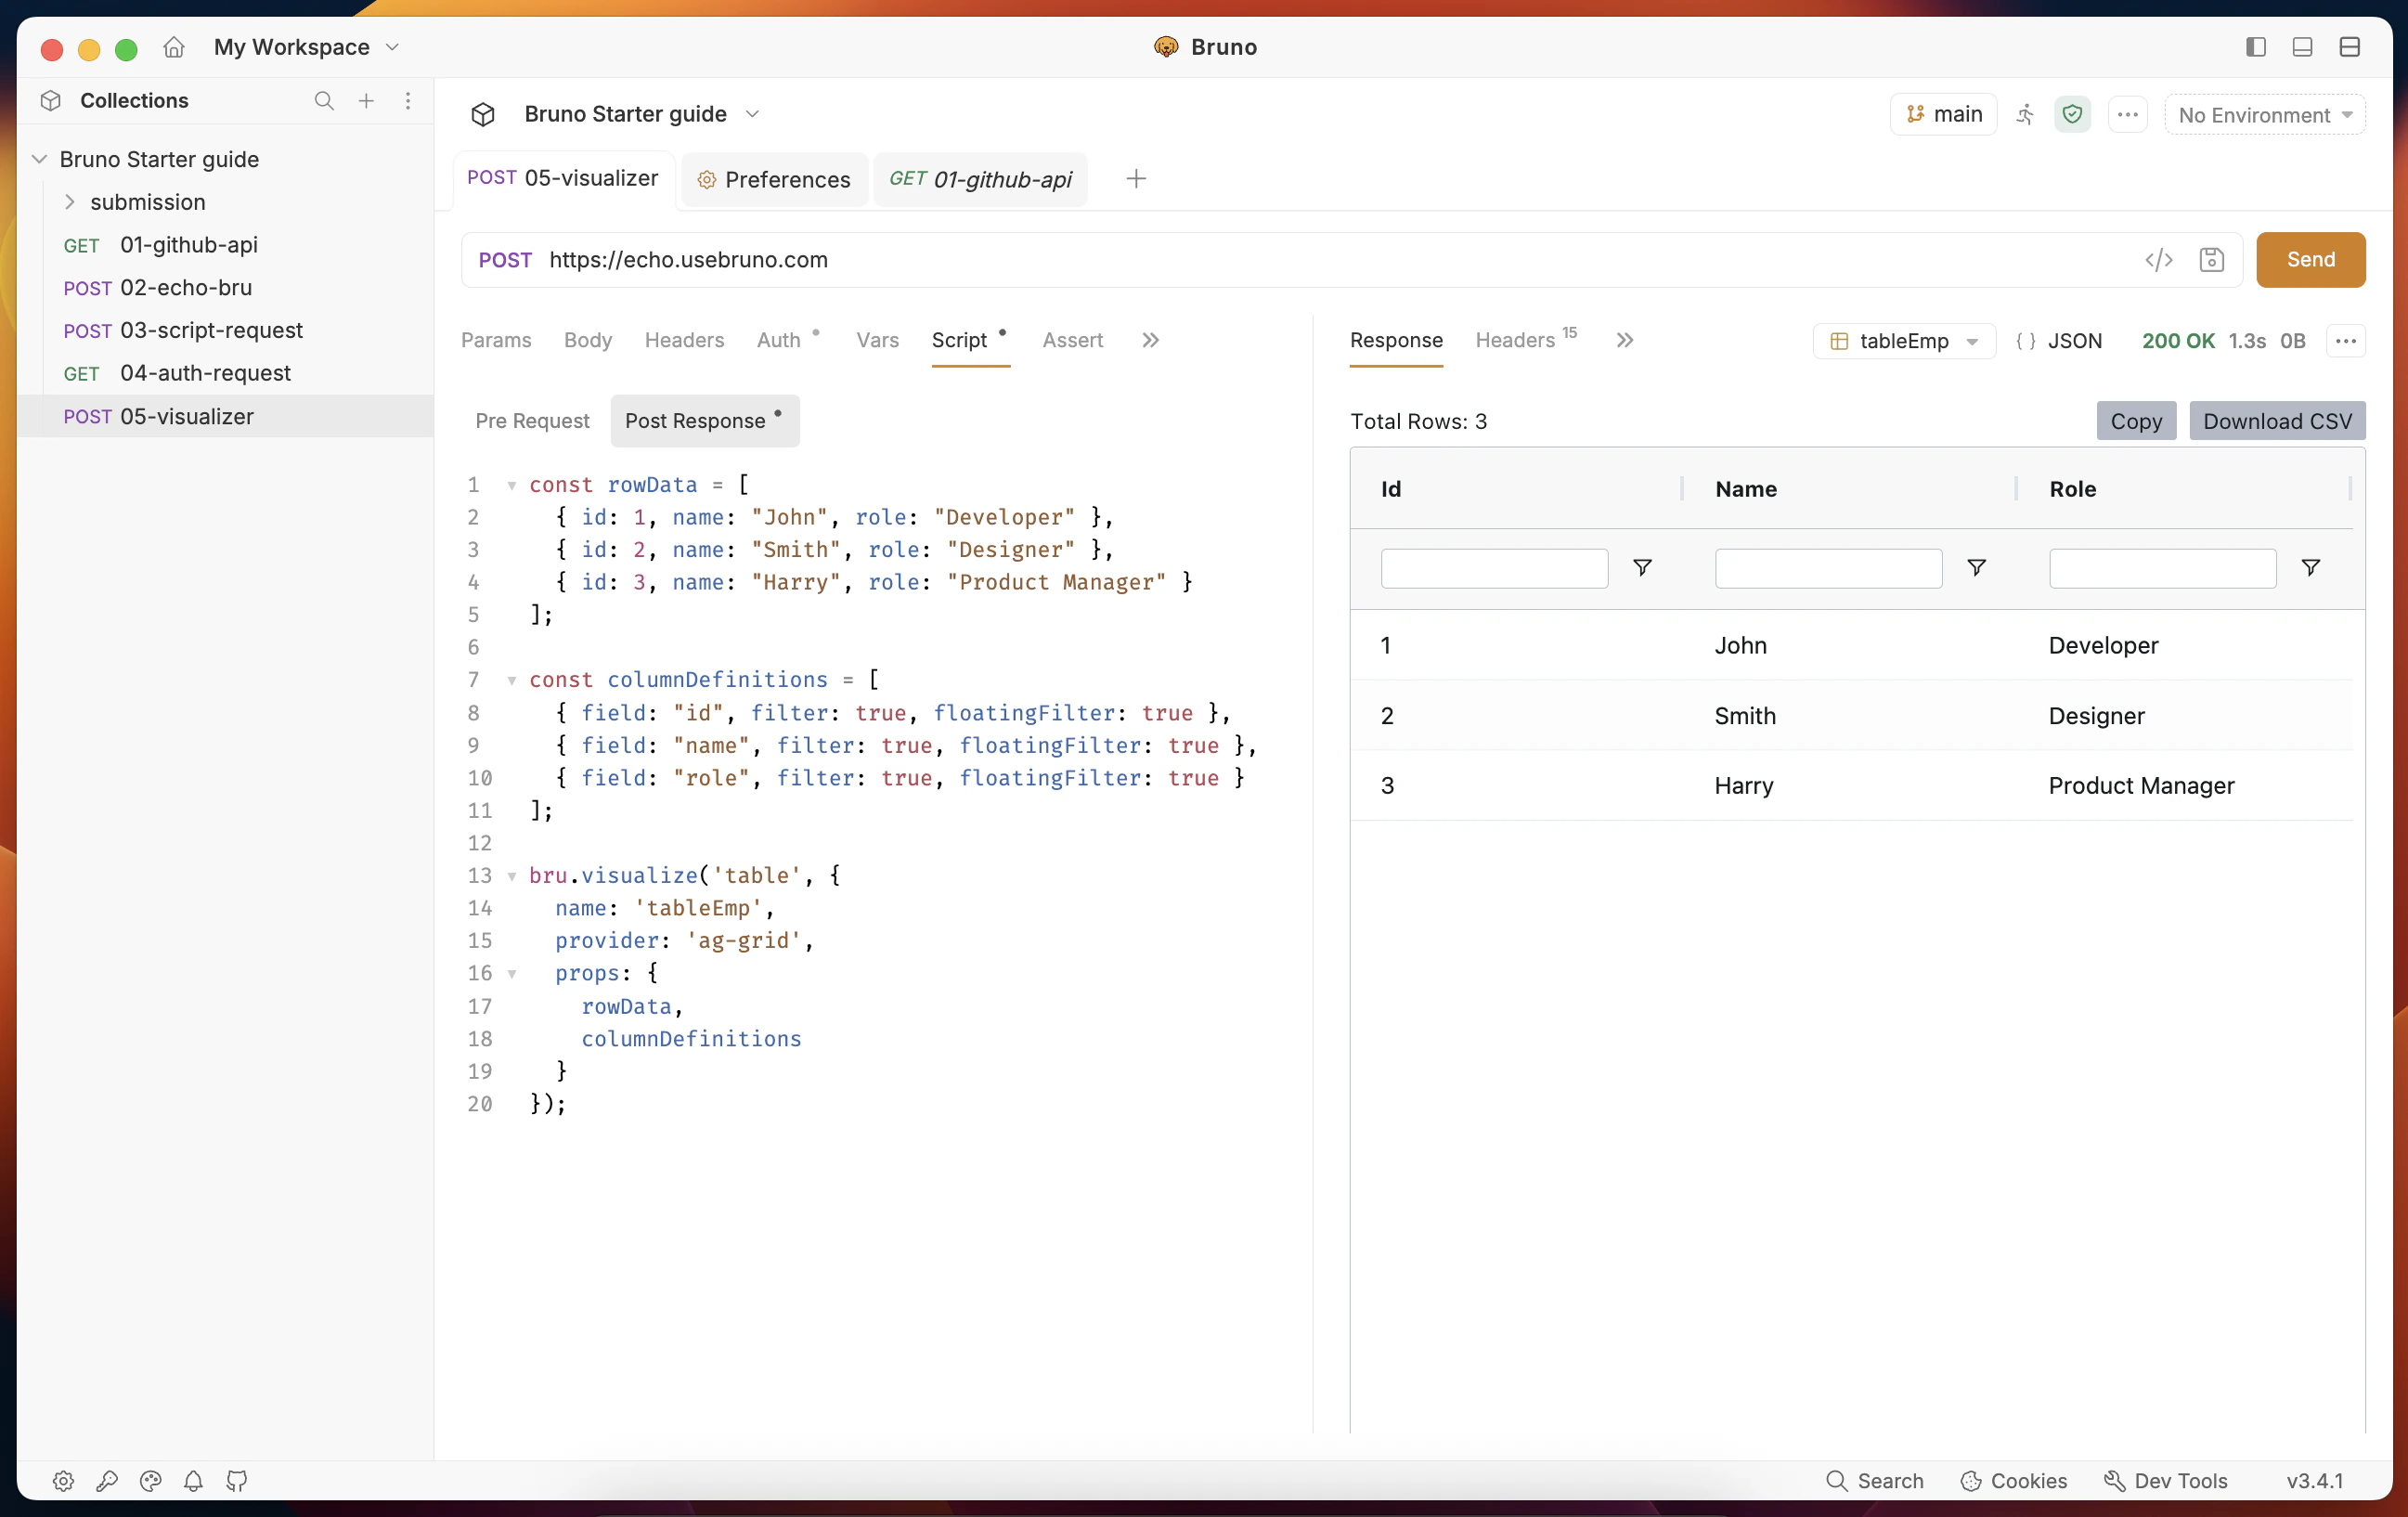
3. Execute request by clicking on Send button or pressing Cmd/Ctrl + Enter.
4. Go to the **Visualize** tab in the response section to see the rendered table.
You have successfully exported your collection as an OpenAPI document. The OpenAPI file is created with a `.yaml` extension and stored in your file system.
You can view and import the OpenAPI file in Bruno. Please refer to [OpenAPI Specification](/open-api/overview) for more details.
**Success Criteria:**
* OpenAPI file is created where you chose and opens without errors
* Exported OpenAPI file has a `.yaml` extension.
More: [OpenAPI Specification](/open-api/overview)
***
## 13. Response Visualizer
**Objective:** Use Bruno's response visualizer to render API response data as an interactive table.
1. Create a new request with:
* Request type as **HTTP**
* Request name as `05-visualizer`
* method as **POST**
* URL as `https://echo.usebruno.com`
2. Go to the **Script** → **Post-response** tab and enter the snippet below:
```javascript theme={null}
const rowData = [
{ id: 1, name: "John", role: "Developer" },
{ id: 2, name: "Smith", role: "Designer" },
{ id: 3, name: "Harry", role: "Product Manager" }
];
const columnDefinitions = [
{ field: "id", filter: true, floatingFilter: true },
{ field: "name", filter: true, floatingFilter: true },
{ field: "role", filter: true, floatingFilter: true }
];
bru.visualize('table', {
name: 'tableEmp',
provider: 'ag-grid',
props: {
rowData,
columnDefinitions
}
});
```
3. Execute request by clicking on Send button or pressing Cmd/Ctrl + Enter.
4. Go to the **Visualize** tab in the response section to see the rendered table.
 **Success Criteria:**
* The post-response script runs without errors.
* The **Visualize** tab displays an interactive table with three rows (John, Smith, Harry) and filterable columns.
More: [Response Visualizer](/advanced-guides/visualize)
***
Congratulations on completing the Quick Start guide! You have learned the basics of Bruno and how to use it to create API requests. Feel free to dive into the advanced guides to learn more about Bruno.
* **Auth** — [Authentication](/auth/overview)
* **Secrets** — [.env and secret managers](/secrets-management/dotenv-file)
* **Git Collaboration** — [Git integration (GUI)](/git-integration/using-gui/intro)
***
**Success Criteria:**
* The post-response script runs without errors.
* The **Visualize** tab displays an interactive table with three rows (John, Smith, Harry) and filterable columns.
More: [Response Visualizer](/advanced-guides/visualize)
***
Congratulations on completing the Quick Start guide! You have learned the basics of Bruno and how to use it to create API requests. Feel free to dive into the advanced guides to learn more about Bruno.
* **Auth** — [Authentication](/auth/overview)
* **Secrets** — [.env and secret managers](/secrets-management/dotenv-file)
* **Git Collaboration** — [Git integration (GUI)](/git-integration/using-gui/intro)
***