> ## Documentation Index
> Fetch the complete documentation index at: https://docs.usebruno.com/llms.txt
> Use this file to discover all available pages before exploring further.
# Provider
export const PremiumBadge = ({noLink}) => {
const badge =
PREMIUM
;
if (noLink) {
return badge;
}
return
{badge}
;
};
This guide covers Git operations for team members who create and share collections.
## Free Features
The following features are available in the **free version** starting from Bruno 3.0.0.
### Initializing Git
Initializing Git in Bruno is the first step towards managing your API collections with version control. It's easy and quick to set up. Follow the steps below to initialize Git.
1. Launch the **Bruno app**.
2. Navigate to the collection you want to initialize with Git.
3. Click on the **Git Icon** in the top-right corner of the navbar.
4. Click the **Initialize** button to set up your collection with Git.
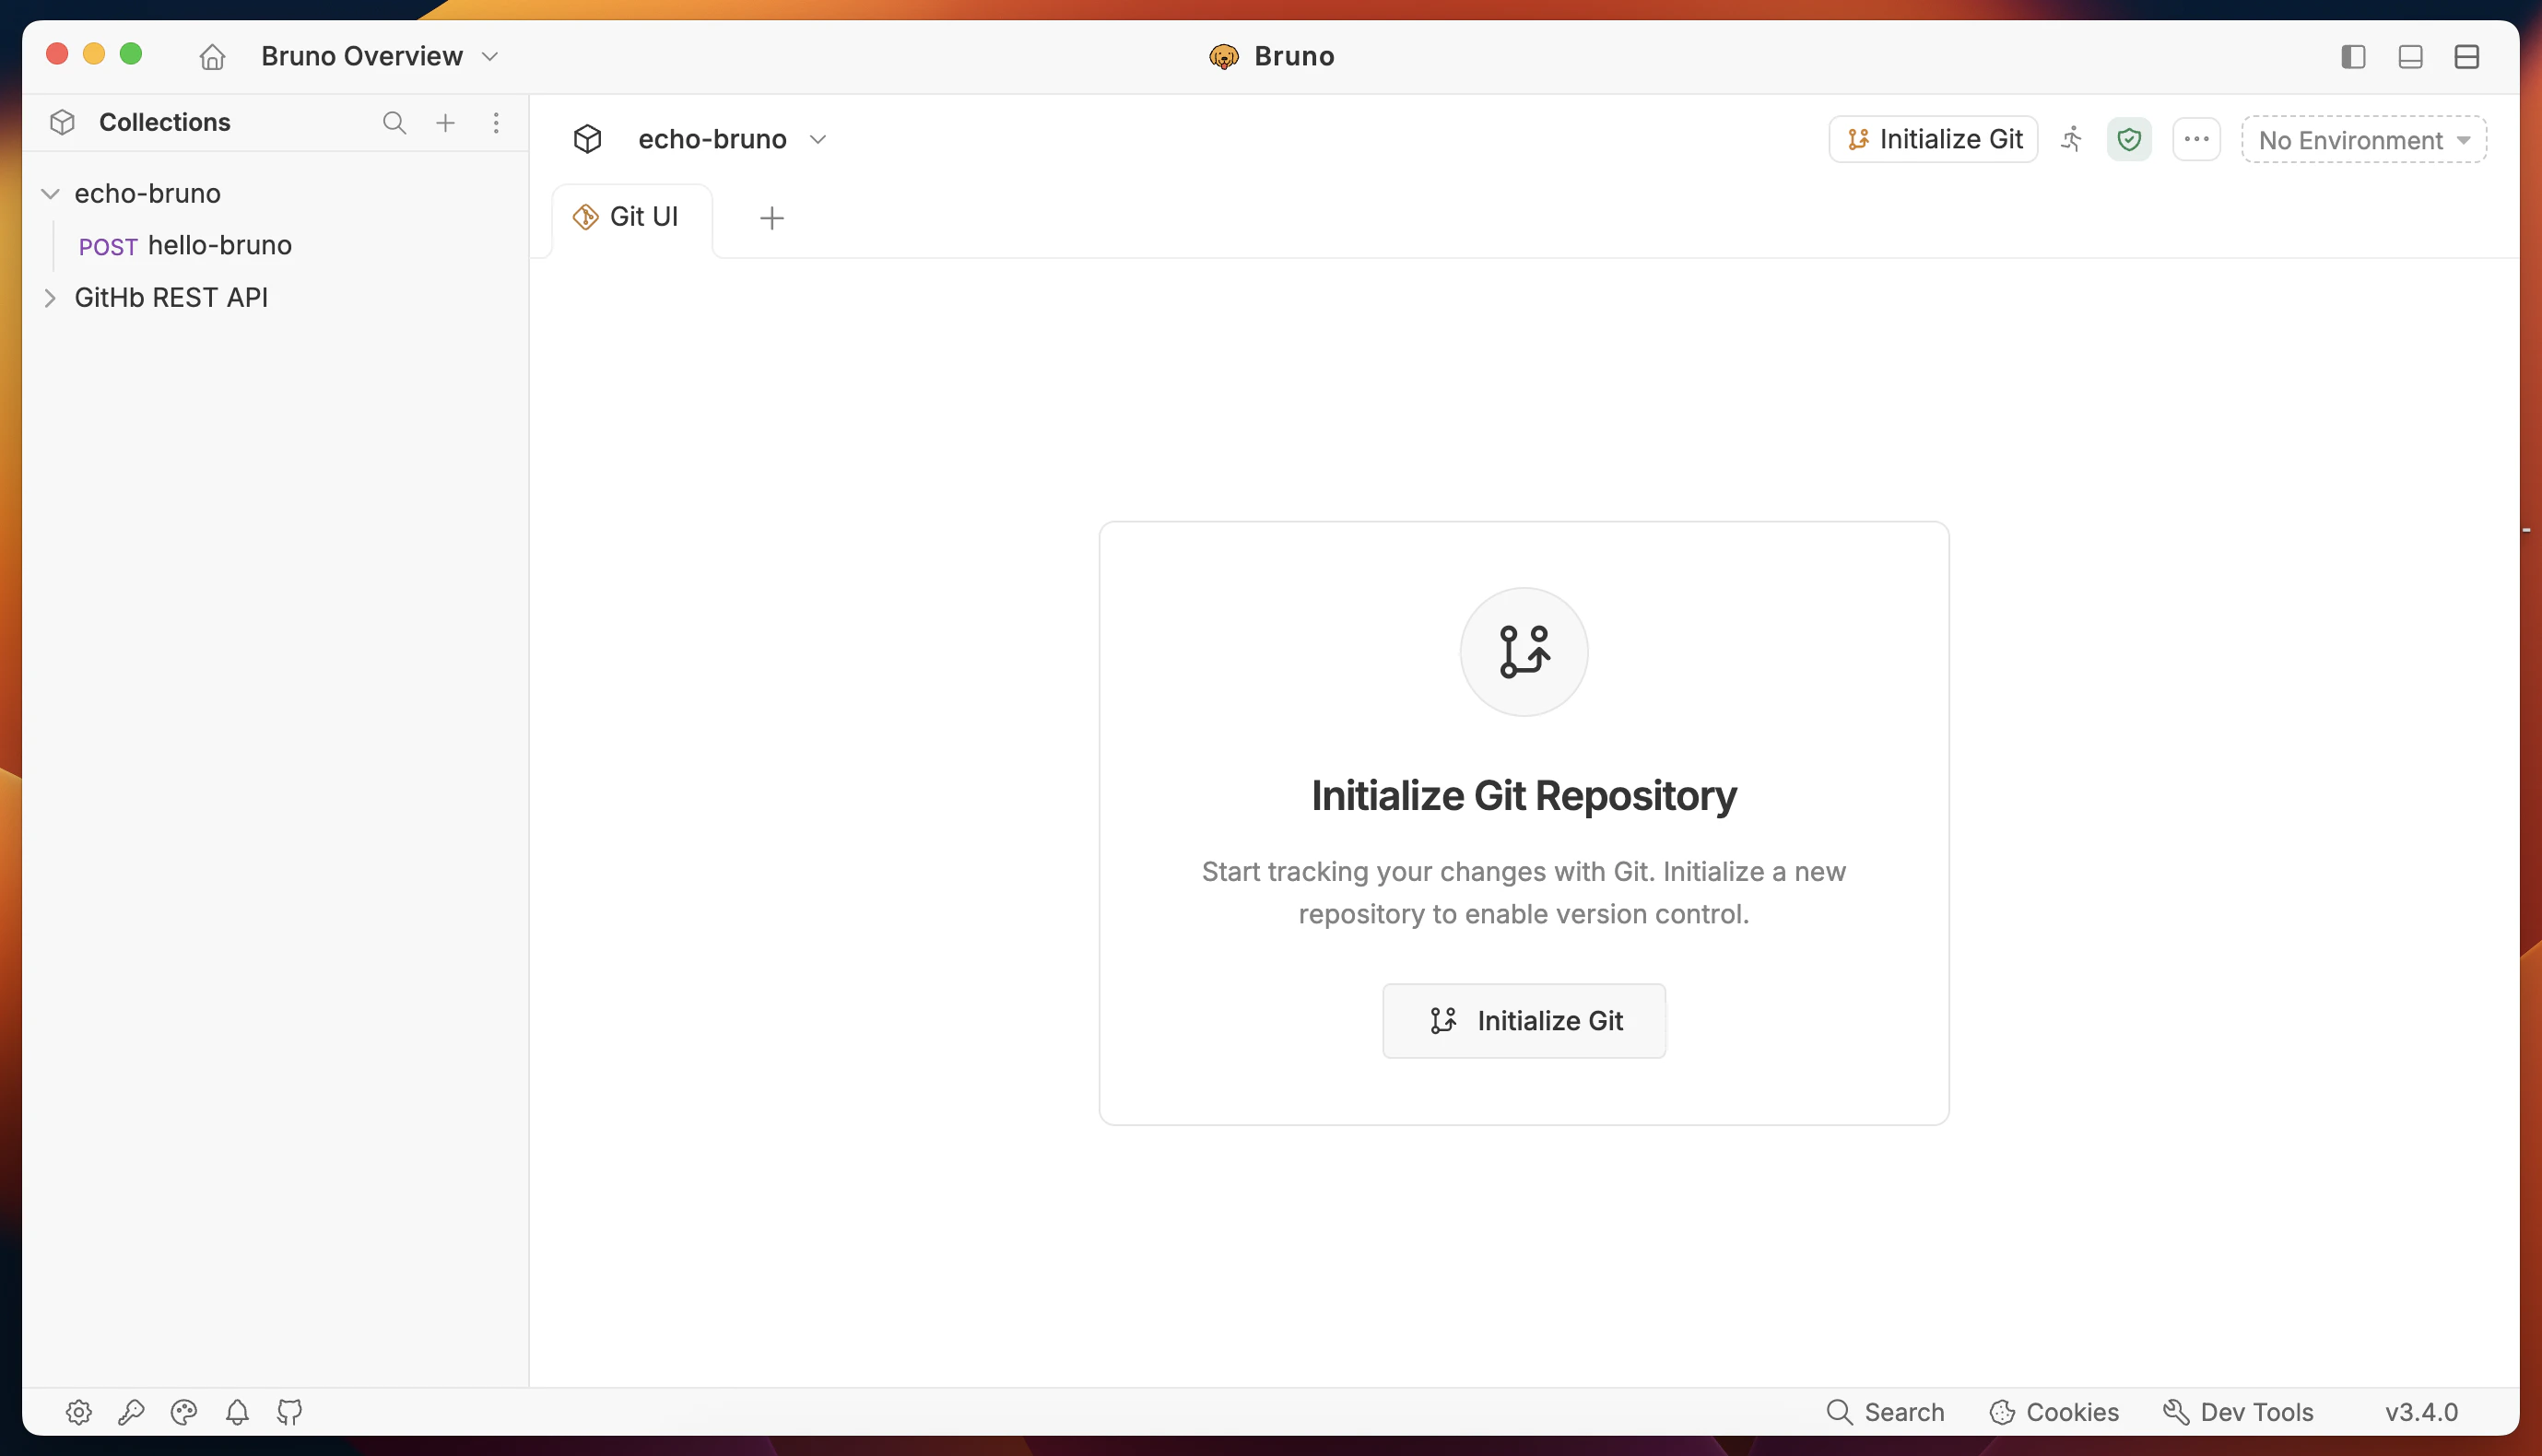 This allows you to perform other Git operations such as viewing diffs, pulling changes, and more.
### Viewing Diffs
Before committing changes, you can view the differences between your local changes and the previous version. Bruno provides two diff viewing modes to help you understand changes better.
1. Go to **Git UI**.
2. Click on any modified file to see the diff view.
3. Review the changes highlighted in the diff viewer.
This allows you to perform other Git operations such as viewing diffs, pulling changes, and more.
### Viewing Diffs
Before committing changes, you can view the differences between your local changes and the previous version. Bruno provides two diff viewing modes to help you understand changes better.
1. Go to **Git UI**.
2. Click on any modified file to see the diff view.
3. Review the changes highlighted in the diff viewer.
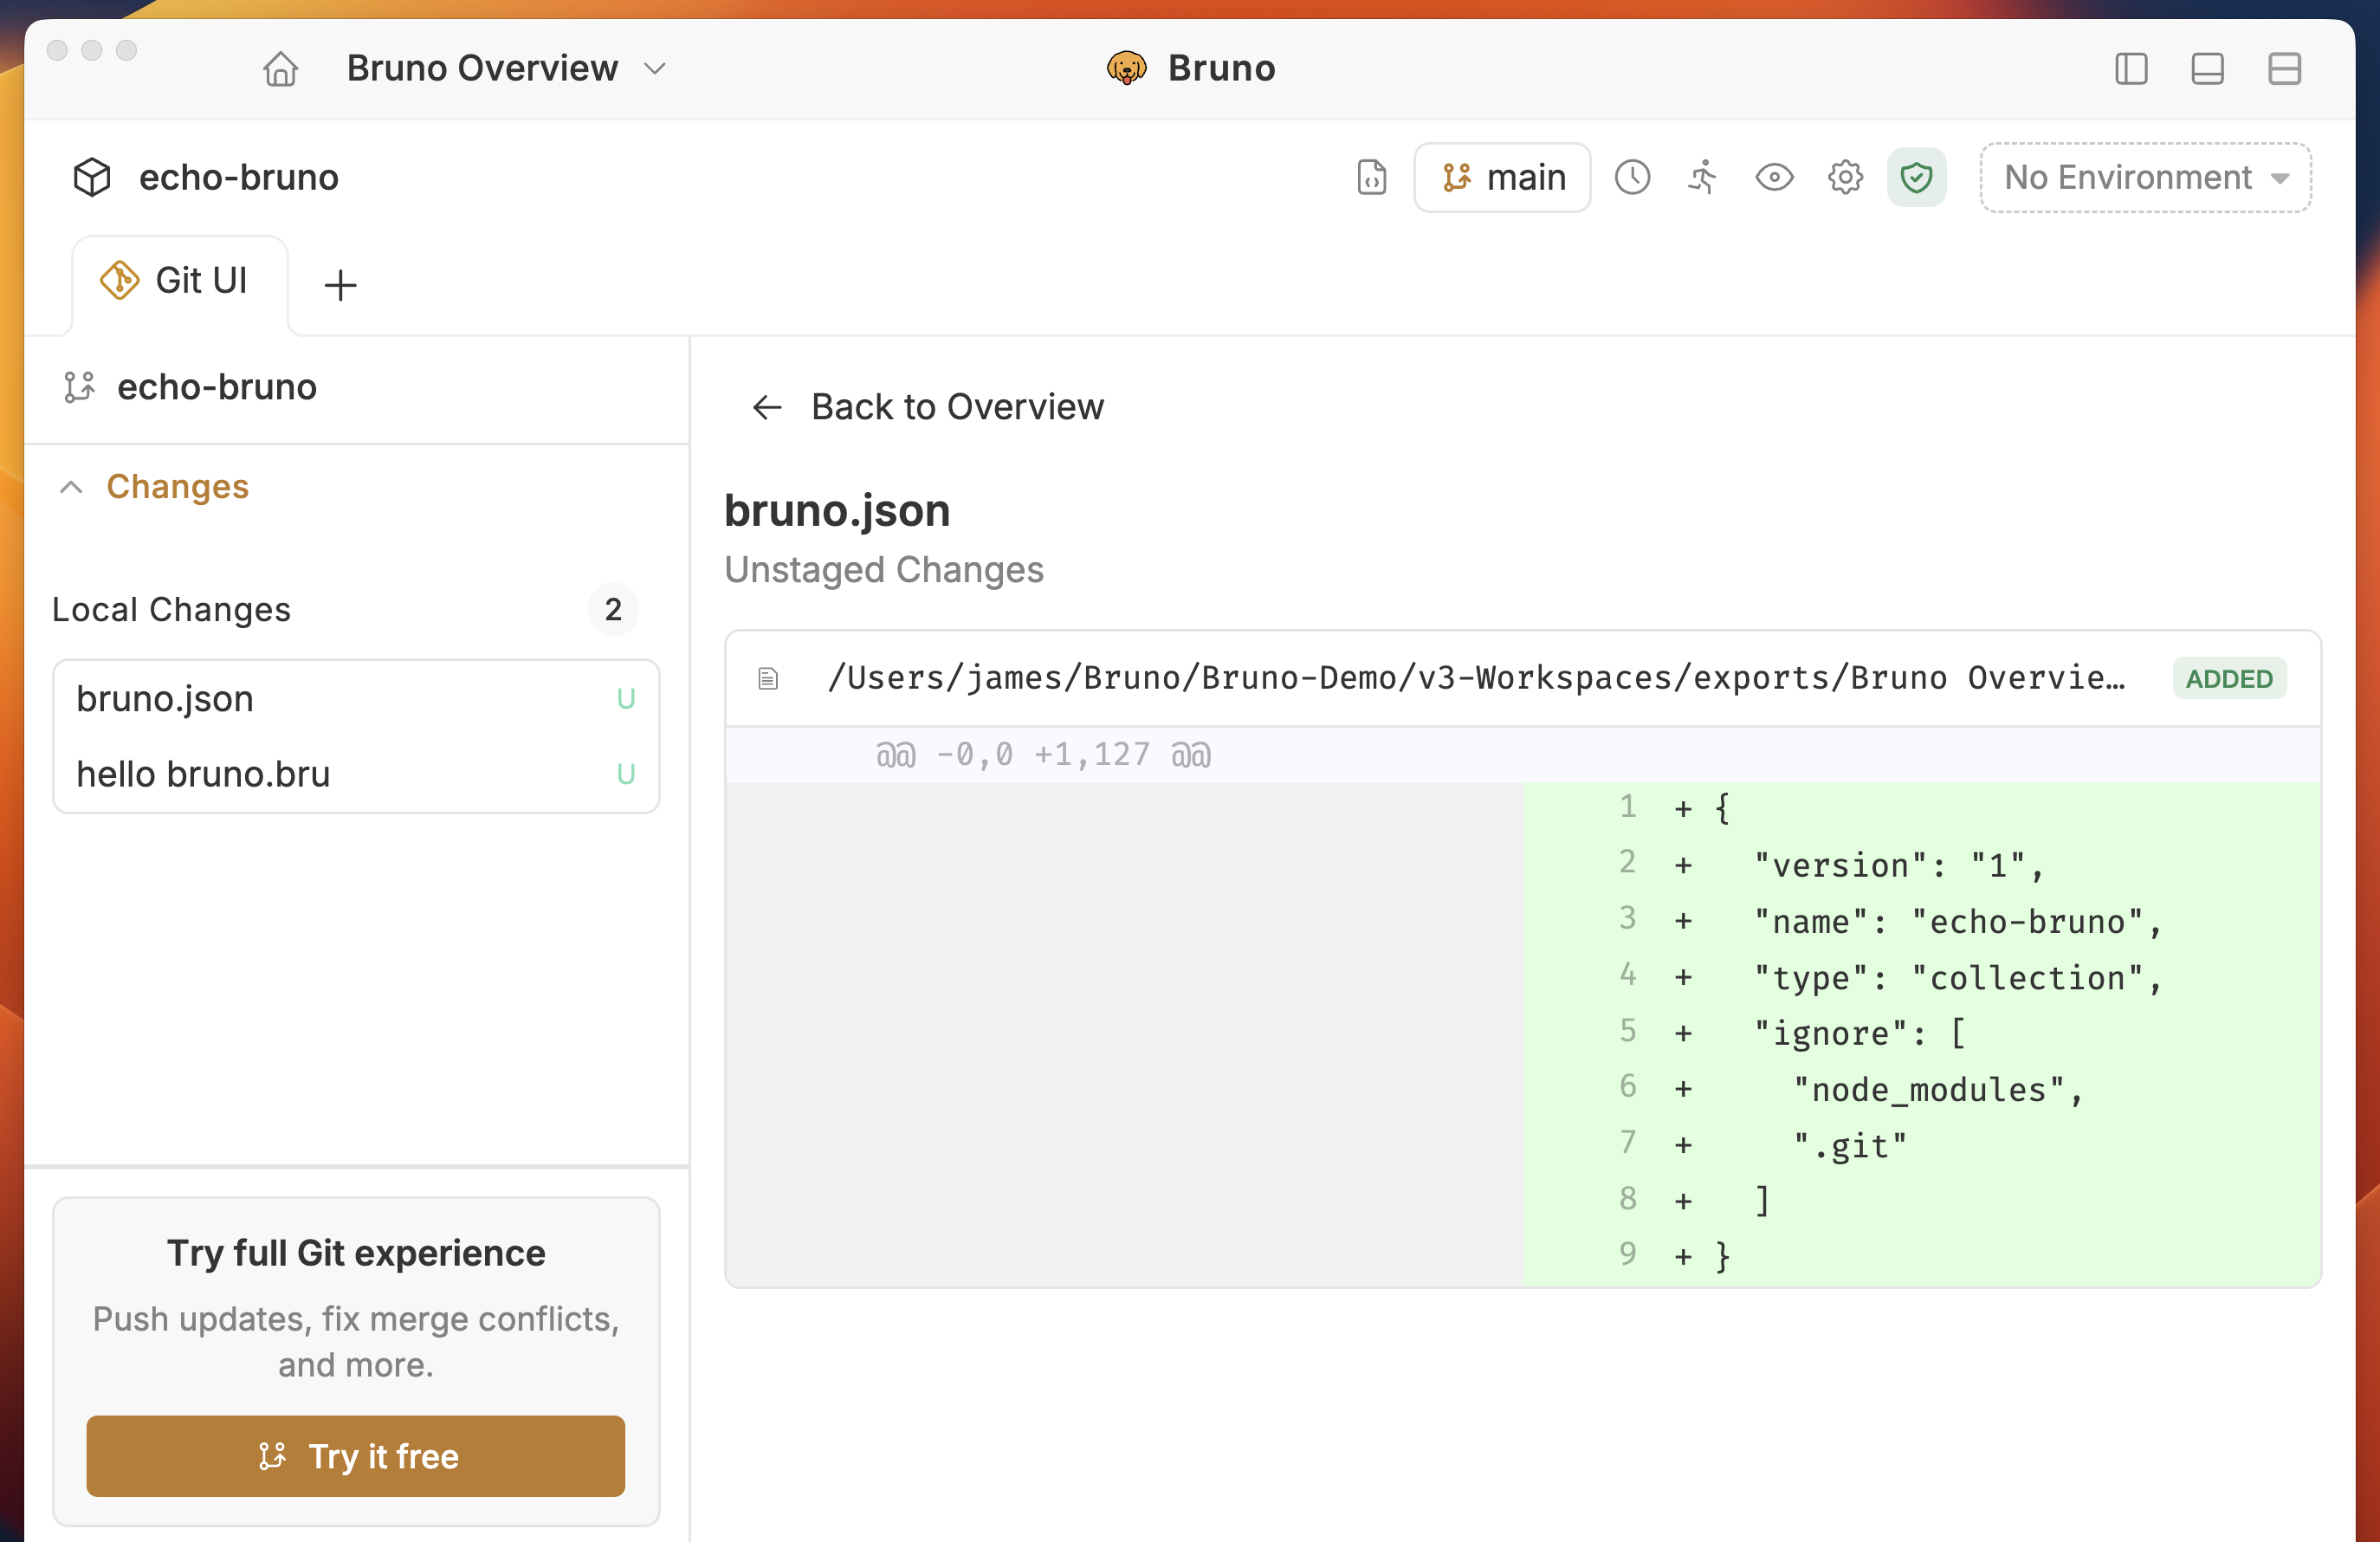 #### Text-Based Diff View
The **Text-Based Diff** view displays changes in a traditional side-by-side or unified format, showing additions and deletions line-by-line. This is ideal for reviewing detailed code changes.
#### Text-Based Diff View
The **Text-Based Diff** view displays changes in a traditional side-by-side or unified format, showing additions and deletions line-by-line. This is ideal for reviewing detailed code changes.
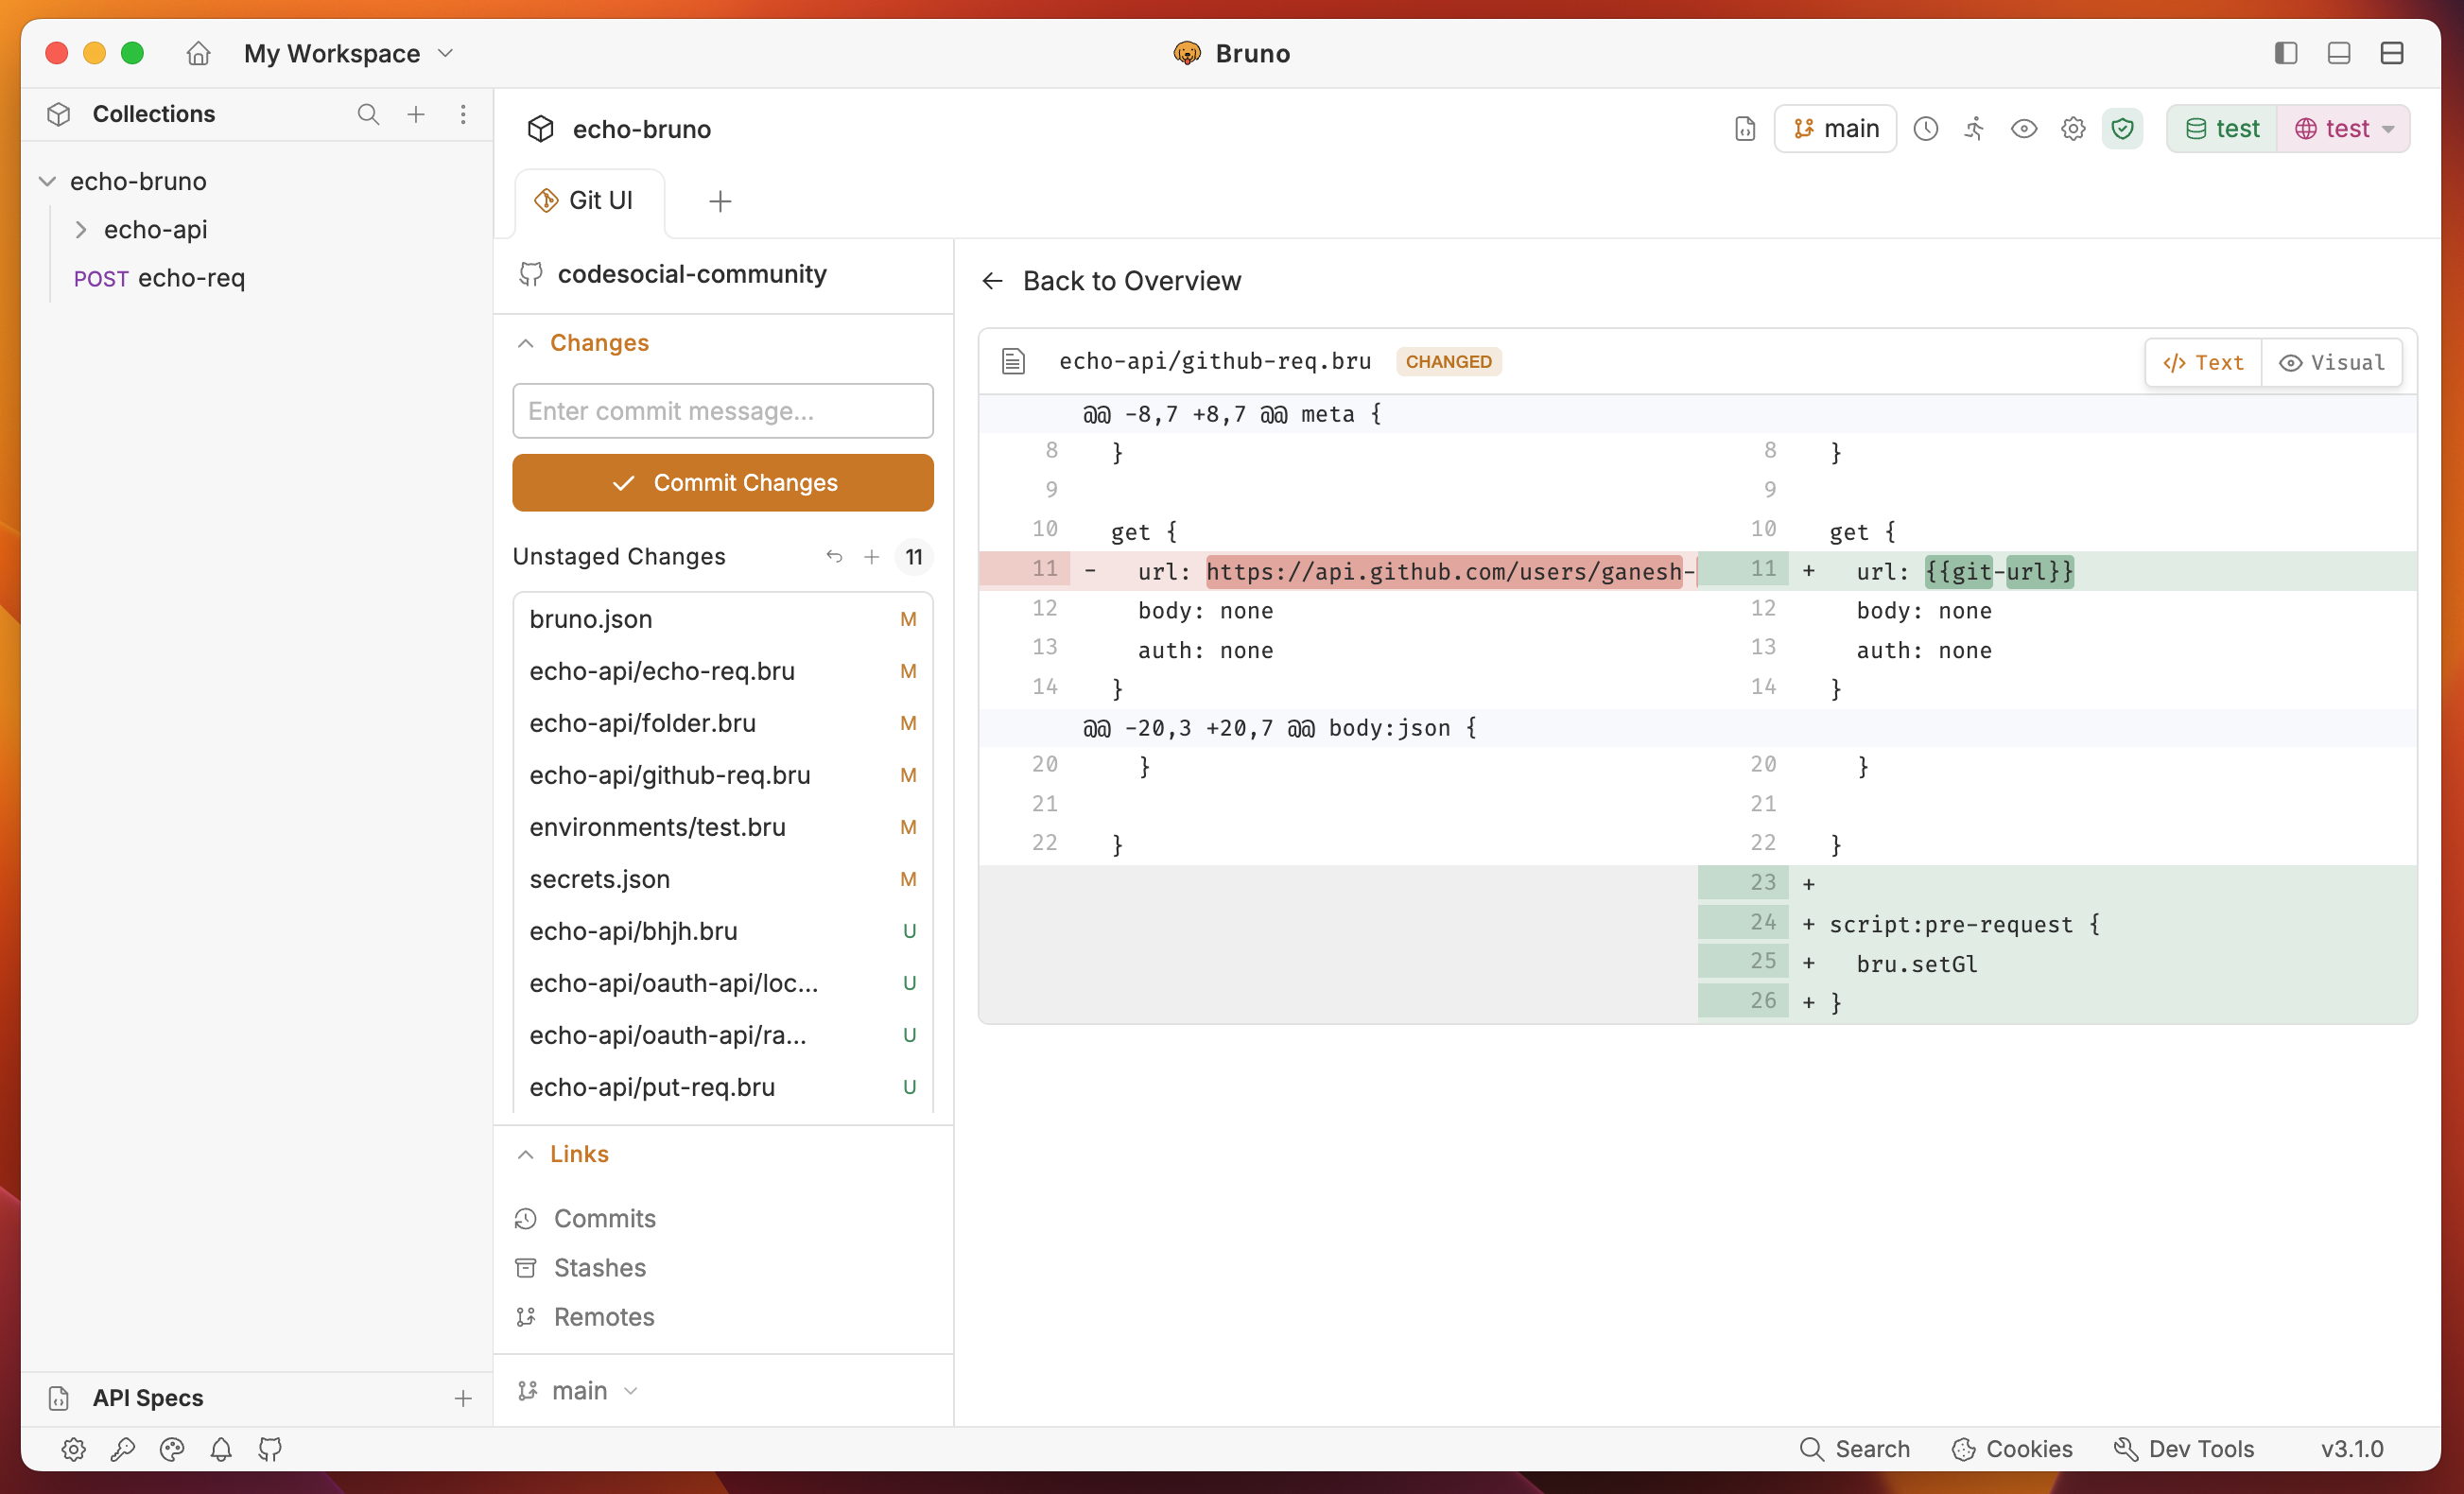 #### Visual-Based Diff View
The **Visual-Based Diff** view provides a more intuitive, visual representation of changes. This mode highlights modifications in a user-friendly format, making it easier to understand structural changes at a glance.
#### Visual-Based Diff View
The **Visual-Based Diff** view provides a more intuitive, visual representation of changes. This mode highlights modifications in a user-friendly format, making it easier to understand structural changes at a glance.
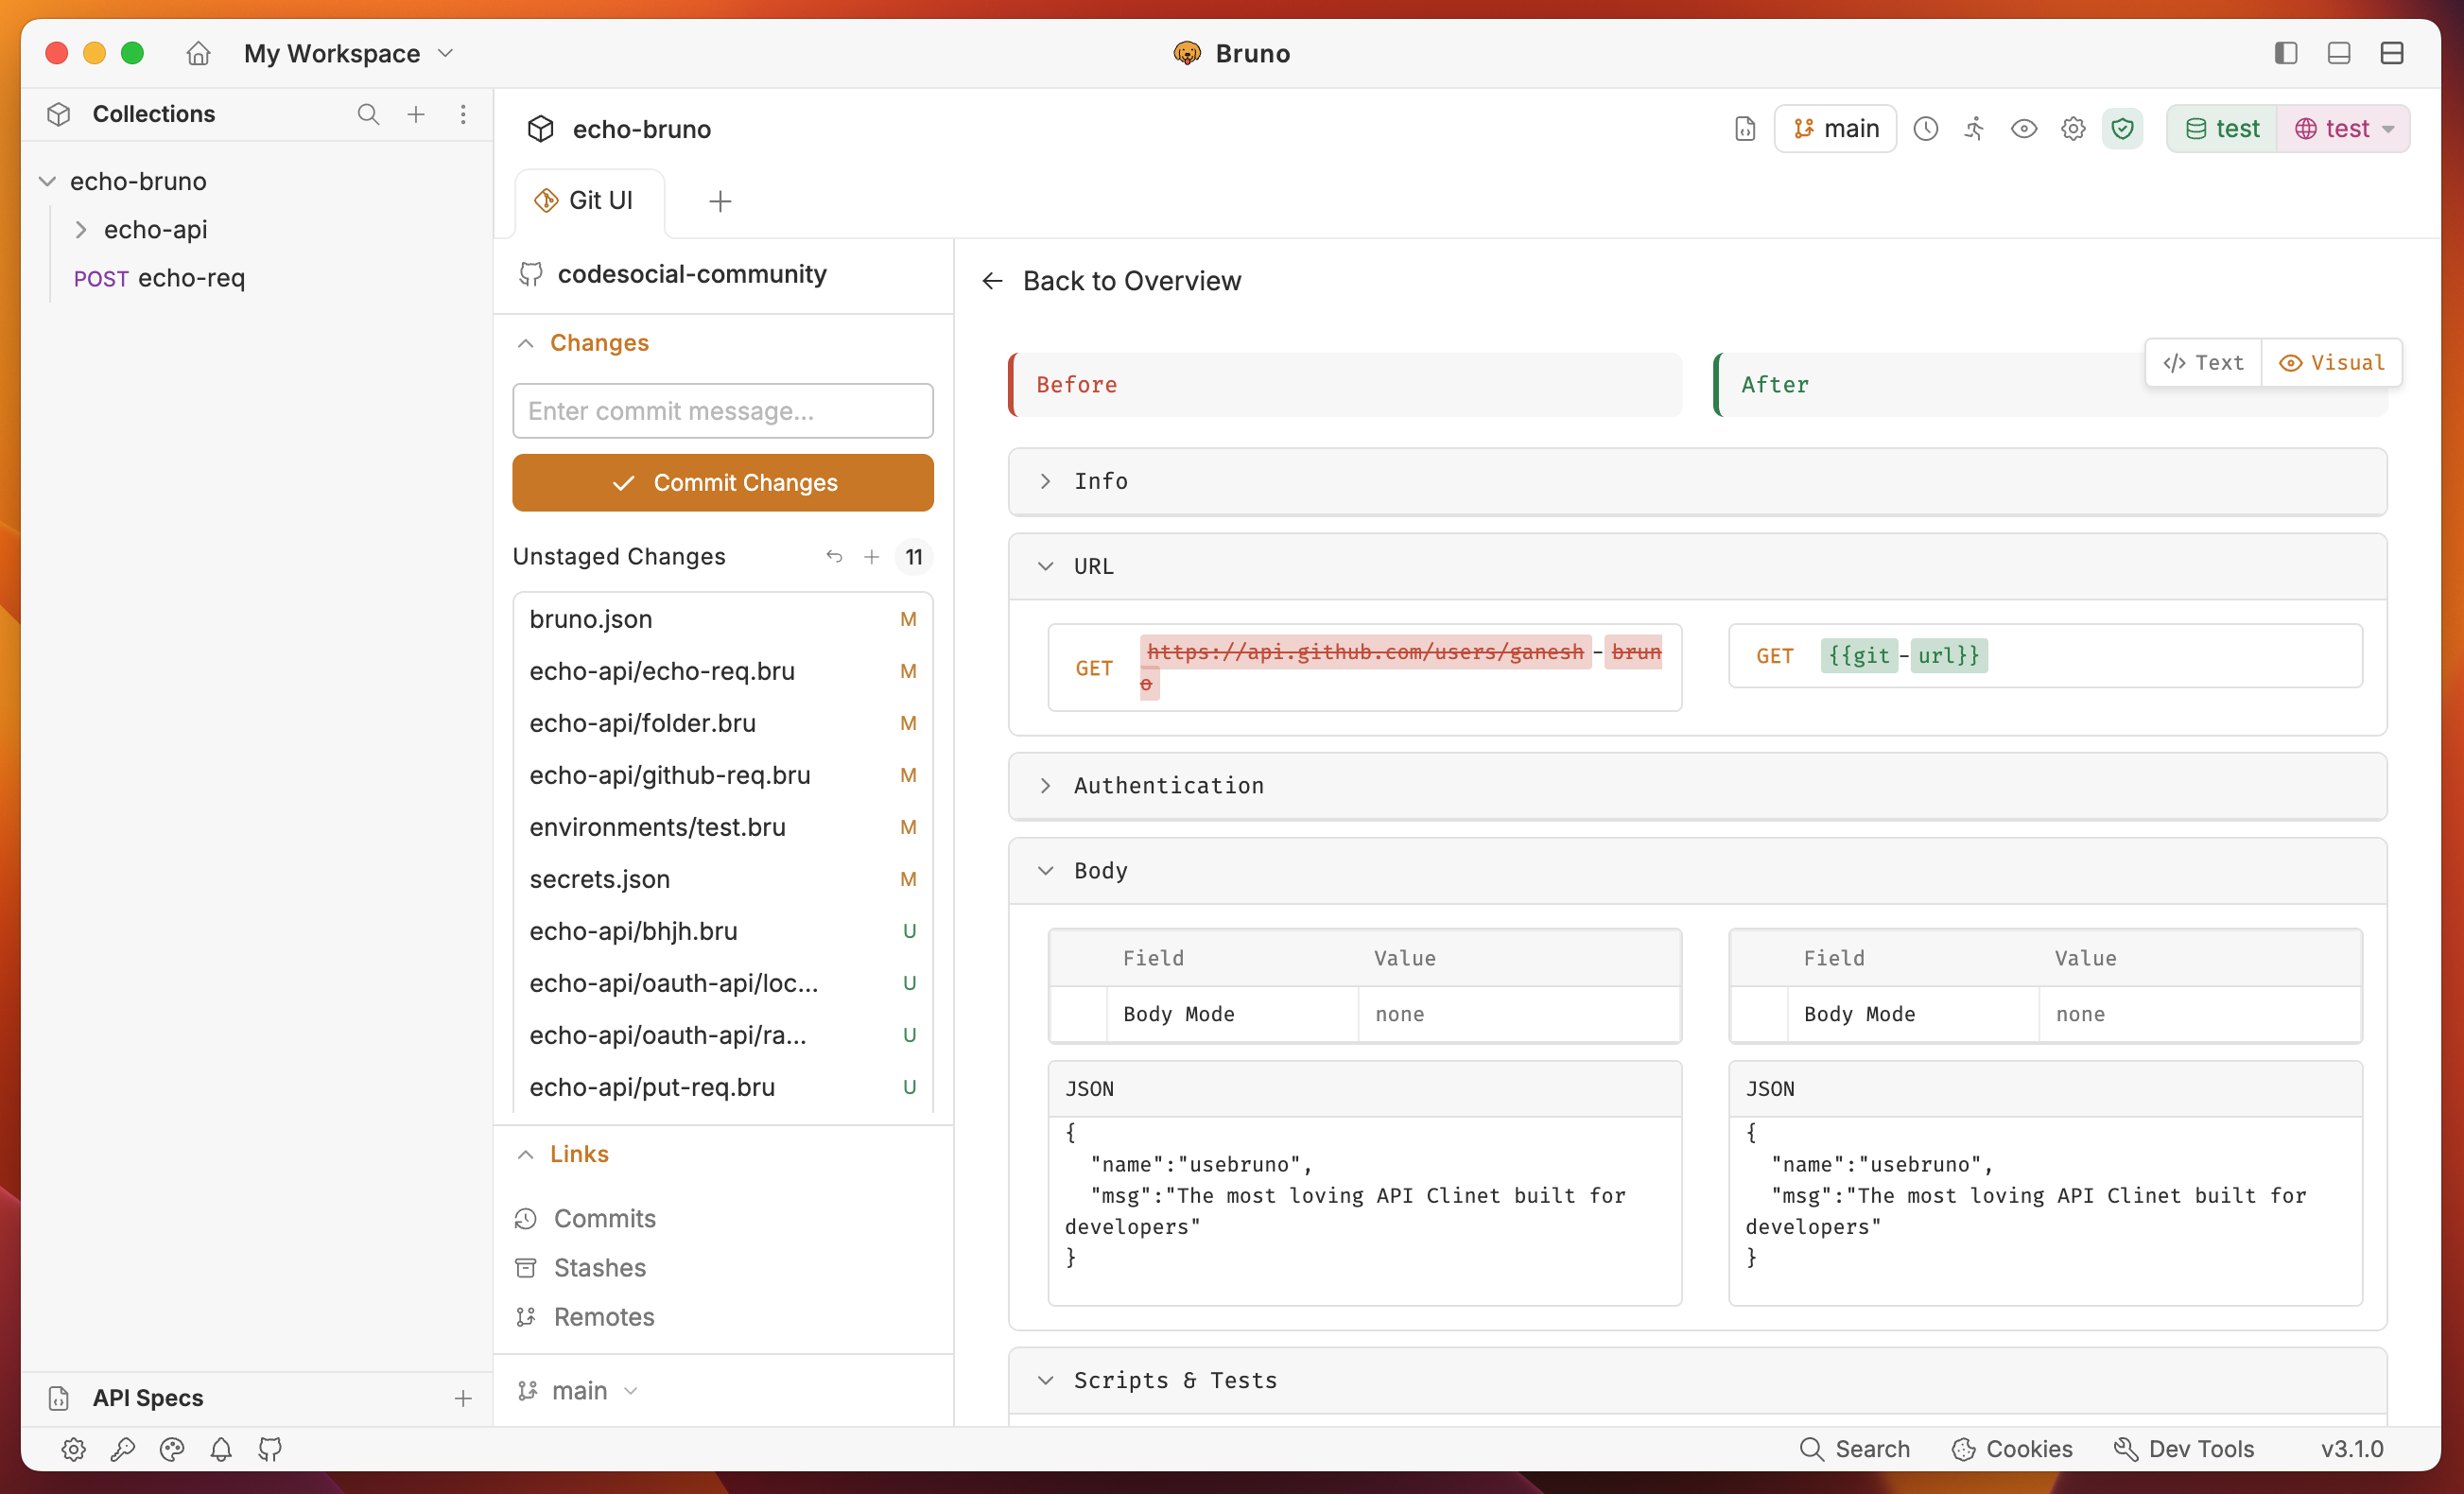 You can switch between these views to choose the format that best suits your workflow and helps you understand exactly what has changed before deciding to commit.
***
## Pro & Ultimate Features
The following features require [Pro or Ultimate](https://www.usebruno.com/pricing) editions.
### Connecting to Remote Repository
Once you have initialized your collection, the next step is to connect it to a remote Git repository. Bruno gives you two ways to do this:
* **[Create a new GitHub repository directly from Bruno](#create-a-new-github-repository-from-bruno)** — recommended for new collections. Bruno creates the repo on GitHub for you, wires up the remote, and pushes the initial commit, all without leaving the app.
* **[Connect to an existing repository](#connect-to-an-existing-repository)** — use this if you already have a repo on GitHub, GitLab, Bitbucket, or any other Git provider.
#### Create a new GitHub repository from Bruno
After you initialize Git in a collection that has no remote yet, Bruno shows a **Create a repository on GitHub** prompt in the Git UI. This lets you create the repo on GitHub, set it as the remote, and push your local branch — all in one flow.
You can switch between these views to choose the format that best suits your workflow and helps you understand exactly what has changed before deciding to commit.
***
## Pro & Ultimate Features
The following features require [Pro or Ultimate](https://www.usebruno.com/pricing) editions.
### Connecting to Remote Repository
Once you have initialized your collection, the next step is to connect it to a remote Git repository. Bruno gives you two ways to do this:
* **[Create a new GitHub repository directly from Bruno](#create-a-new-github-repository-from-bruno)** — recommended for new collections. Bruno creates the repo on GitHub for you, wires up the remote, and pushes the initial commit, all without leaving the app.
* **[Connect to an existing repository](#connect-to-an-existing-repository)** — use this if you already have a repo on GitHub, GitLab, Bitbucket, or any other Git provider.
#### Create a new GitHub repository from Bruno
After you initialize Git in a collection that has no remote yet, Bruno shows a **Create a repository on GitHub** prompt in the Git UI. This lets you create the repo on GitHub, set it as the remote, and push your local branch — all in one flow.
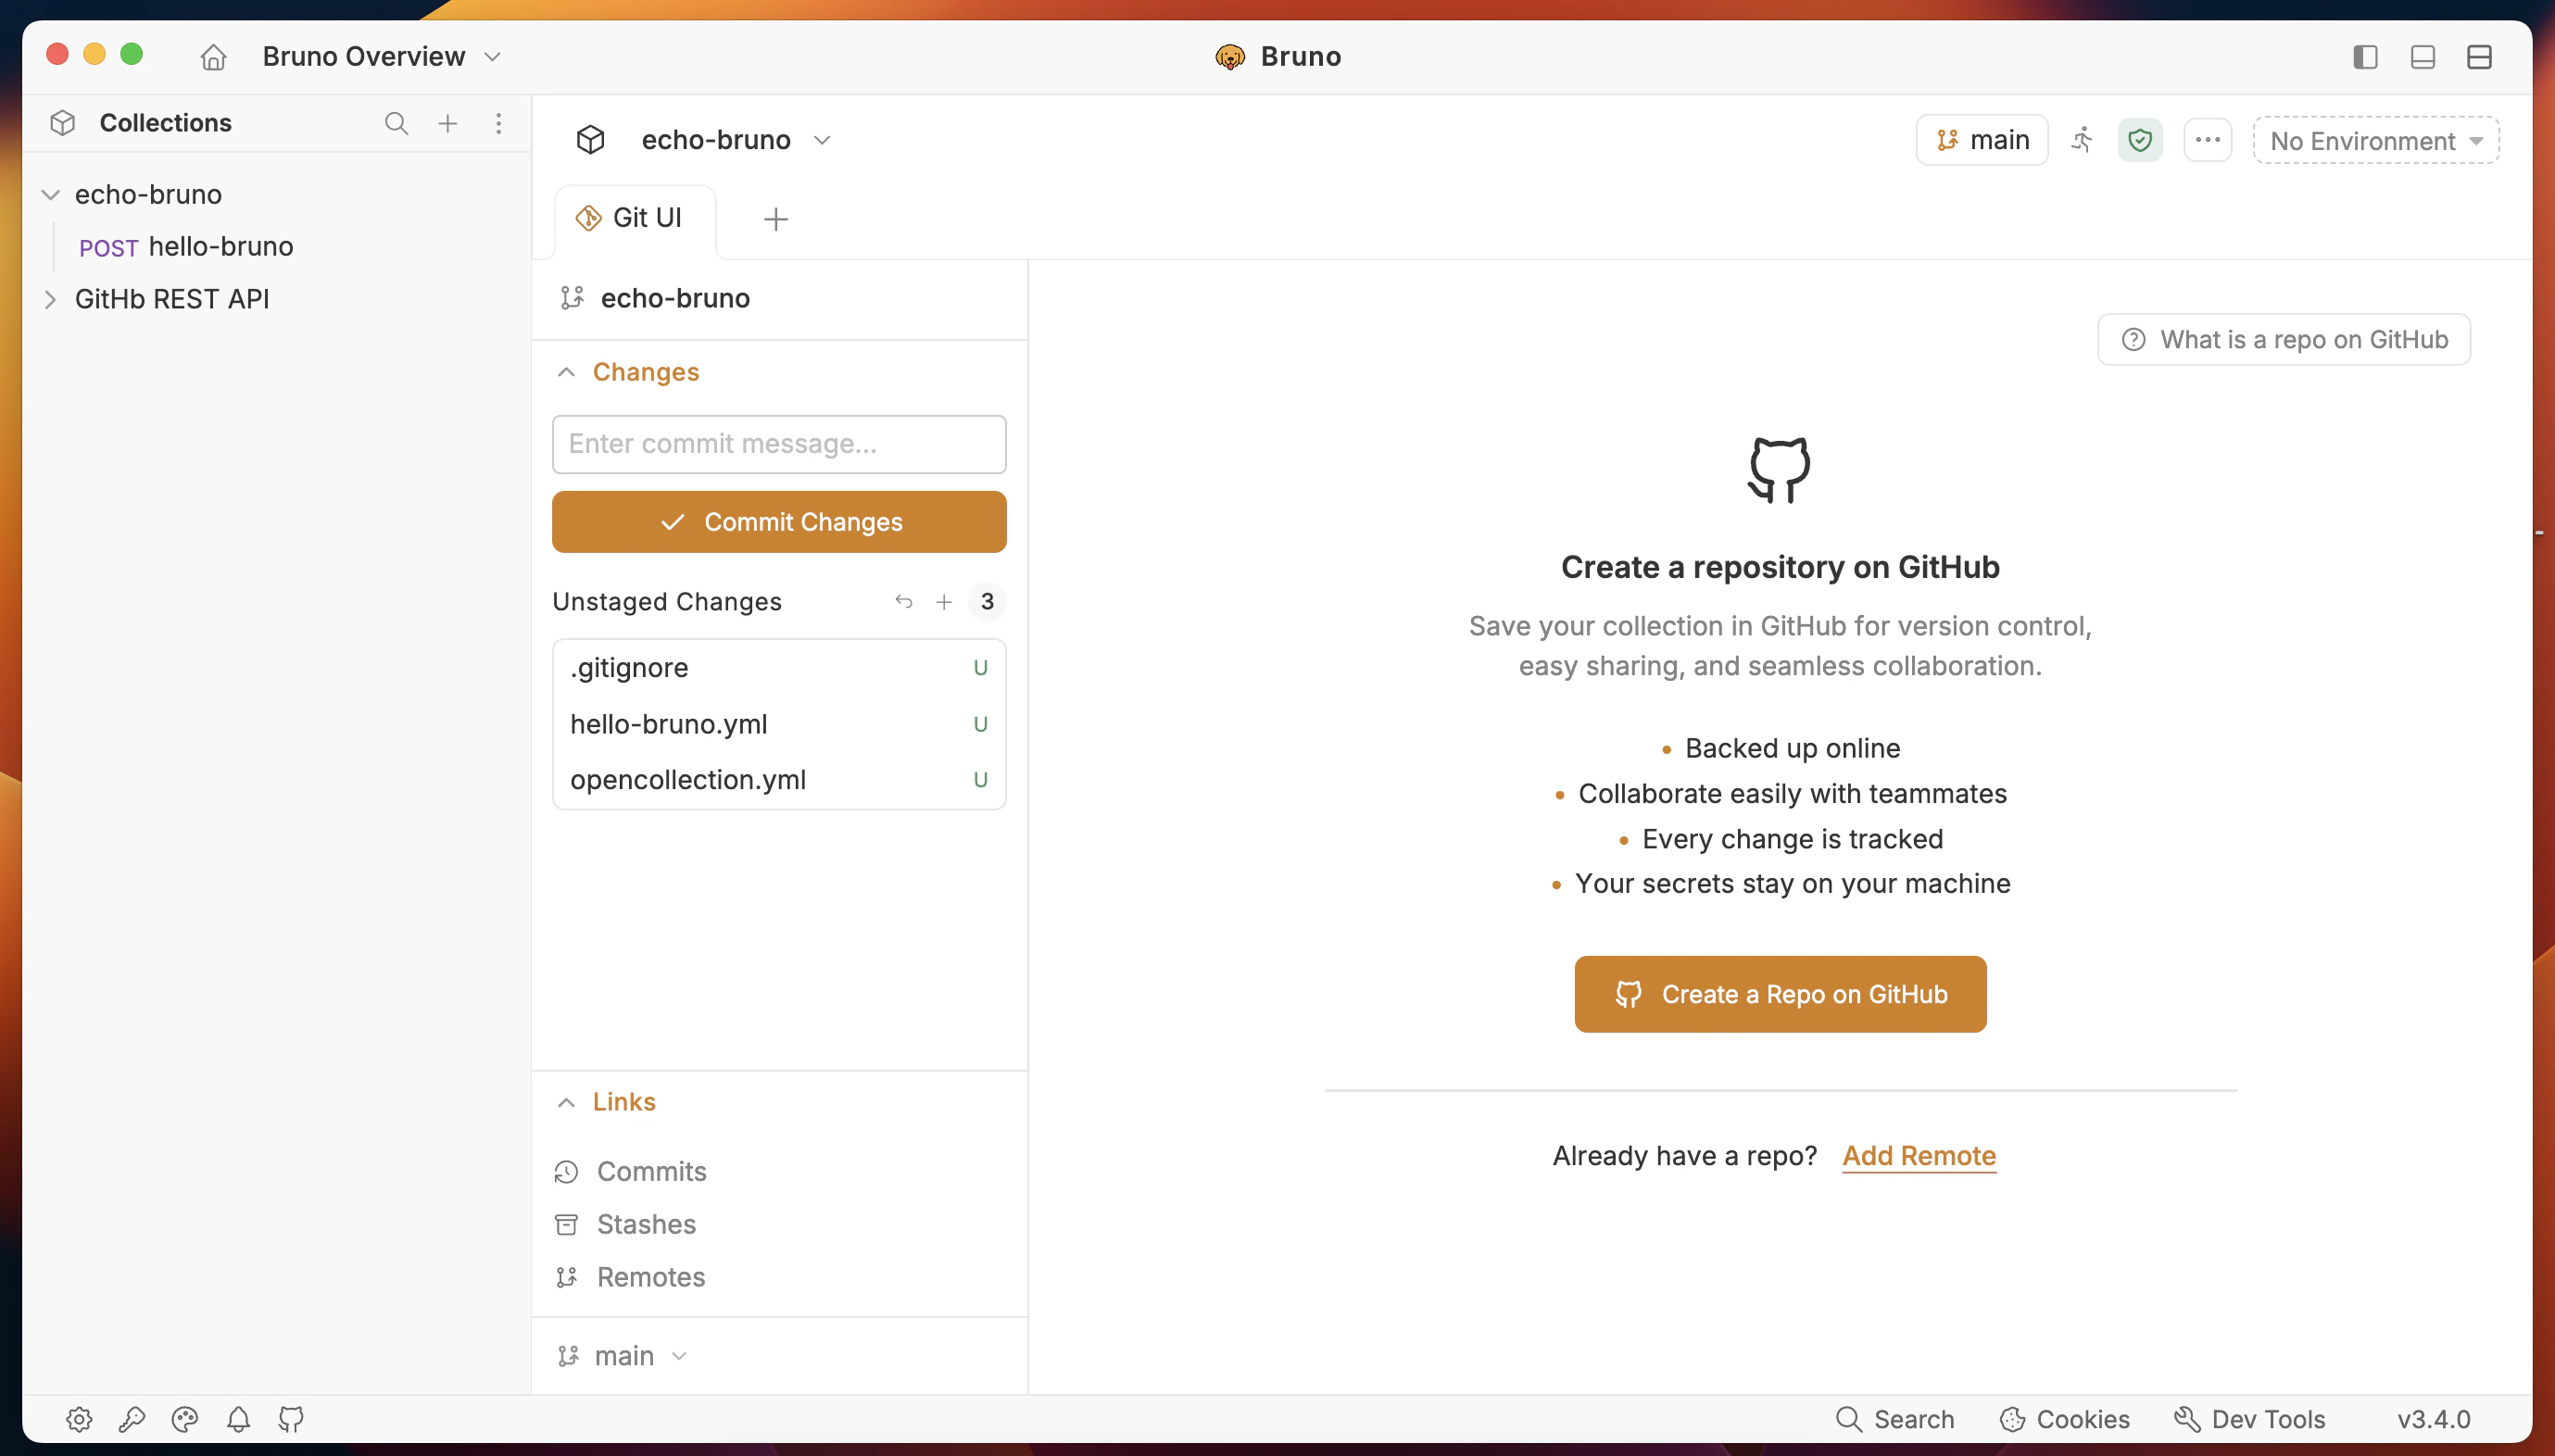 1. Open the **Git initialized** Bruno collection.
2. In the **Git UI**, click the **Create a Repo on GitHub** button.
3. If this is your first time, Bruno will prompt you to sign in to GitHub (via OAuth or a Personal Access Token). Authorize Bruno to manage repositories on your behalf.
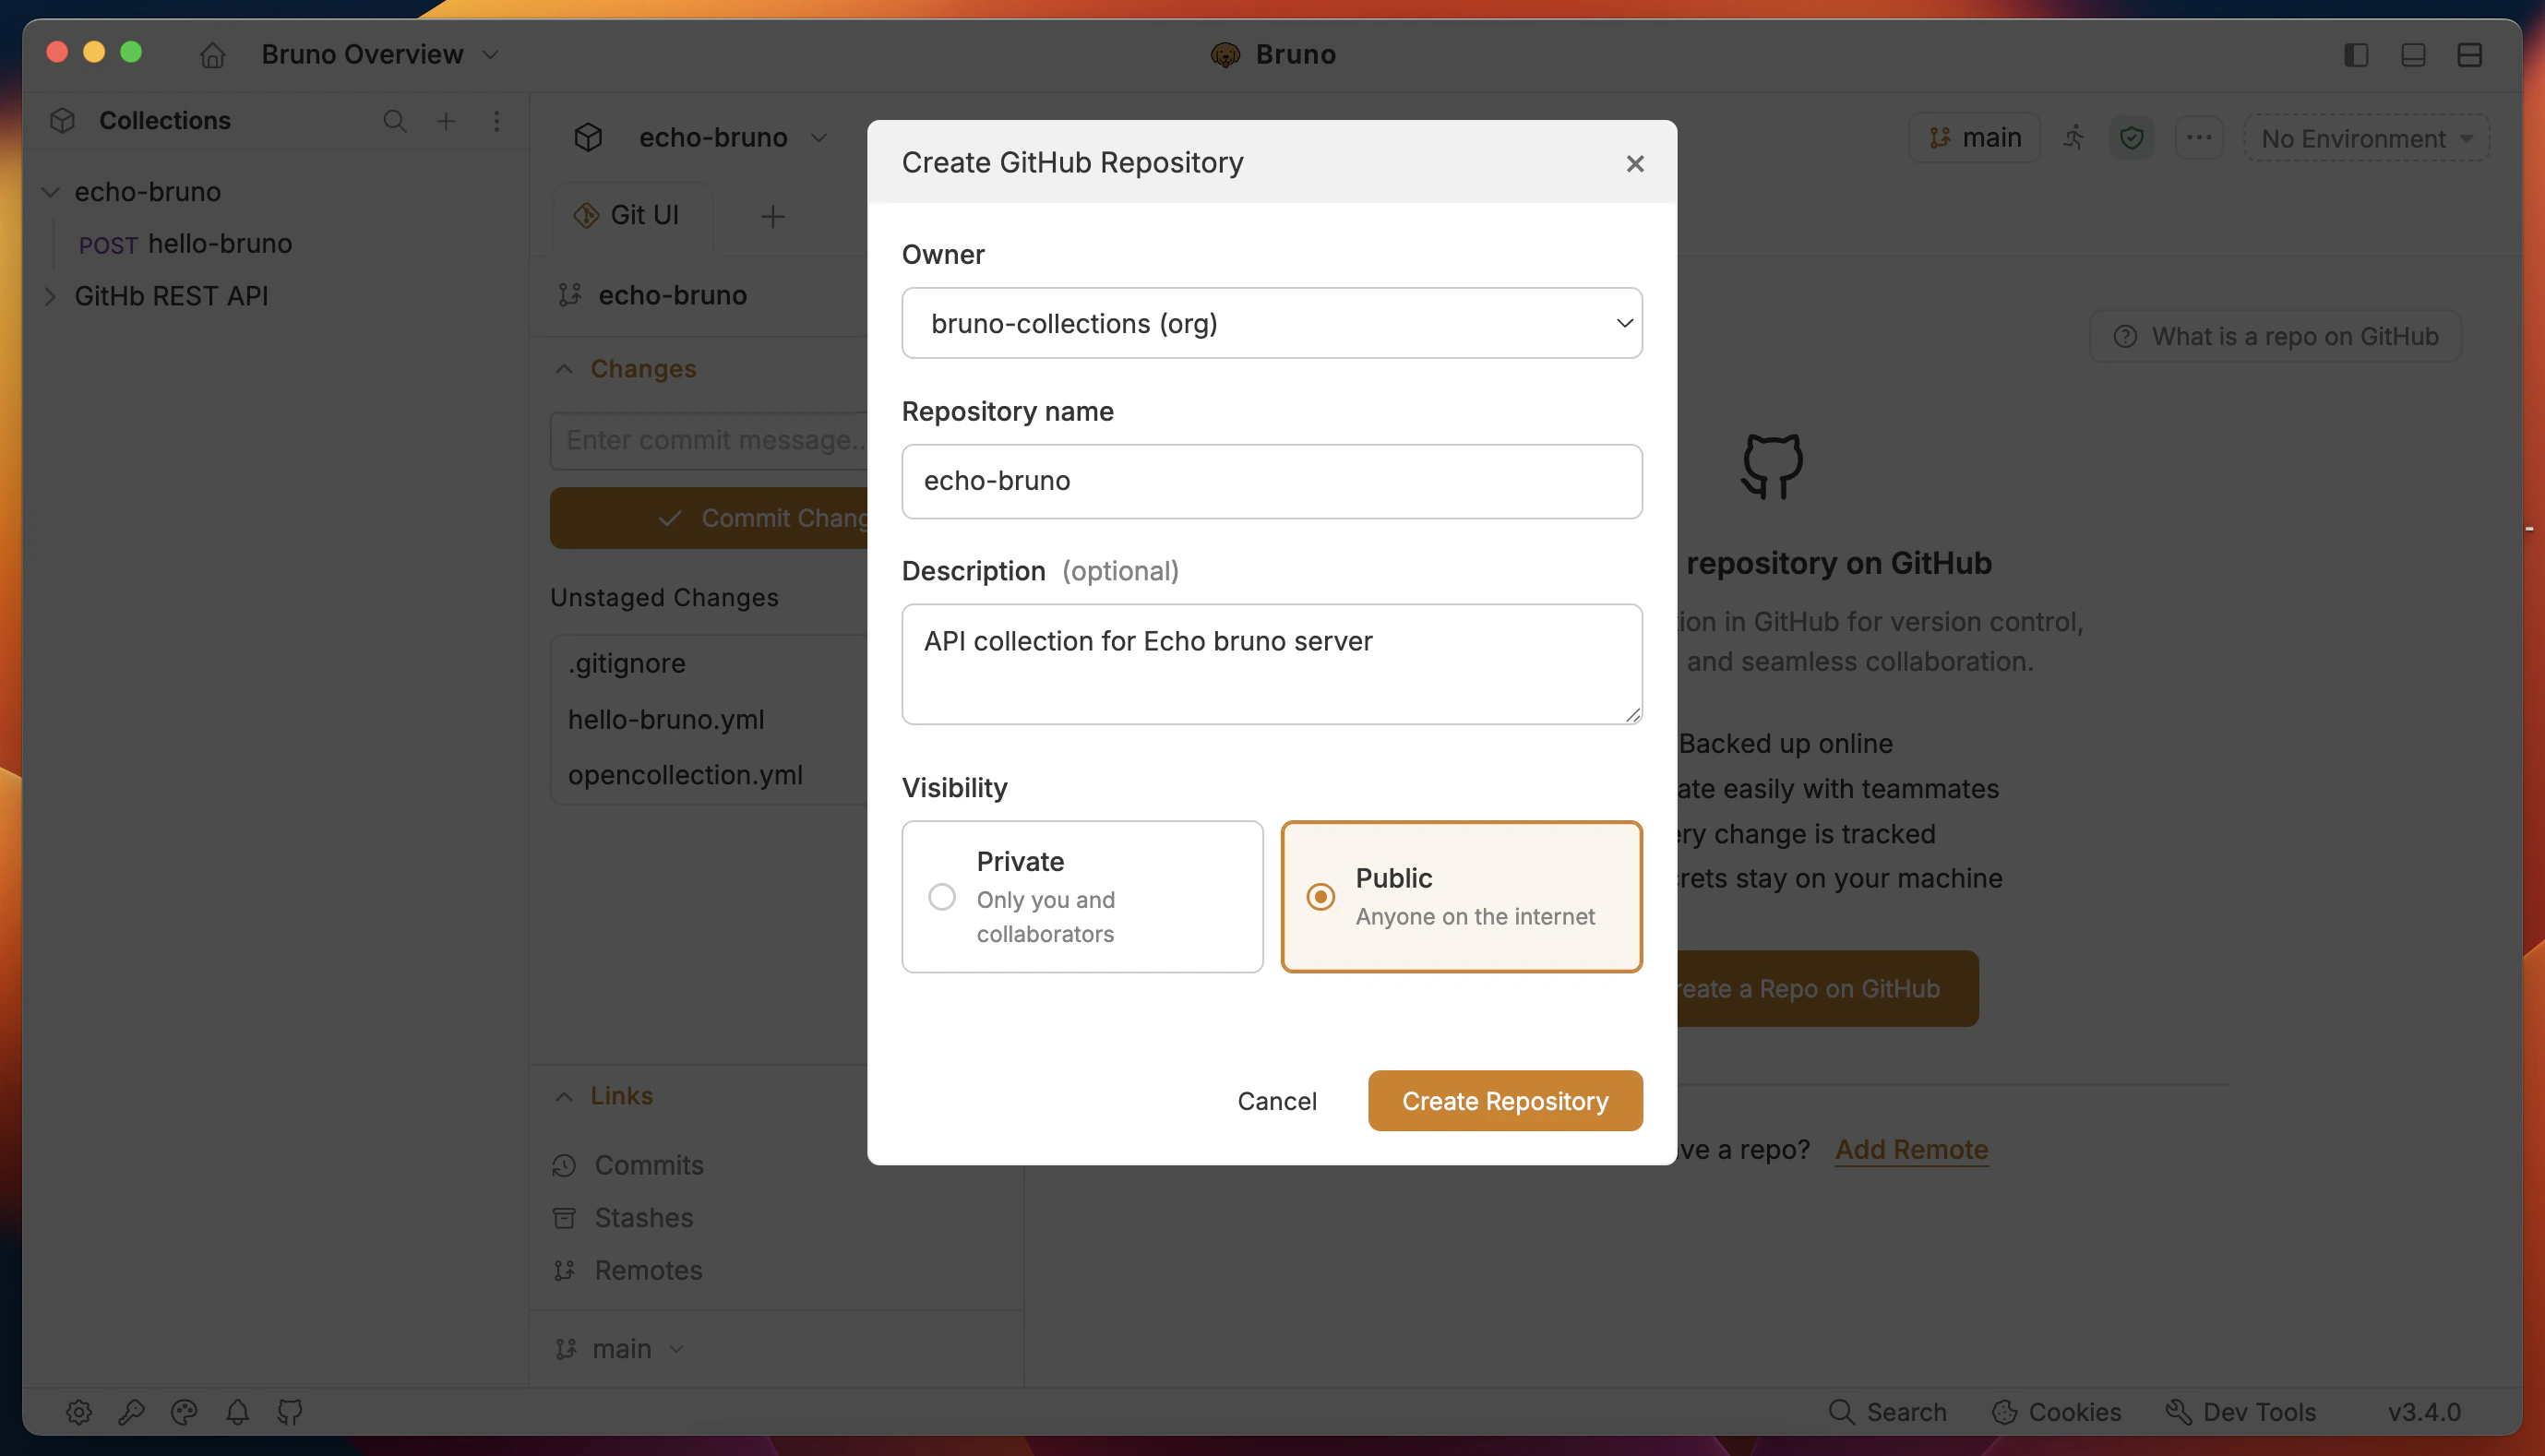
4. Fill in the **Create GitHub Repository** dialog:
* **Owner** — choose your personal account or any organization you have access to.
* **Repository name** — the name of the new repo on GitHub.
* **Description** *(optional)* — a short summary that appears on the GitHub repo page.
* **Visibility** — pick **Private** (you and invited collaborators only) or **Public** (anyone on the internet can view).
5. Click **Create Repository**.
1. Open the **Git initialized** Bruno collection.
2. In the **Git UI**, click the **Create a Repo on GitHub** button.
3. If this is your first time, Bruno will prompt you to sign in to GitHub (via OAuth or a Personal Access Token). Authorize Bruno to manage repositories on your behalf.
4. Fill in the **Create GitHub Repository** dialog:
* **Owner** — choose your personal account or any organization you have access to.
* **Repository name** — the name of the new repo on GitHub.
* **Description** *(optional)* — a short summary that appears on the GitHub repo page.
* **Visibility** — pick **Private** (you and invited collaborators only) or **Public** (anyone on the internet can view).
5. Click **Create Repository**.
 Bruno will then:
* Create the new repository on GitHub via the GitHub API.
* Set it as the **origin** remote on your local collection automatically.
* Push your local branch to GitHub so the repo is ready for collaboration immediately.
This flow is ideal for users without deep Git experience — you never have to visit github.com or copy-paste a remote URL. Once the repo is created, all standard Git operations (commit, push, pull, branches) continue to work the same way as before.
#### Connect to an existing repository
If you already have a repository on GitHub, GitLab, Bitbucket, or any other Git provider, click the **Add Remote** link on the same prompt (or use the **Remotes** option under **Quick Links**) to wire it up manually.
To connect Bruno to GitHub via this manual flow, you need to set up either an SSH key or a Personal Access Token (PAT) on GitHub. Follow this [official GitHub guide](https://docs.github.com/en/authentication/keeping-your-account-and-data-secure/managing-your-personal-access-tokens) to set it up.
1. Create an empty Git repository on GitHub (or your provider of choice).
2. Open the **Git initialized** Bruno collection.
3. Click on **Quick Links** (bottom-left corner).
4. Select **Remotes** from the dropdown.
Bruno will then:
* Create the new repository on GitHub via the GitHub API.
* Set it as the **origin** remote on your local collection automatically.
* Push your local branch to GitHub so the repo is ready for collaboration immediately.
This flow is ideal for users without deep Git experience — you never have to visit github.com or copy-paste a remote URL. Once the repo is created, all standard Git operations (commit, push, pull, branches) continue to work the same way as before.
#### Connect to an existing repository
If you already have a repository on GitHub, GitLab, Bitbucket, or any other Git provider, click the **Add Remote** link on the same prompt (or use the **Remotes** option under **Quick Links**) to wire it up manually.
To connect Bruno to GitHub via this manual flow, you need to set up either an SSH key or a Personal Access Token (PAT) on GitHub. Follow this [official GitHub guide](https://docs.github.com/en/authentication/keeping-your-account-and-data-secure/managing-your-personal-access-tokens) to set it up.
1. Create an empty Git repository on GitHub (or your provider of choice).
2. Open the **Git initialized** Bruno collection.
3. Click on **Quick Links** (bottom-left corner).
4. Select **Remotes** from the dropdown.
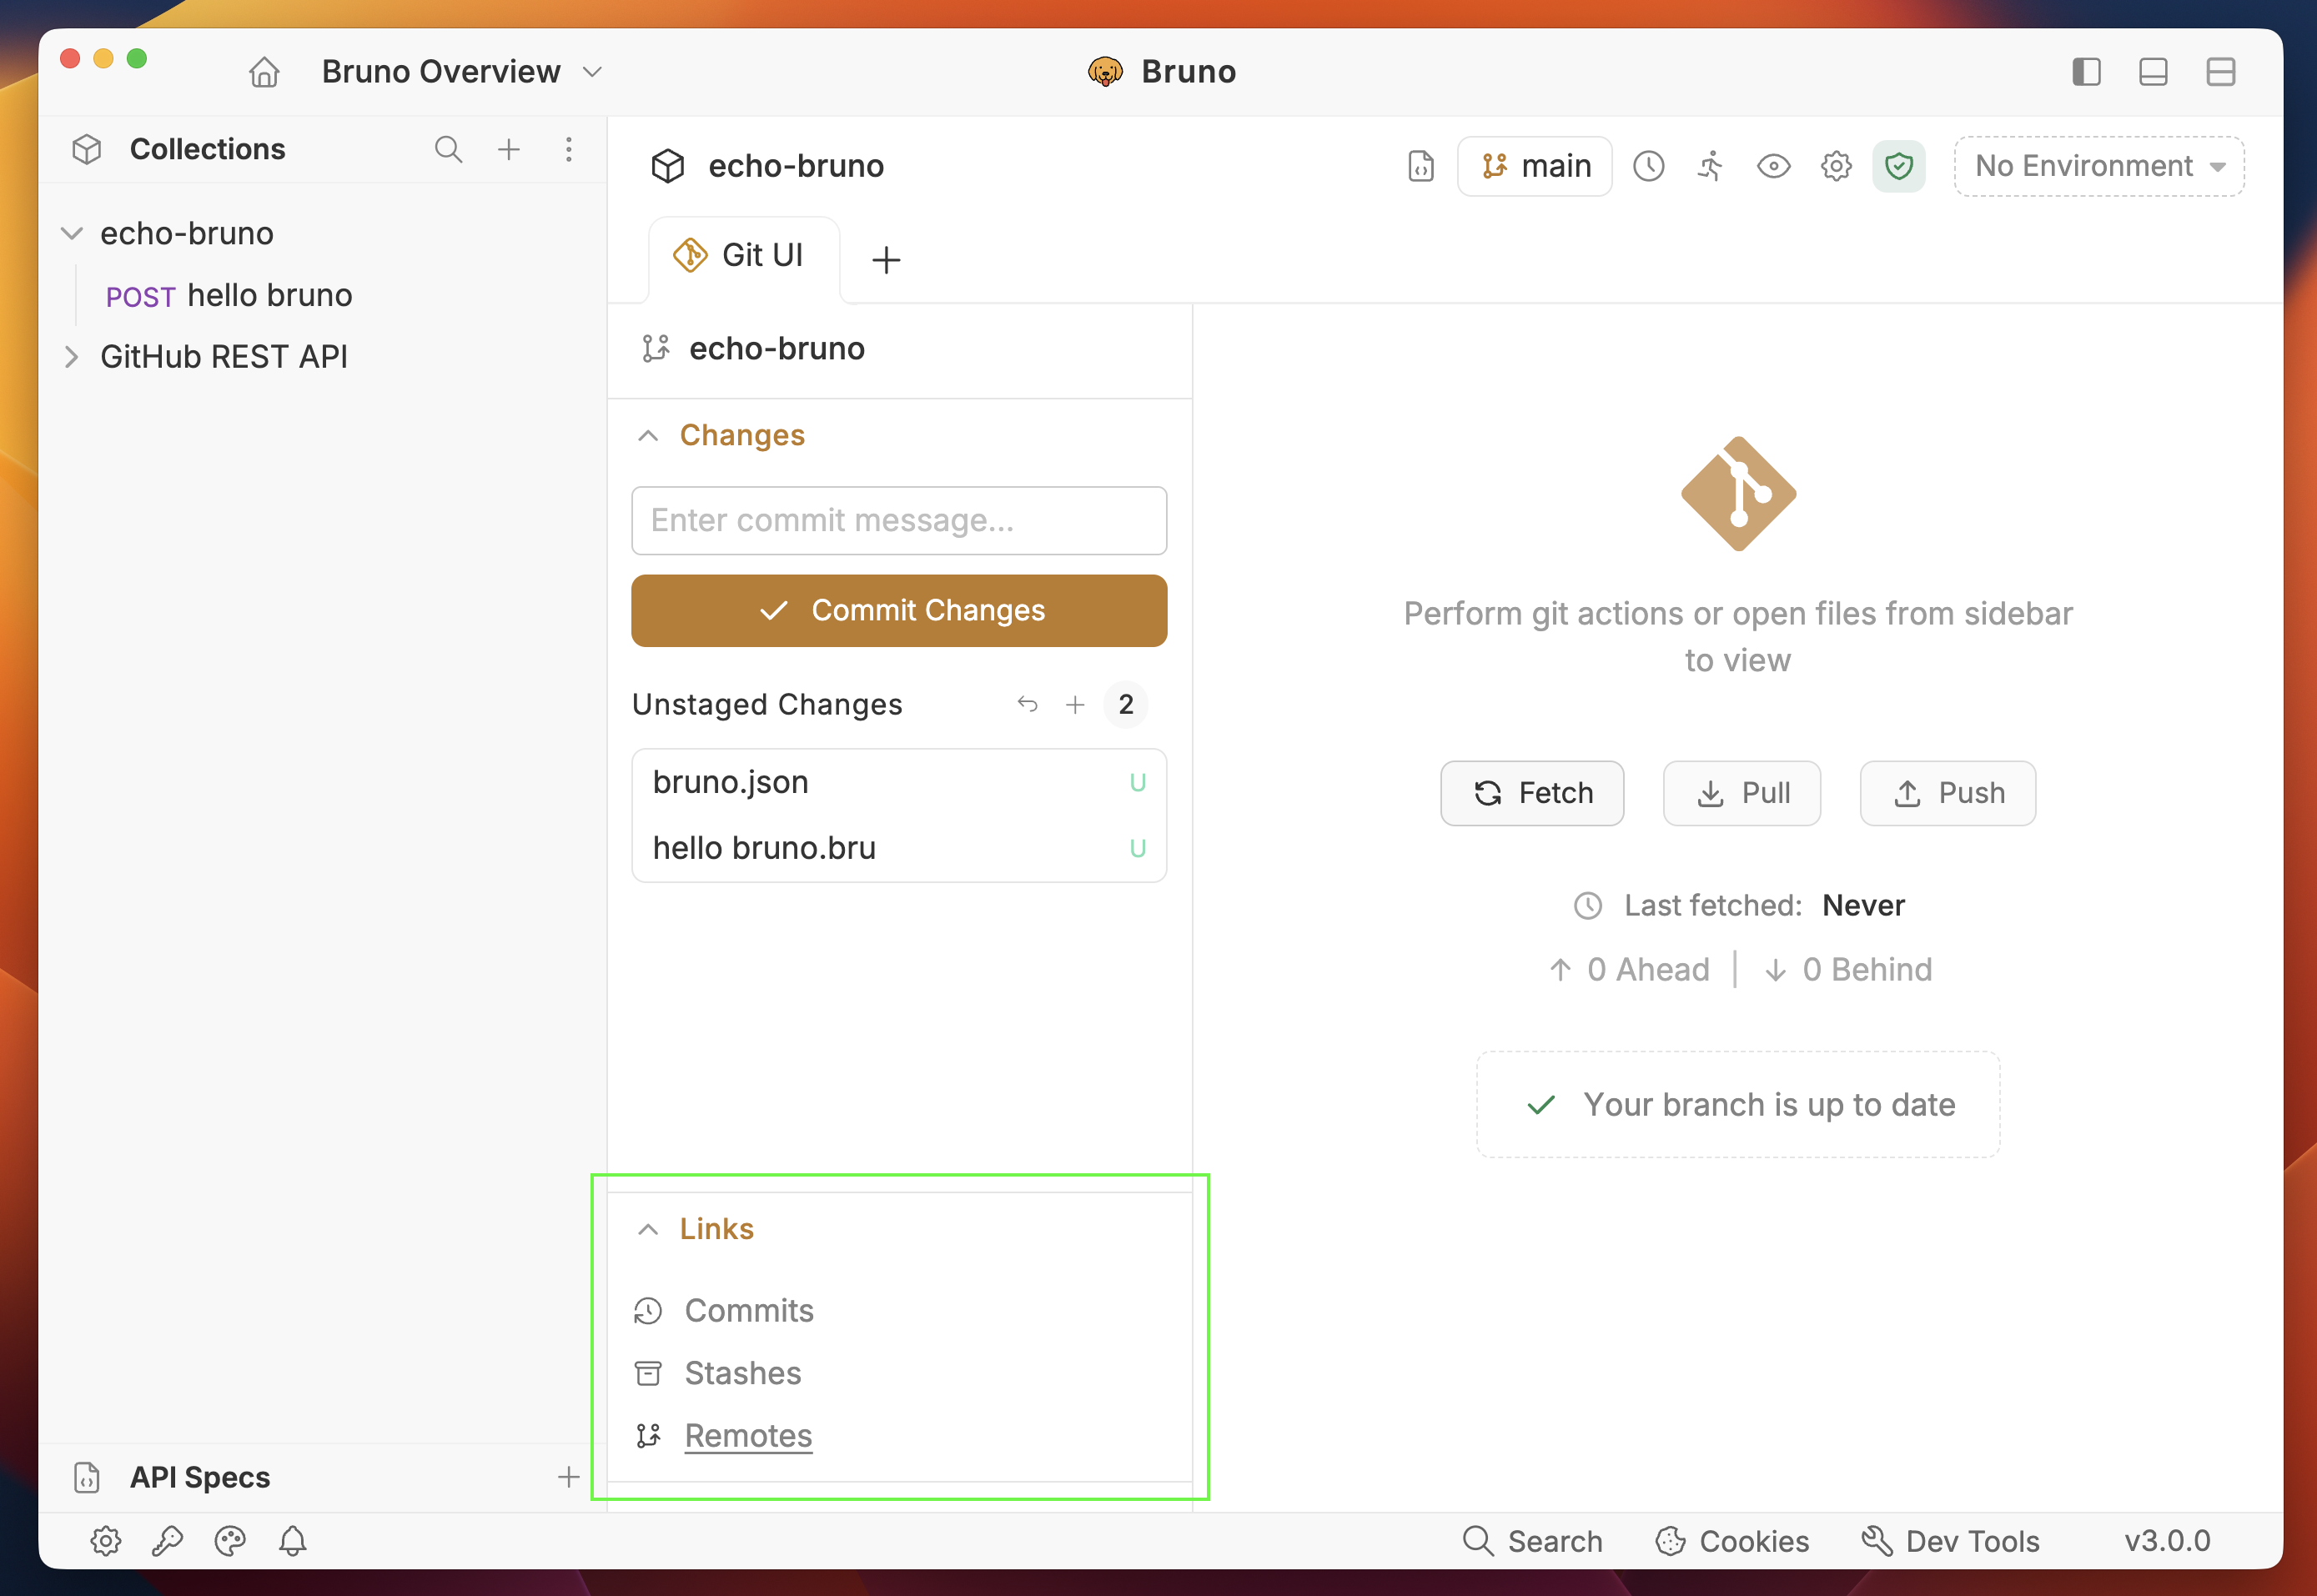 5. Click the **Add Remote** button.
6. Enter **Remote Name** and **URL** (HTTPS or SSH) and click **Save**.
5. Click the **Add Remote** button.
6. Enter **Remote Name** and **URL** (HTTPS or SSH) and click **Save**.
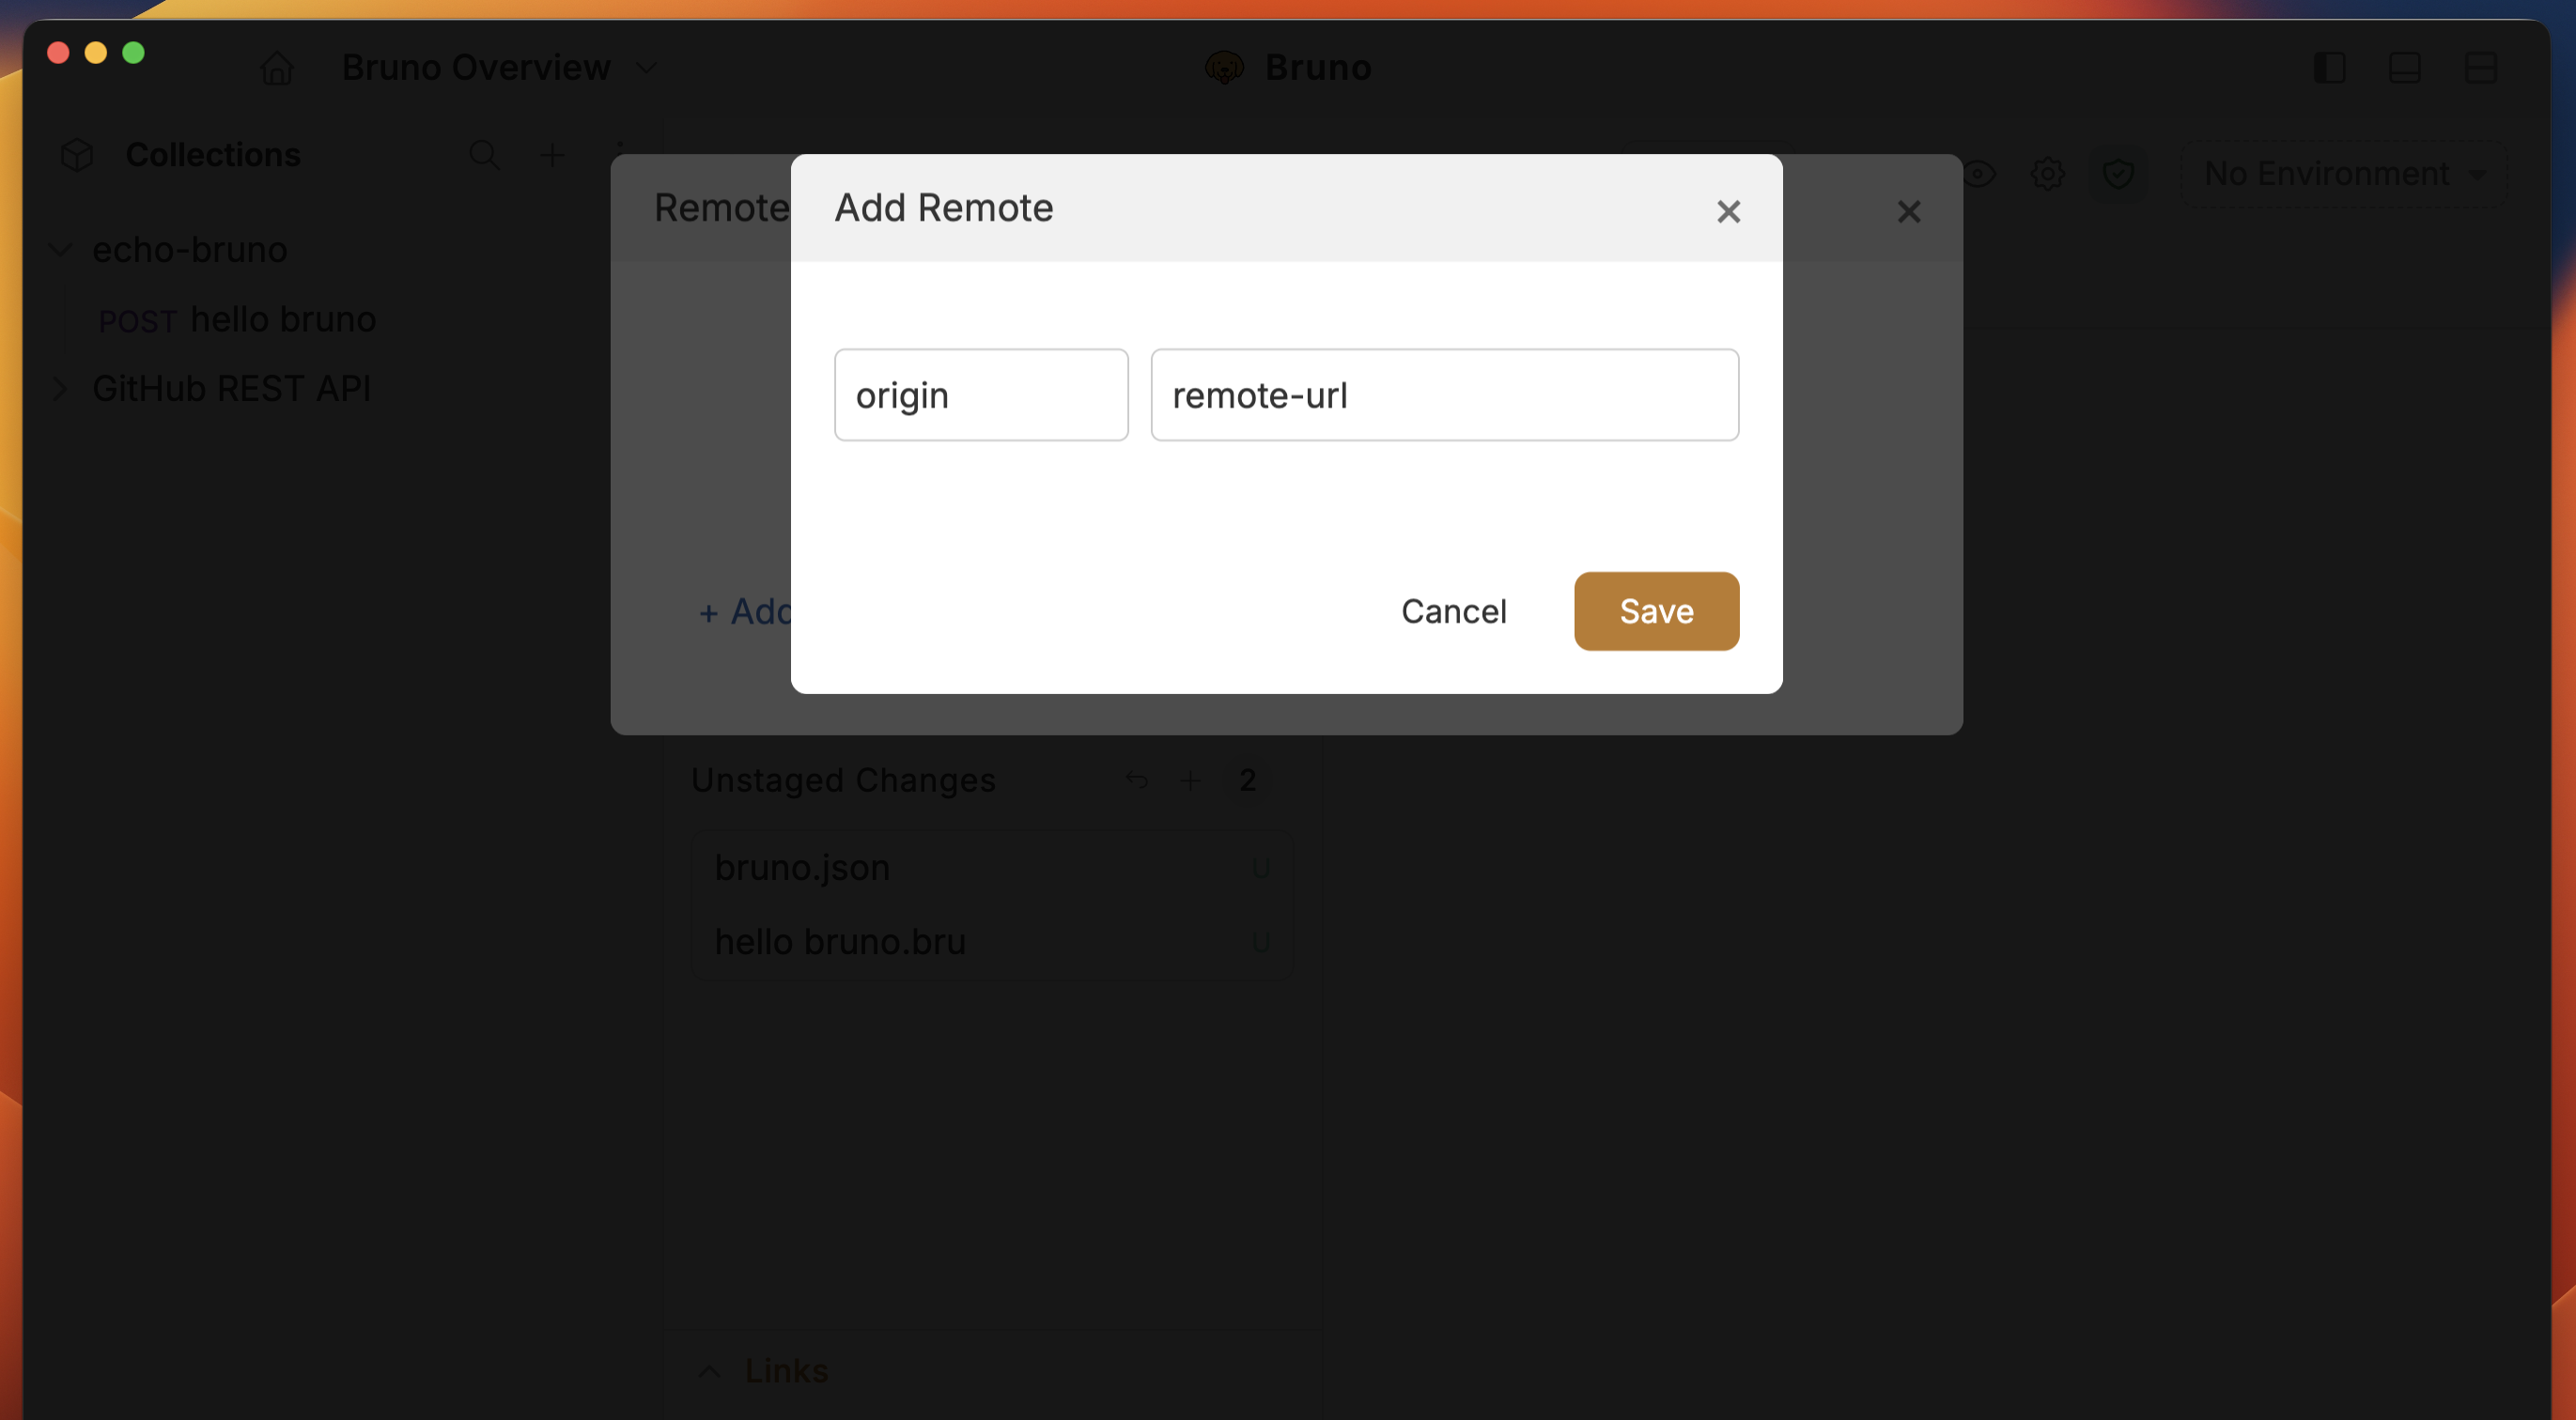 After completing the above steps, your collection will be connected to your remote repository. You'll need to **add and commit** (see below) some changes and push them to populate the remote.
Once your collection is connected to the remote repository, you can manage it directly from the Bruno app.
### Adding and Committing Changes
Once you've made changes to your collection in Bruno, you can easily commit those changes using the Git UI. This allows you to track changes and collaborate with your team efficiently.
Follow these steps to add and commit changes:
1. Go to **Git UI**.
2. Click the **Add Icon** to stage your changes.
After completing the above steps, your collection will be connected to your remote repository. You'll need to **add and commit** (see below) some changes and push them to populate the remote.
Once your collection is connected to the remote repository, you can manage it directly from the Bruno app.
### Adding and Committing Changes
Once you've made changes to your collection in Bruno, you can easily commit those changes using the Git UI. This allows you to track changes and collaborate with your team efficiently.
Follow these steps to add and commit changes:
1. Go to **Git UI**.
2. Click the **Add Icon** to stage your changes.
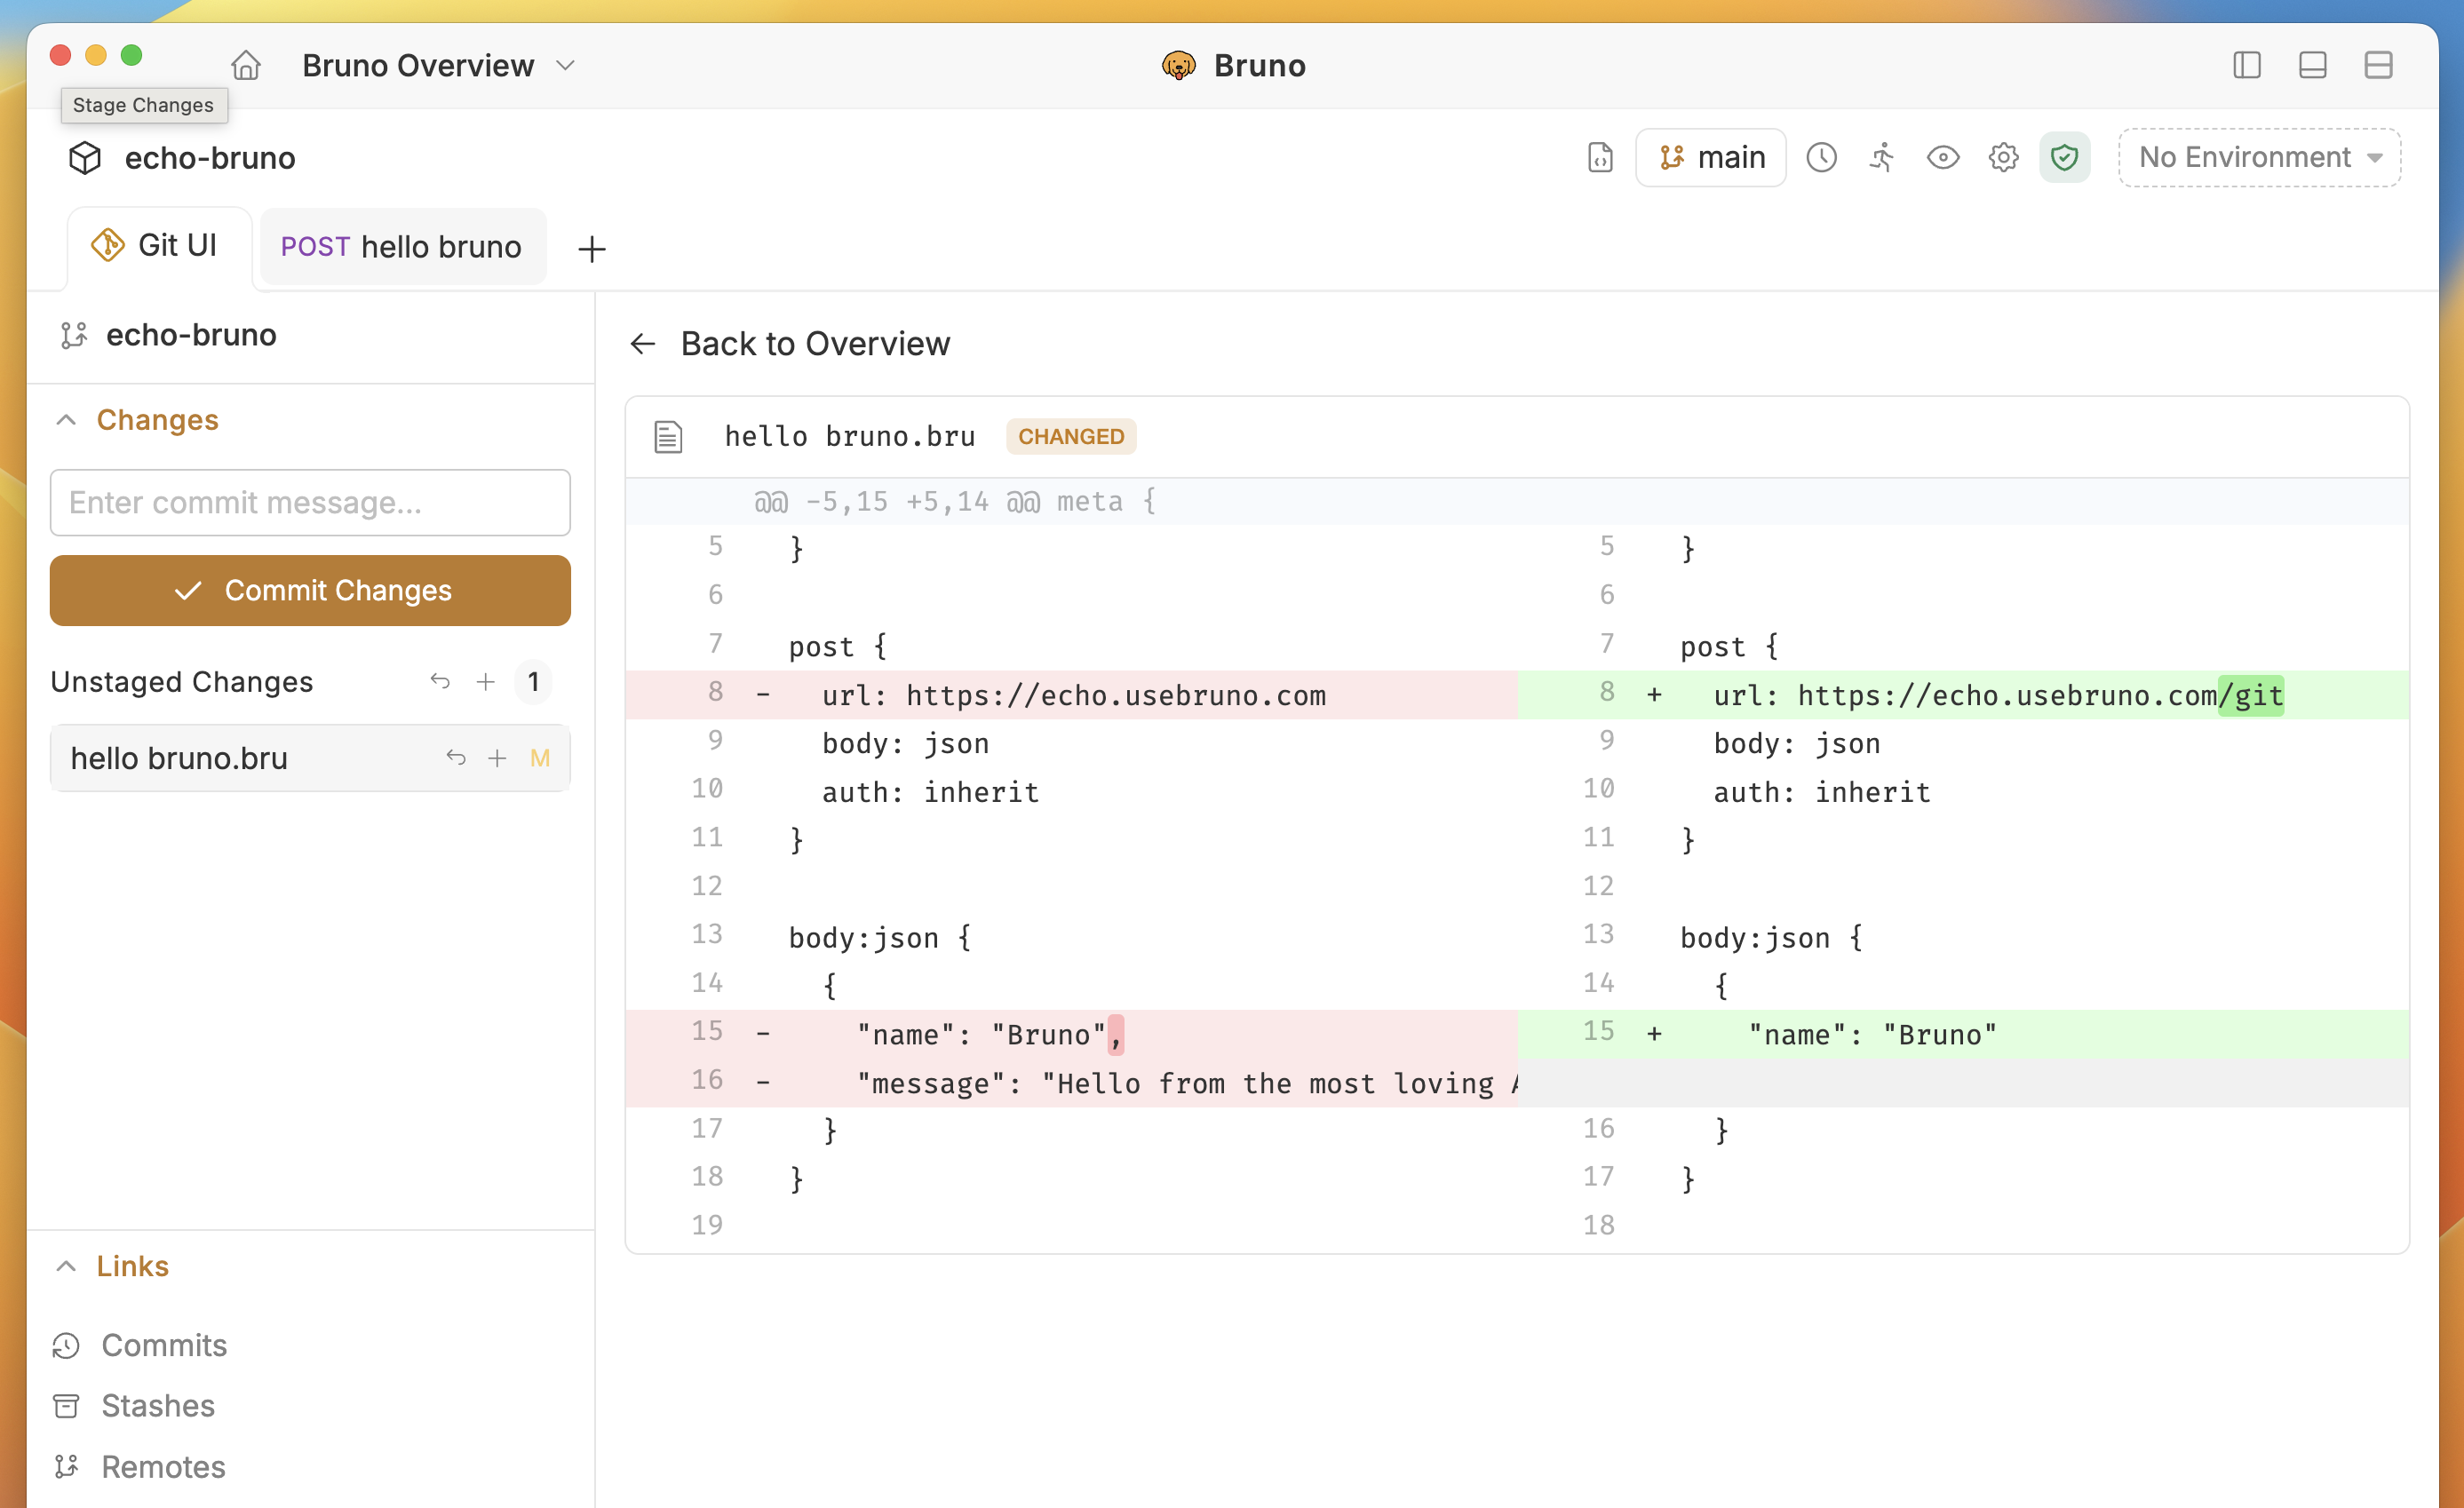 3. Click the **Commit Changes** button.
4. Write a commit message and click **Commit**.
3. Click the **Commit Changes** button.
4. Write a commit message and click **Commit**.
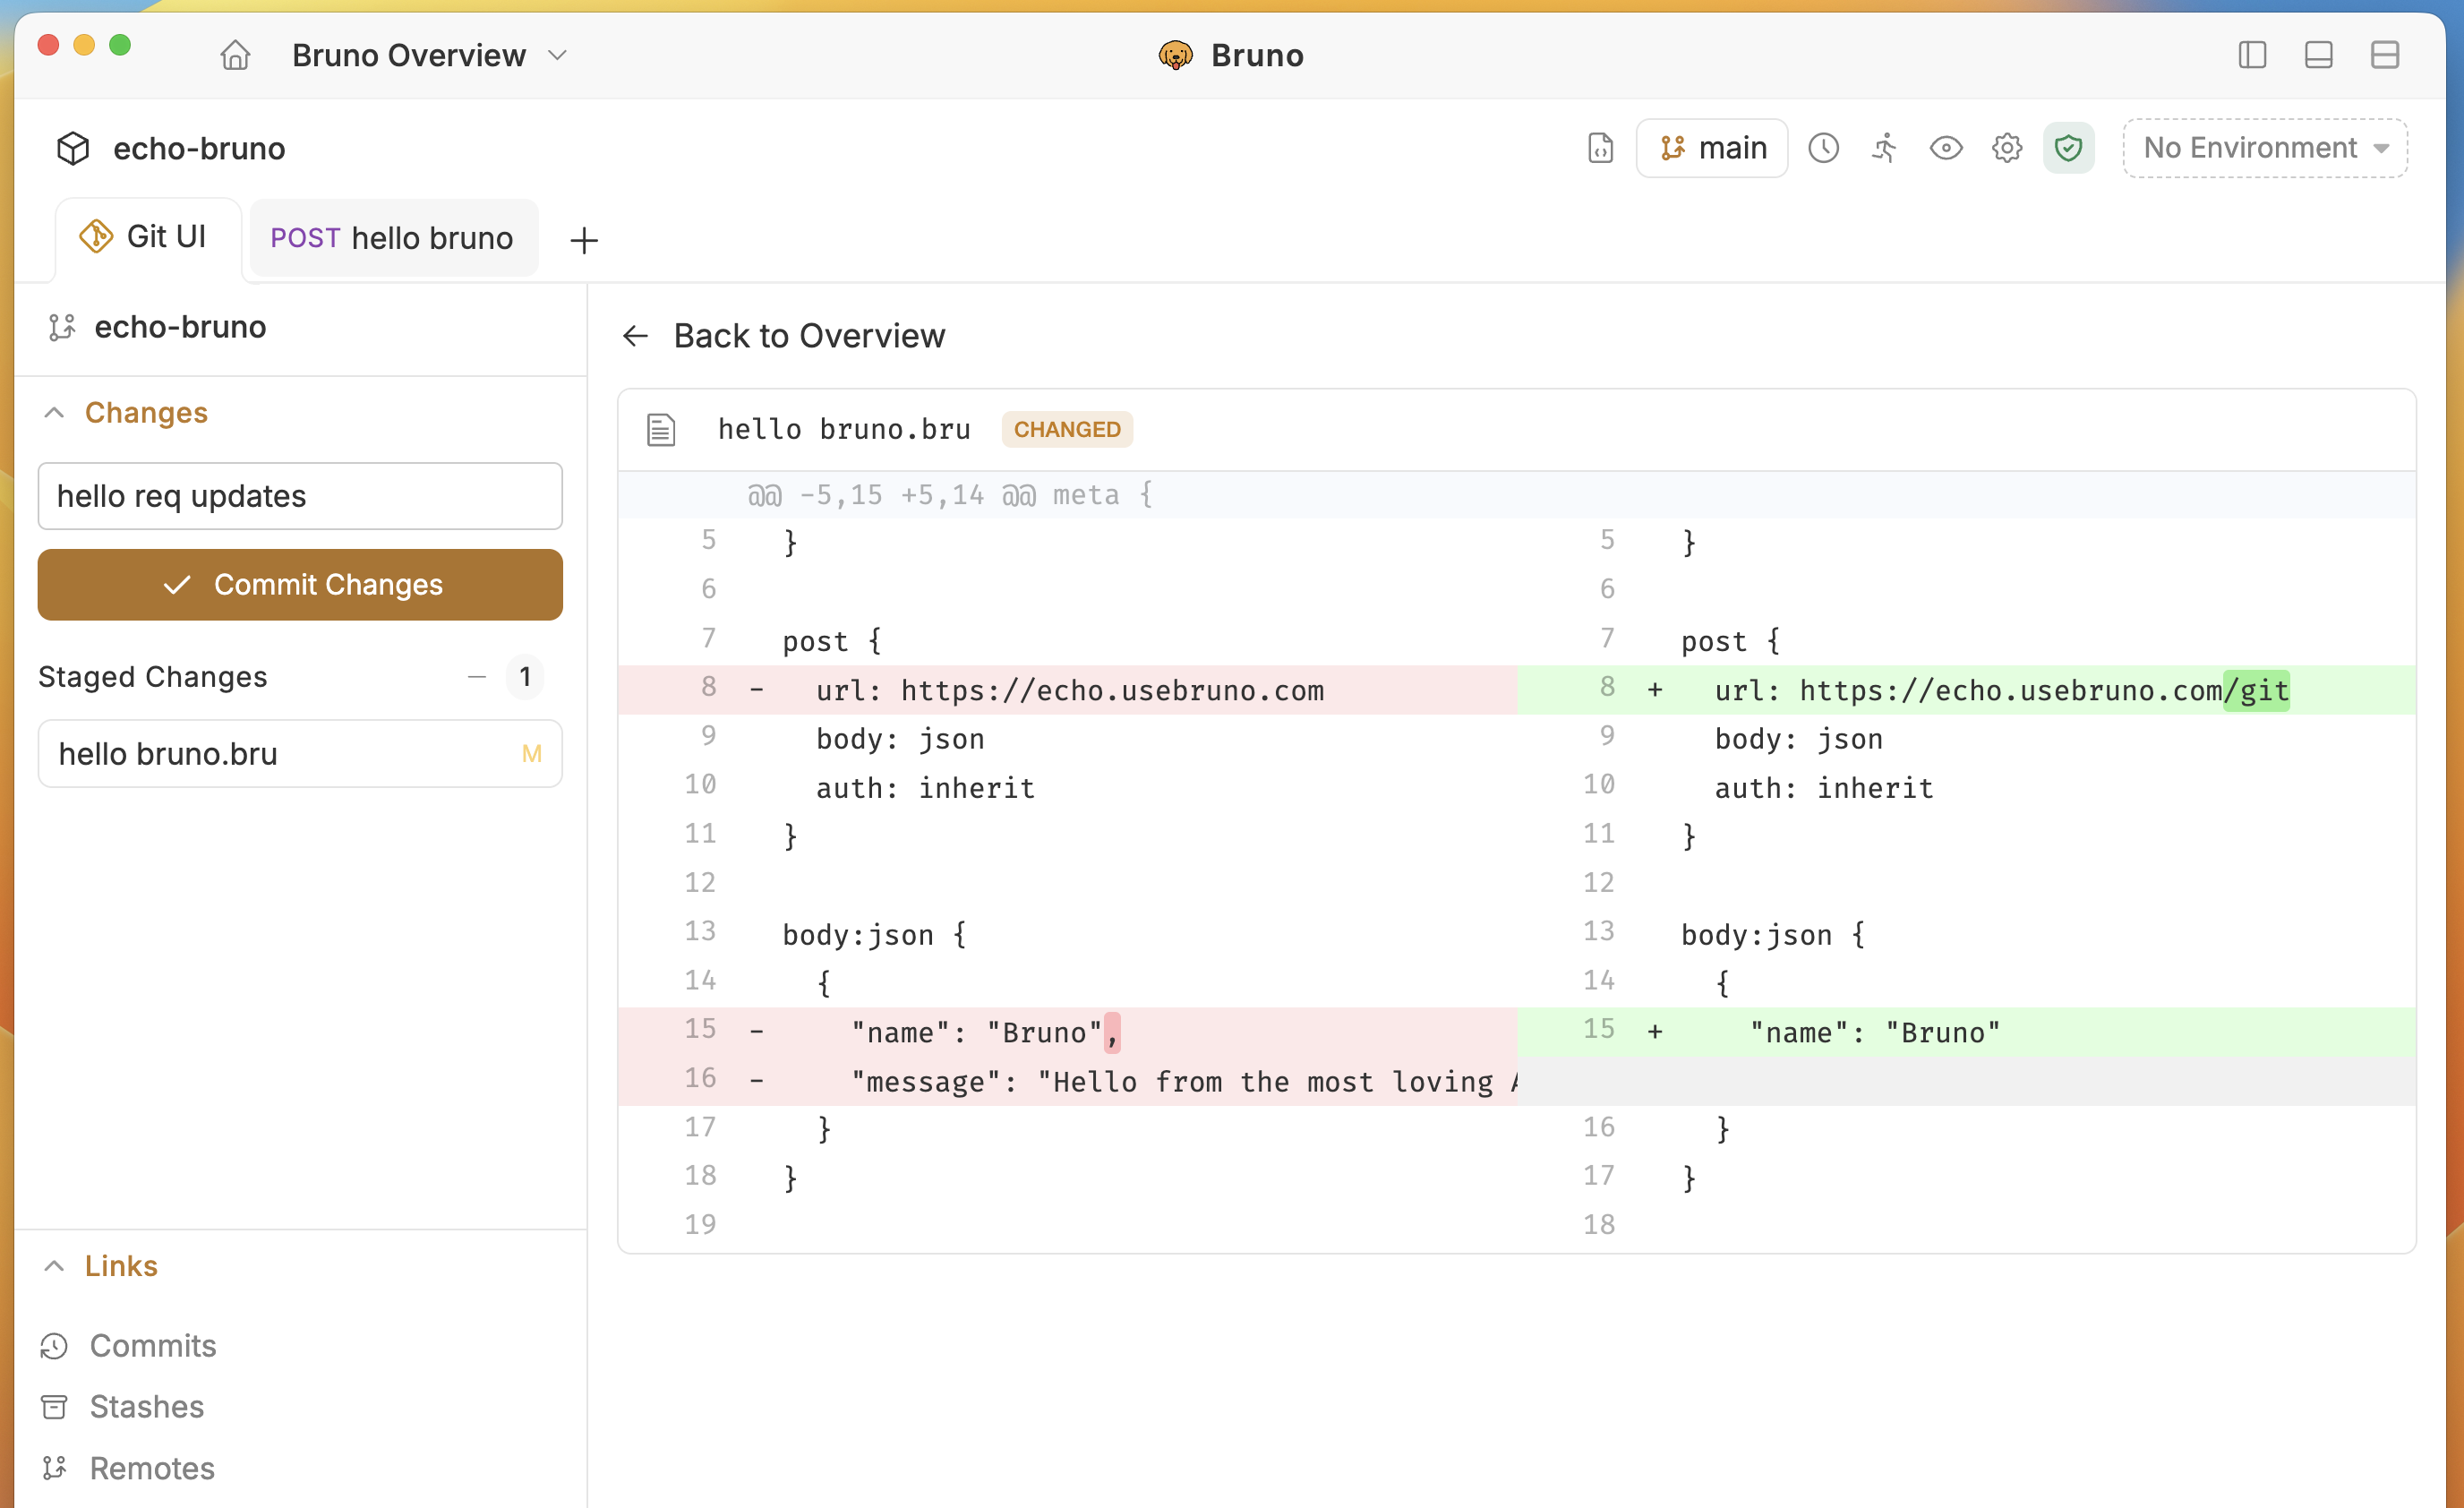 > You can commit all changes in a single click by pressing the **Add All Changes** button.
By following these steps, your changes are now committed and tracked in Git, ready to be pushed or shared with others.
### Pushing Changes
The GUI-based Git integration in Bruno allows both engineering and non-engineering teams to work together in a fast, efficient, and accurate manner. This integration ensures that your collections remain consistently up-to-date across all team members.
> Before you can push or pull changes, ensure that the **remote repository** is linked to your project.
Push your local changes to the remote repository with just a few clicks.
1. Go to **Git UI** and click the **Fetch** button.
2. Click the **Push** button.
> You can commit all changes in a single click by pressing the **Add All Changes** button.
By following these steps, your changes are now committed and tracked in Git, ready to be pushed or shared with others.
### Pushing Changes
The GUI-based Git integration in Bruno allows both engineering and non-engineering teams to work together in a fast, efficient, and accurate manner. This integration ensures that your collections remain consistently up-to-date across all team members.
> Before you can push or pull changes, ensure that the **remote repository** is linked to your project.
Push your local changes to the remote repository with just a few clicks.
1. Go to **Git UI** and click the **Fetch** button.
2. Click the **Push** button.
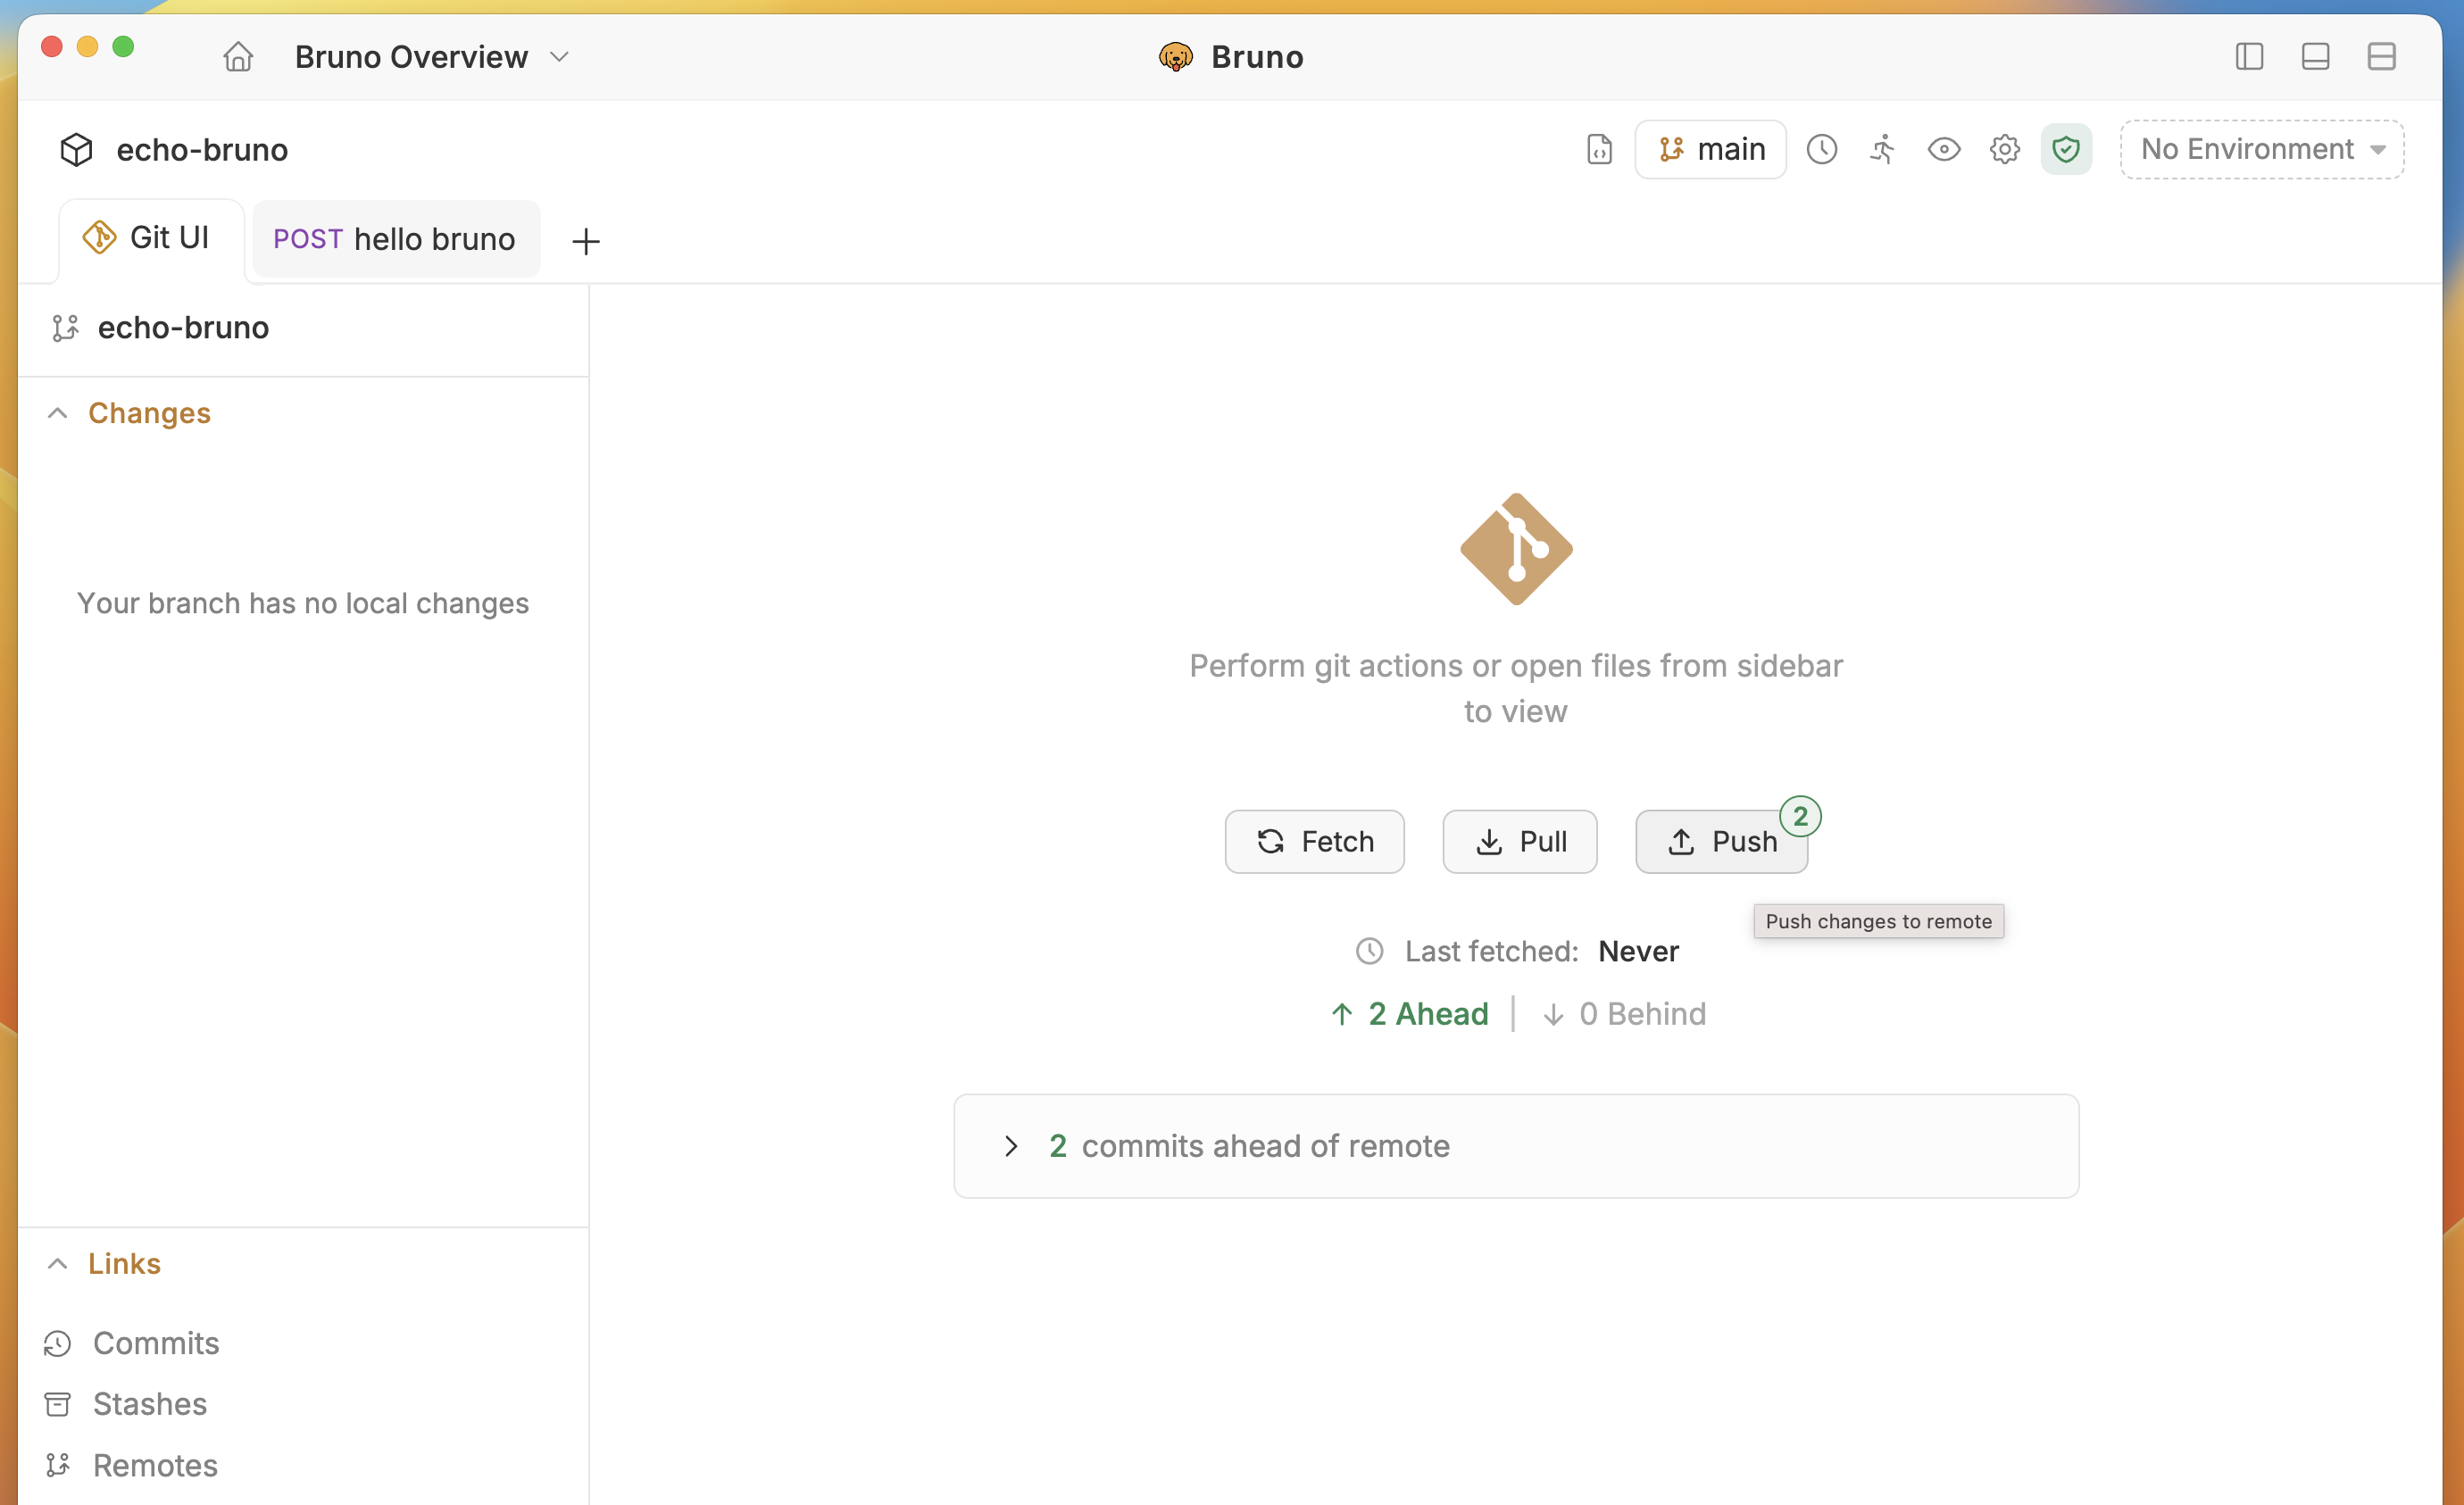 Now you can see all your local changes pushed to the remote repository.
> Follow the Consumer guide to learn about the pulling changes feature.
### Branch Creation and Checkout
With branches in **Bruno**, you can manage your code effectively by isolating different features or tasks.
#### Creating Branches
Follow the steps below to create branches in Bruno.
1. Go to **Git UI**.
2. In the bottom left corner, click on **main** (or the default branch name).
3. Enter a **Branch Name**.
4. Click the **Create branch** button.
Now you can see all your local changes pushed to the remote repository.
> Follow the Consumer guide to learn about the pulling changes feature.
### Branch Creation and Checkout
With branches in **Bruno**, you can manage your code effectively by isolating different features or tasks.
#### Creating Branches
Follow the steps below to create branches in Bruno.
1. Go to **Git UI**.
2. In the bottom left corner, click on **main** (or the default branch name).
3. Enter a **Branch Name**.
4. Click the **Create branch** button.
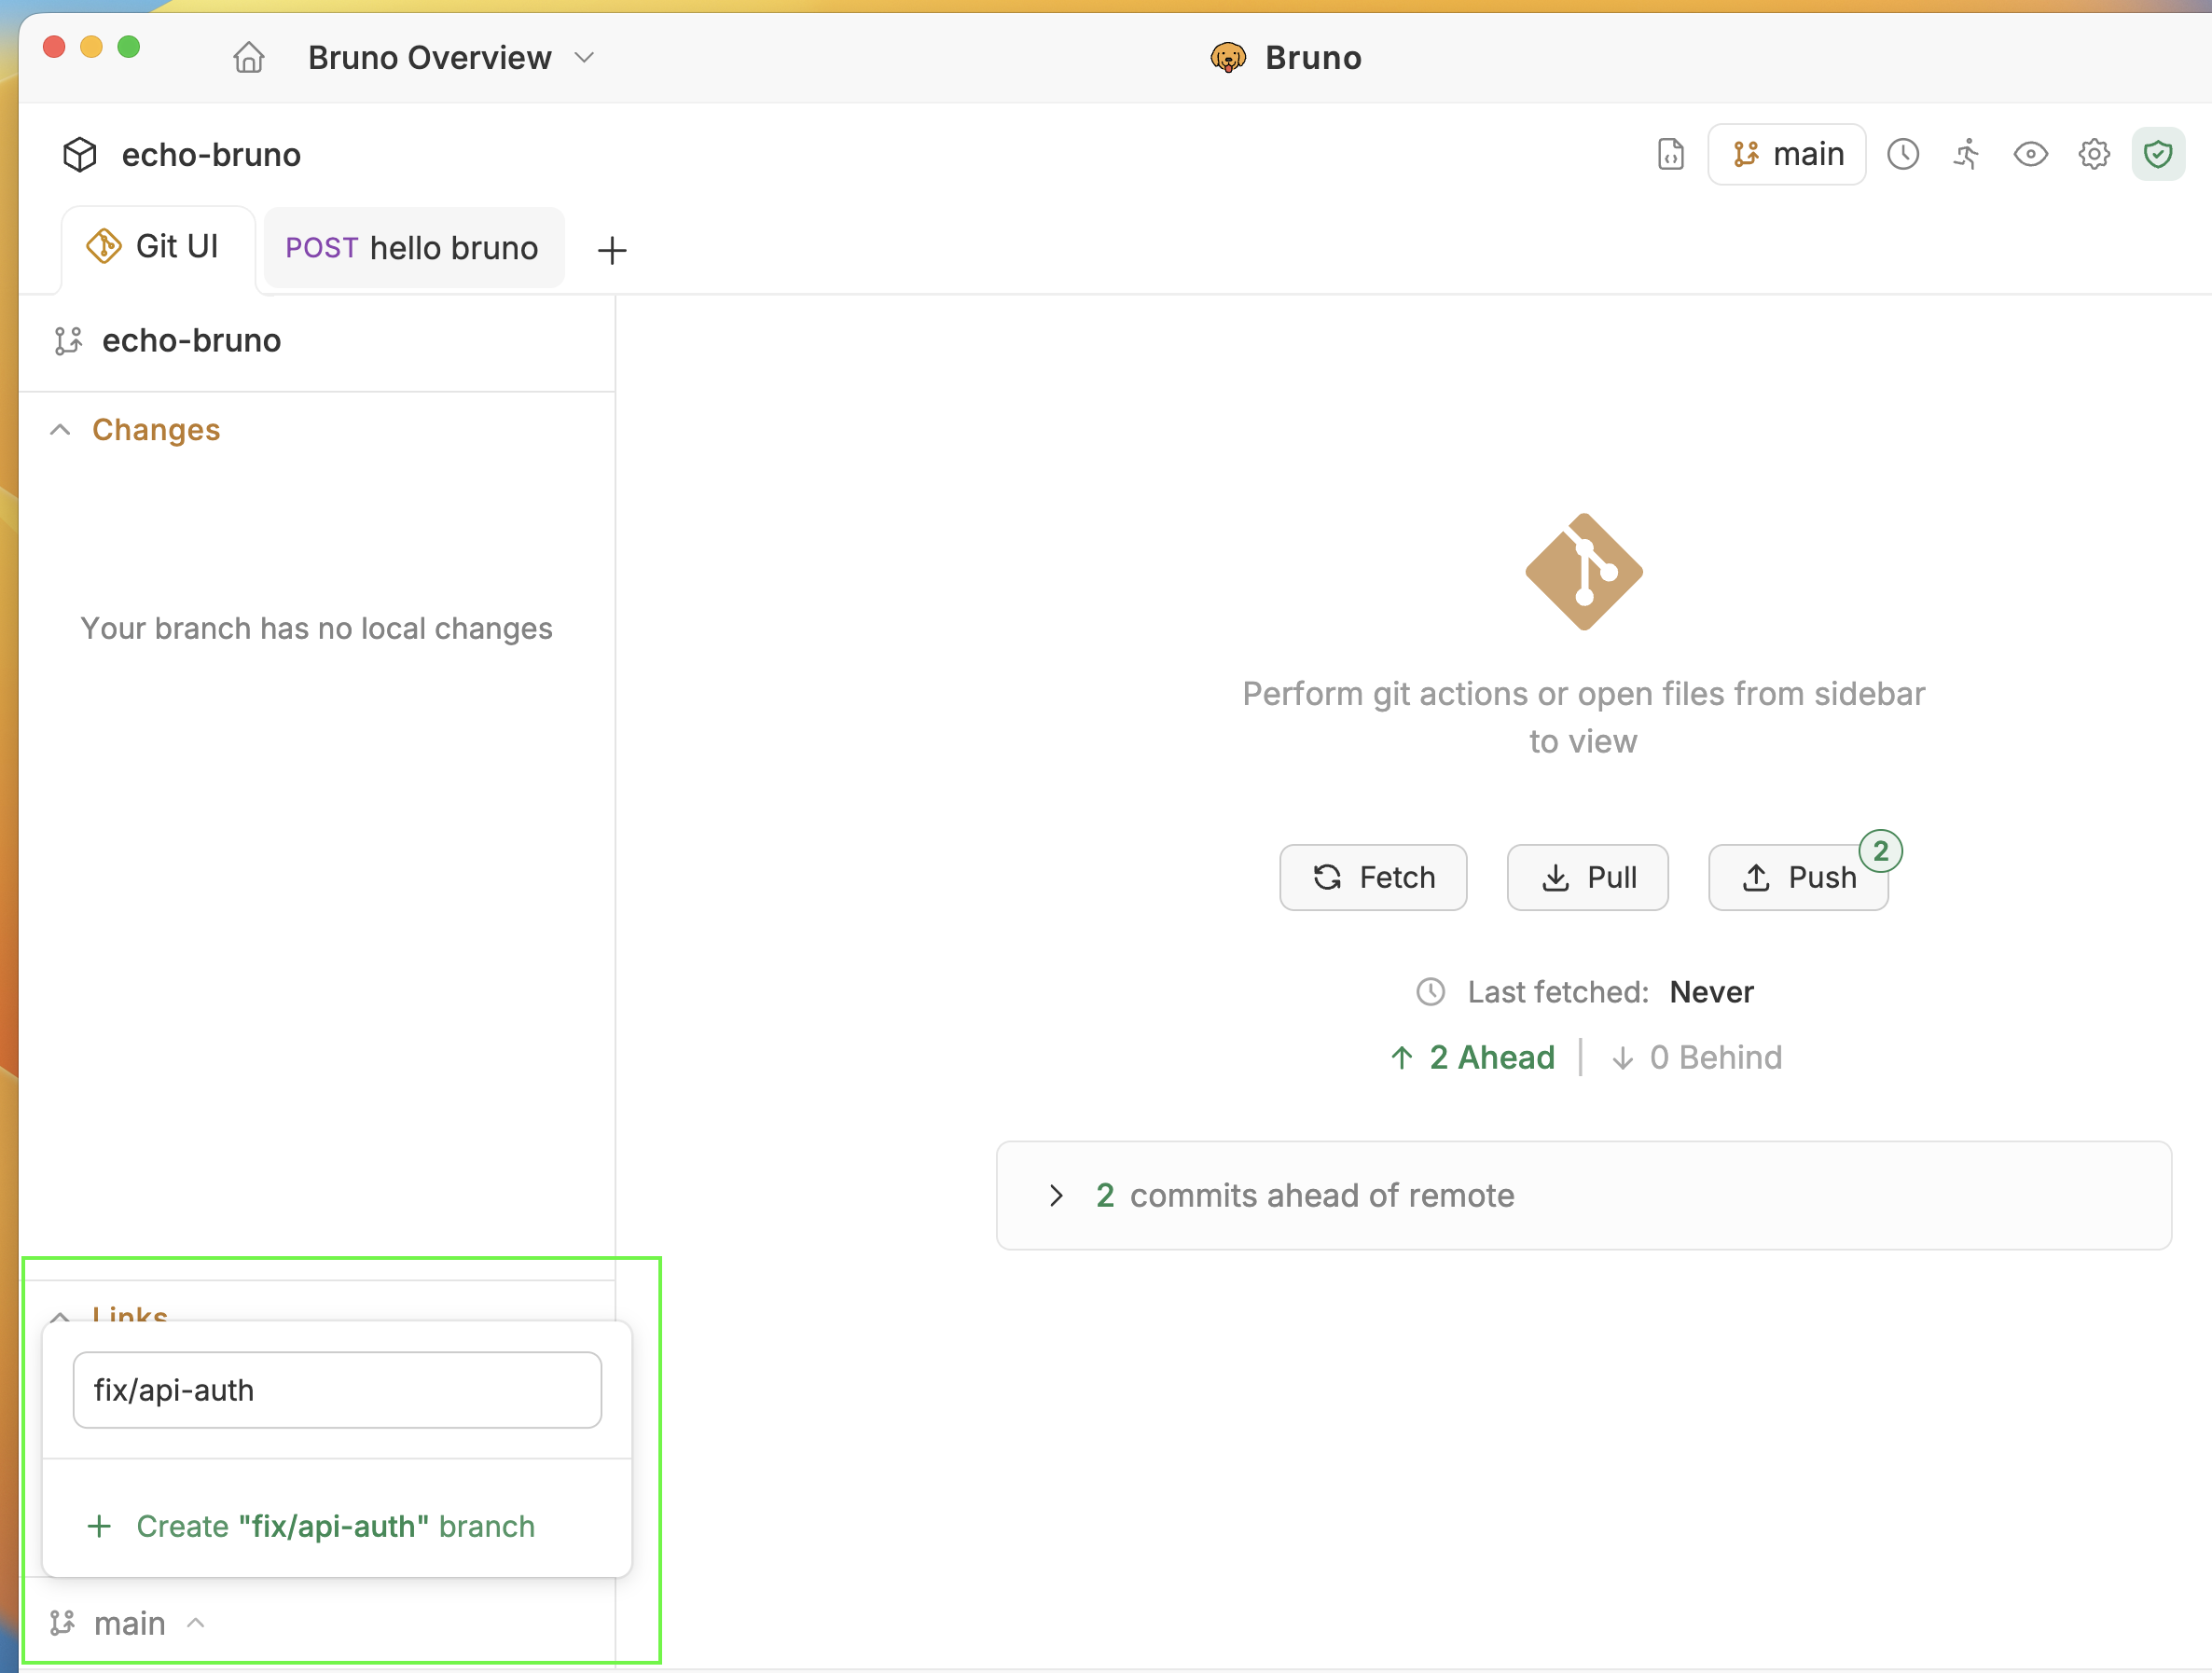 Once the branch is created, you can start making changes to the branch.
#### Branch Checkout
1. Click on **main**.
2. Select the branch you want to switch to.
Once the branch is created, you can start making changes to the branch.
#### Branch Checkout
1. Click on **main**.
2. Select the branch you want to switch to.
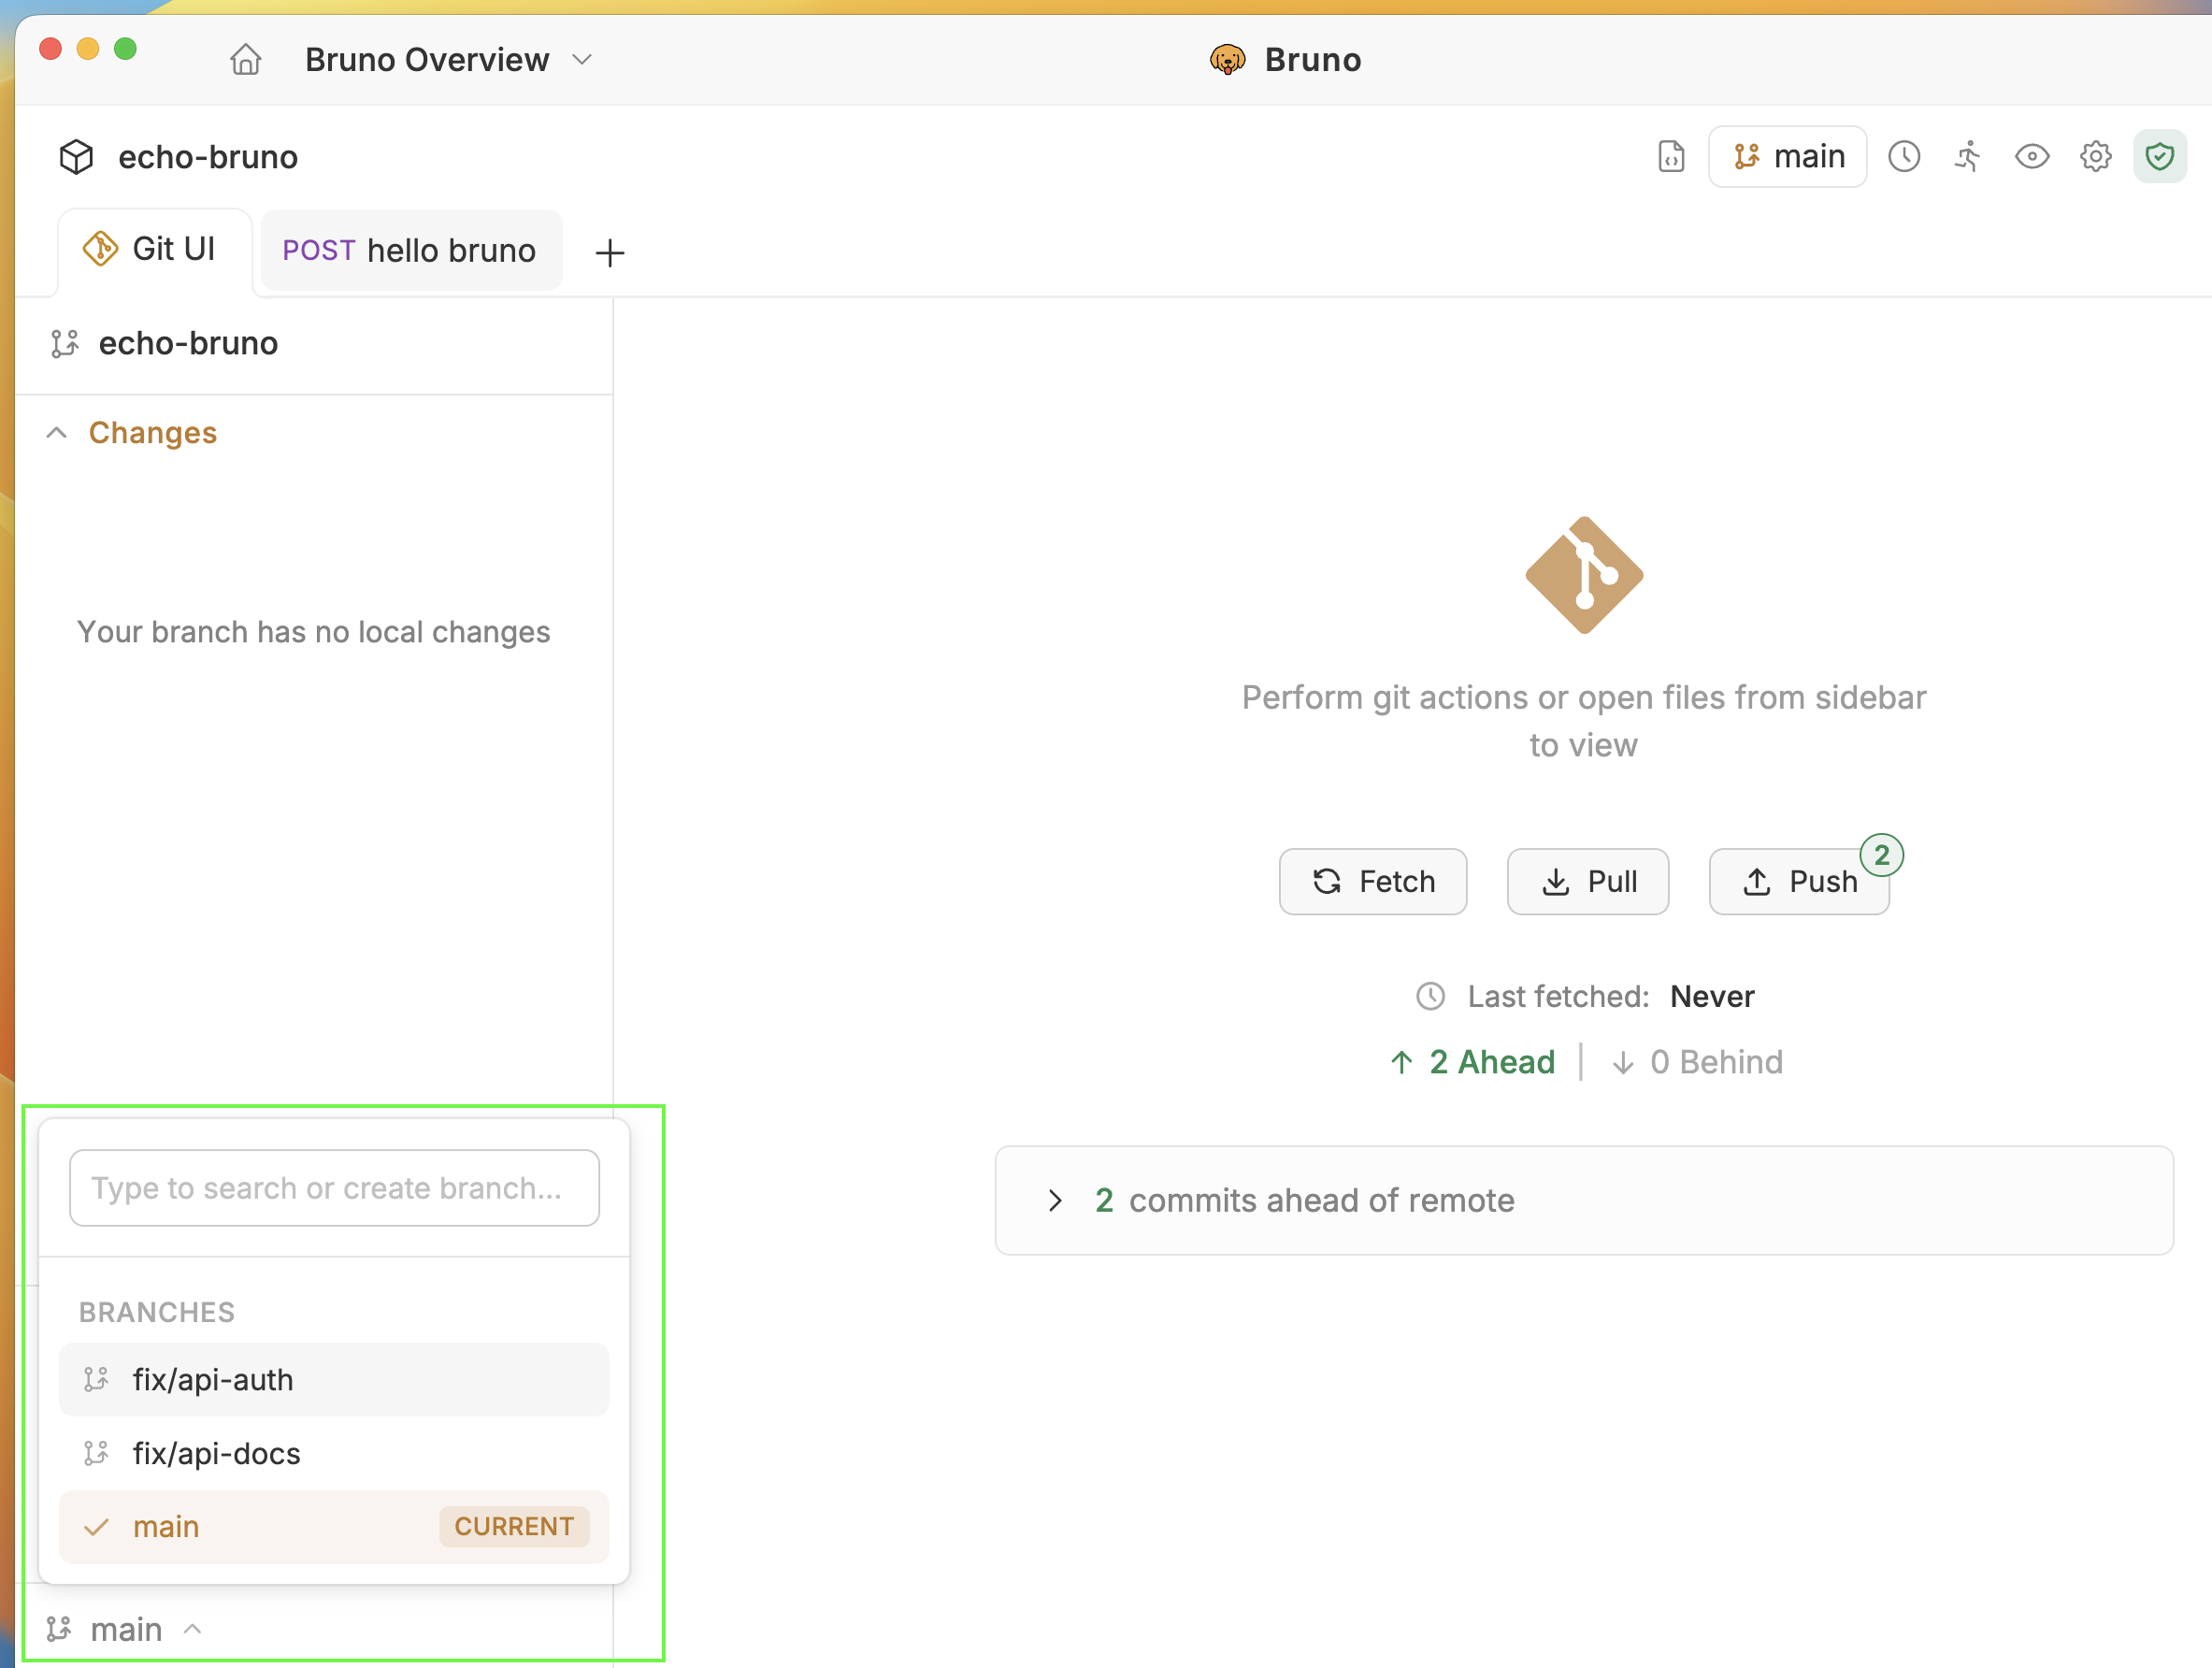 3. Now you're switched to your selected branch.
### Stash Changes
Stashing allows you to temporarily save your uncommitted local changes (both staged and unstaged modified tracked files) and revert your working directory to a clean state matching the last commit. This is especially useful for quickly switching context or handling urgent tasks without having to commit unfinished work.
1. Go to **Git UI**.
2. When you have unstaged changes, click on **Stashes**.
3. Enter a **Stash Message** and click the **Stash files** button.
3. Now you're switched to your selected branch.
### Stash Changes
Stashing allows you to temporarily save your uncommitted local changes (both staged and unstaged modified tracked files) and revert your working directory to a clean state matching the last commit. This is especially useful for quickly switching context or handling urgent tasks without having to commit unfinished work.
1. Go to **Git UI**.
2. When you have unstaged changes, click on **Stashes**.
3. Enter a **Stash Message** and click the **Stash files** button.
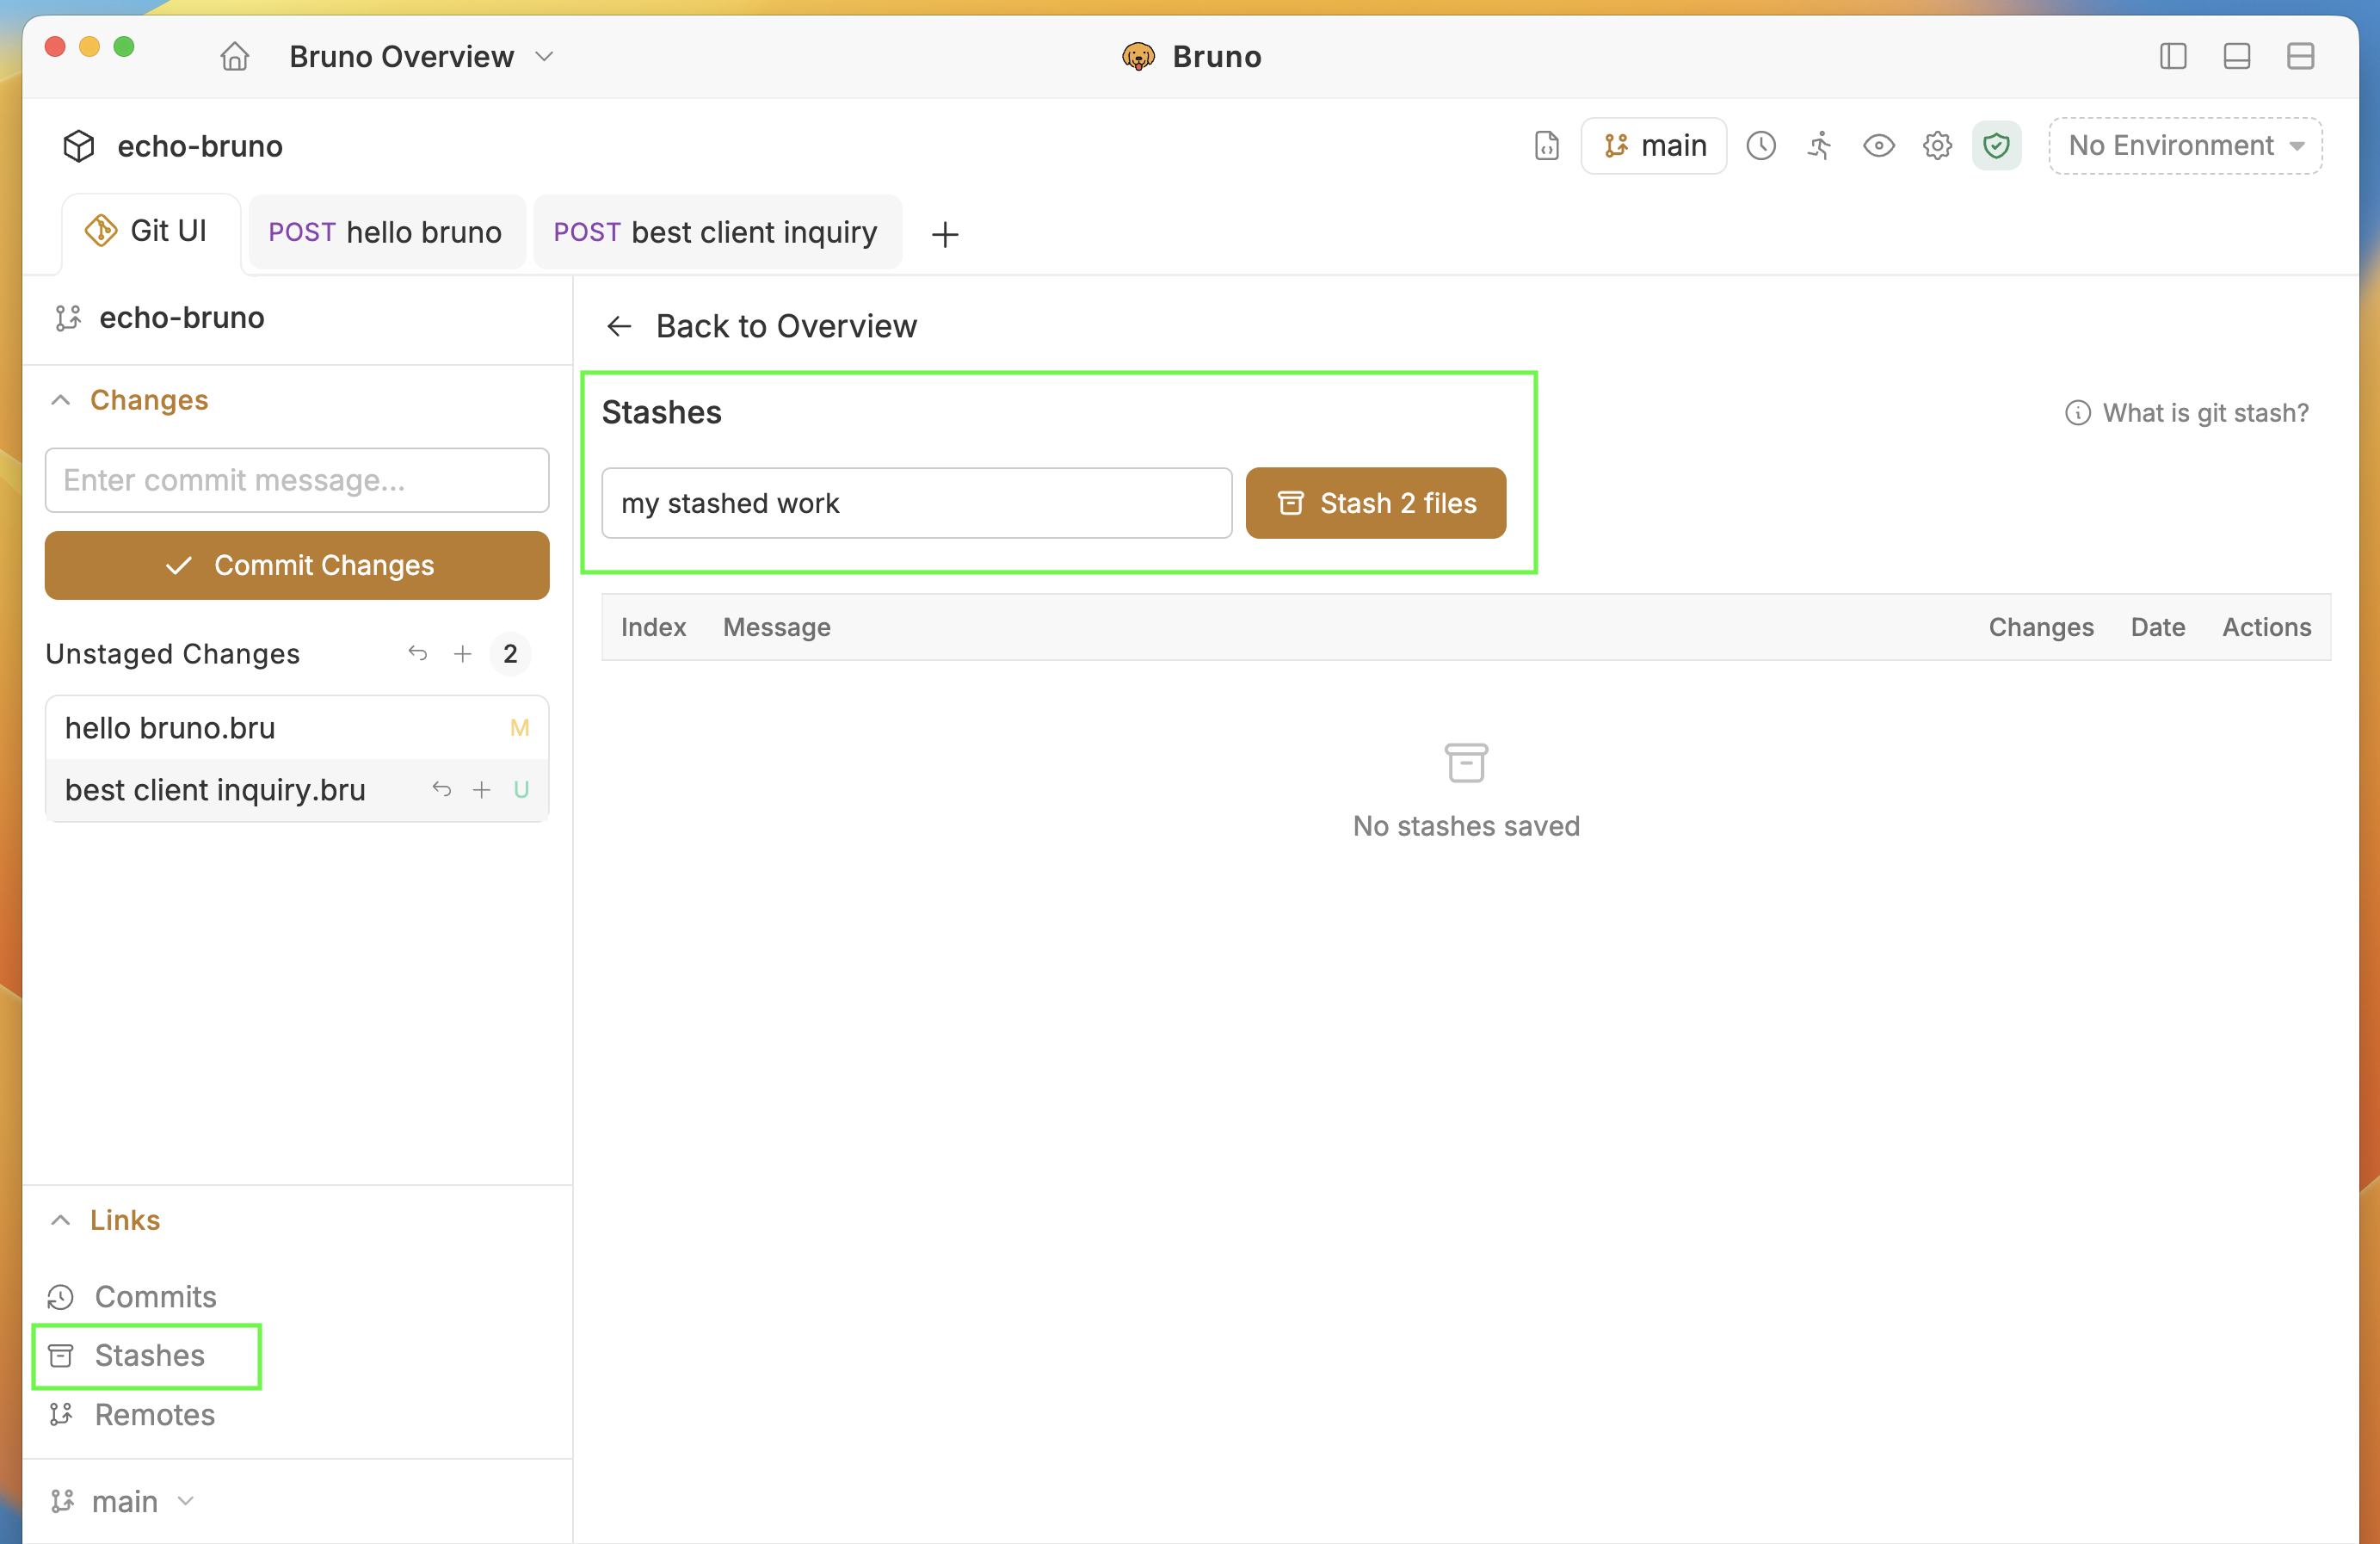 4. Your local changes are saved temporarily so you can work on something else or switch branches without losing your changes.
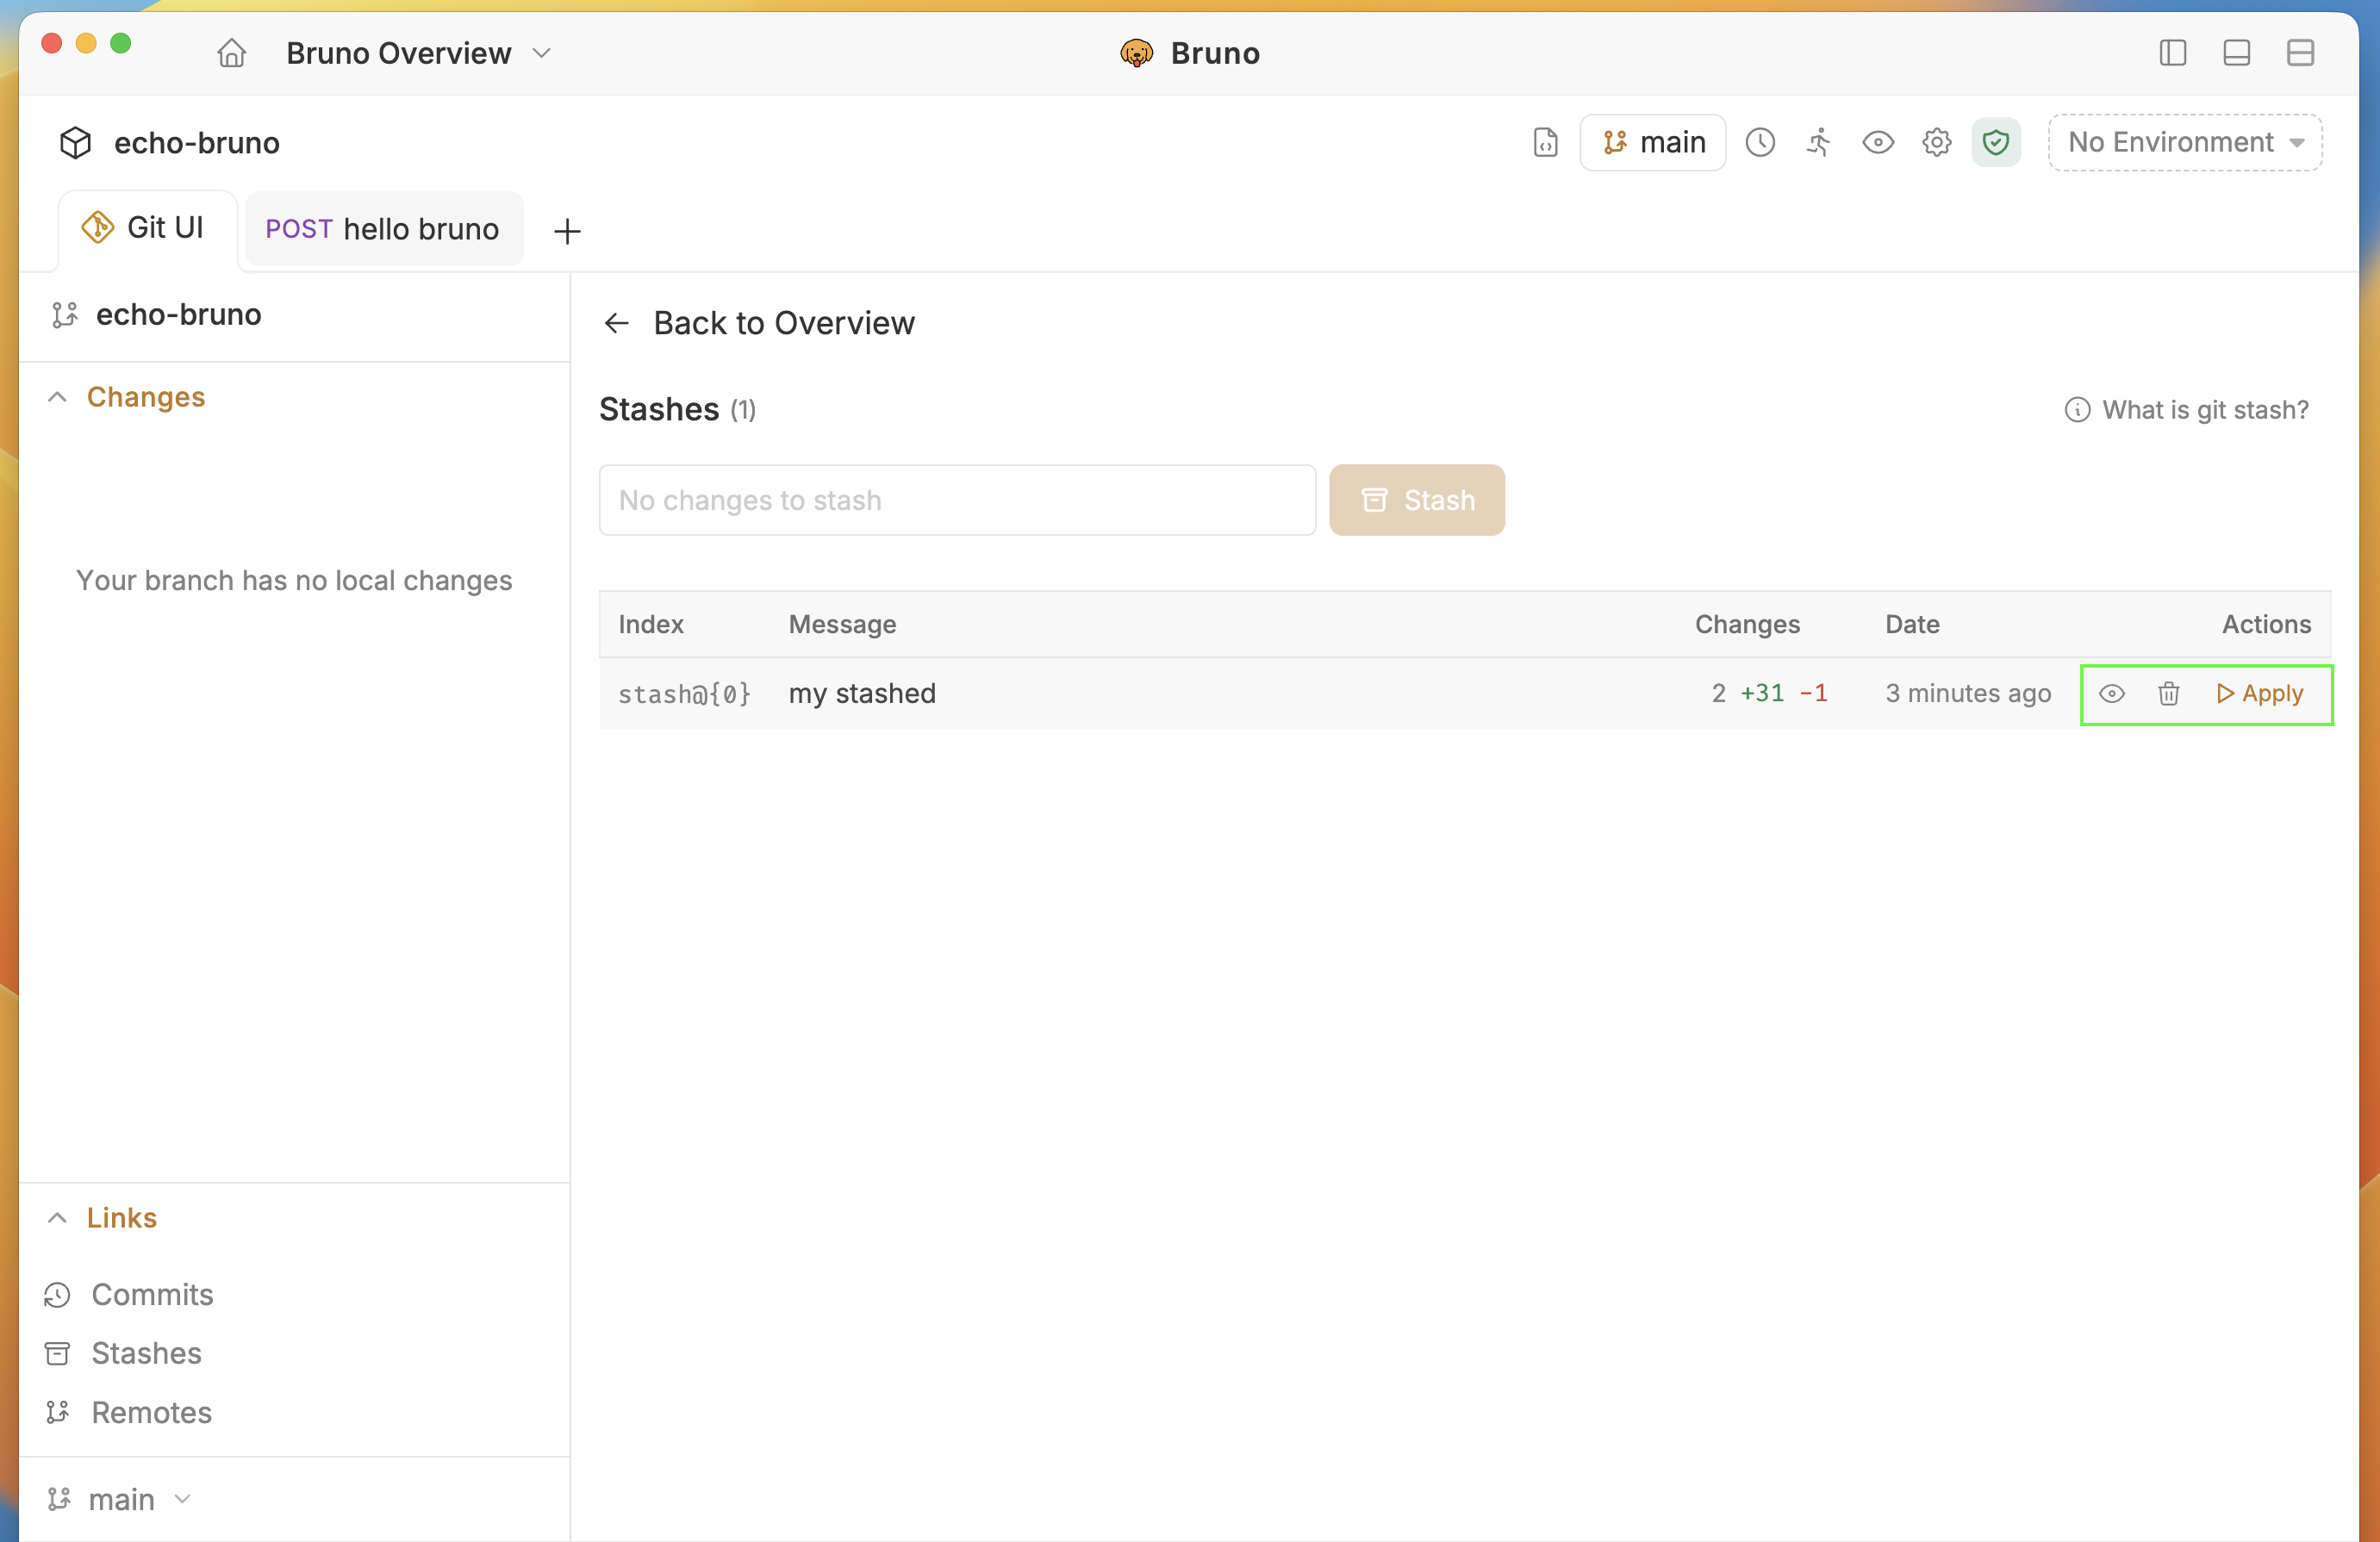
5. Stashes can be viewed, deleted, or applied to restore your changes later.
4. Your local changes are saved temporarily so you can work on something else or switch branches without losing your changes.
5. Stashes can be viewed, deleted, or applied to restore your changes later.
 ### Merge Conflict Resolution
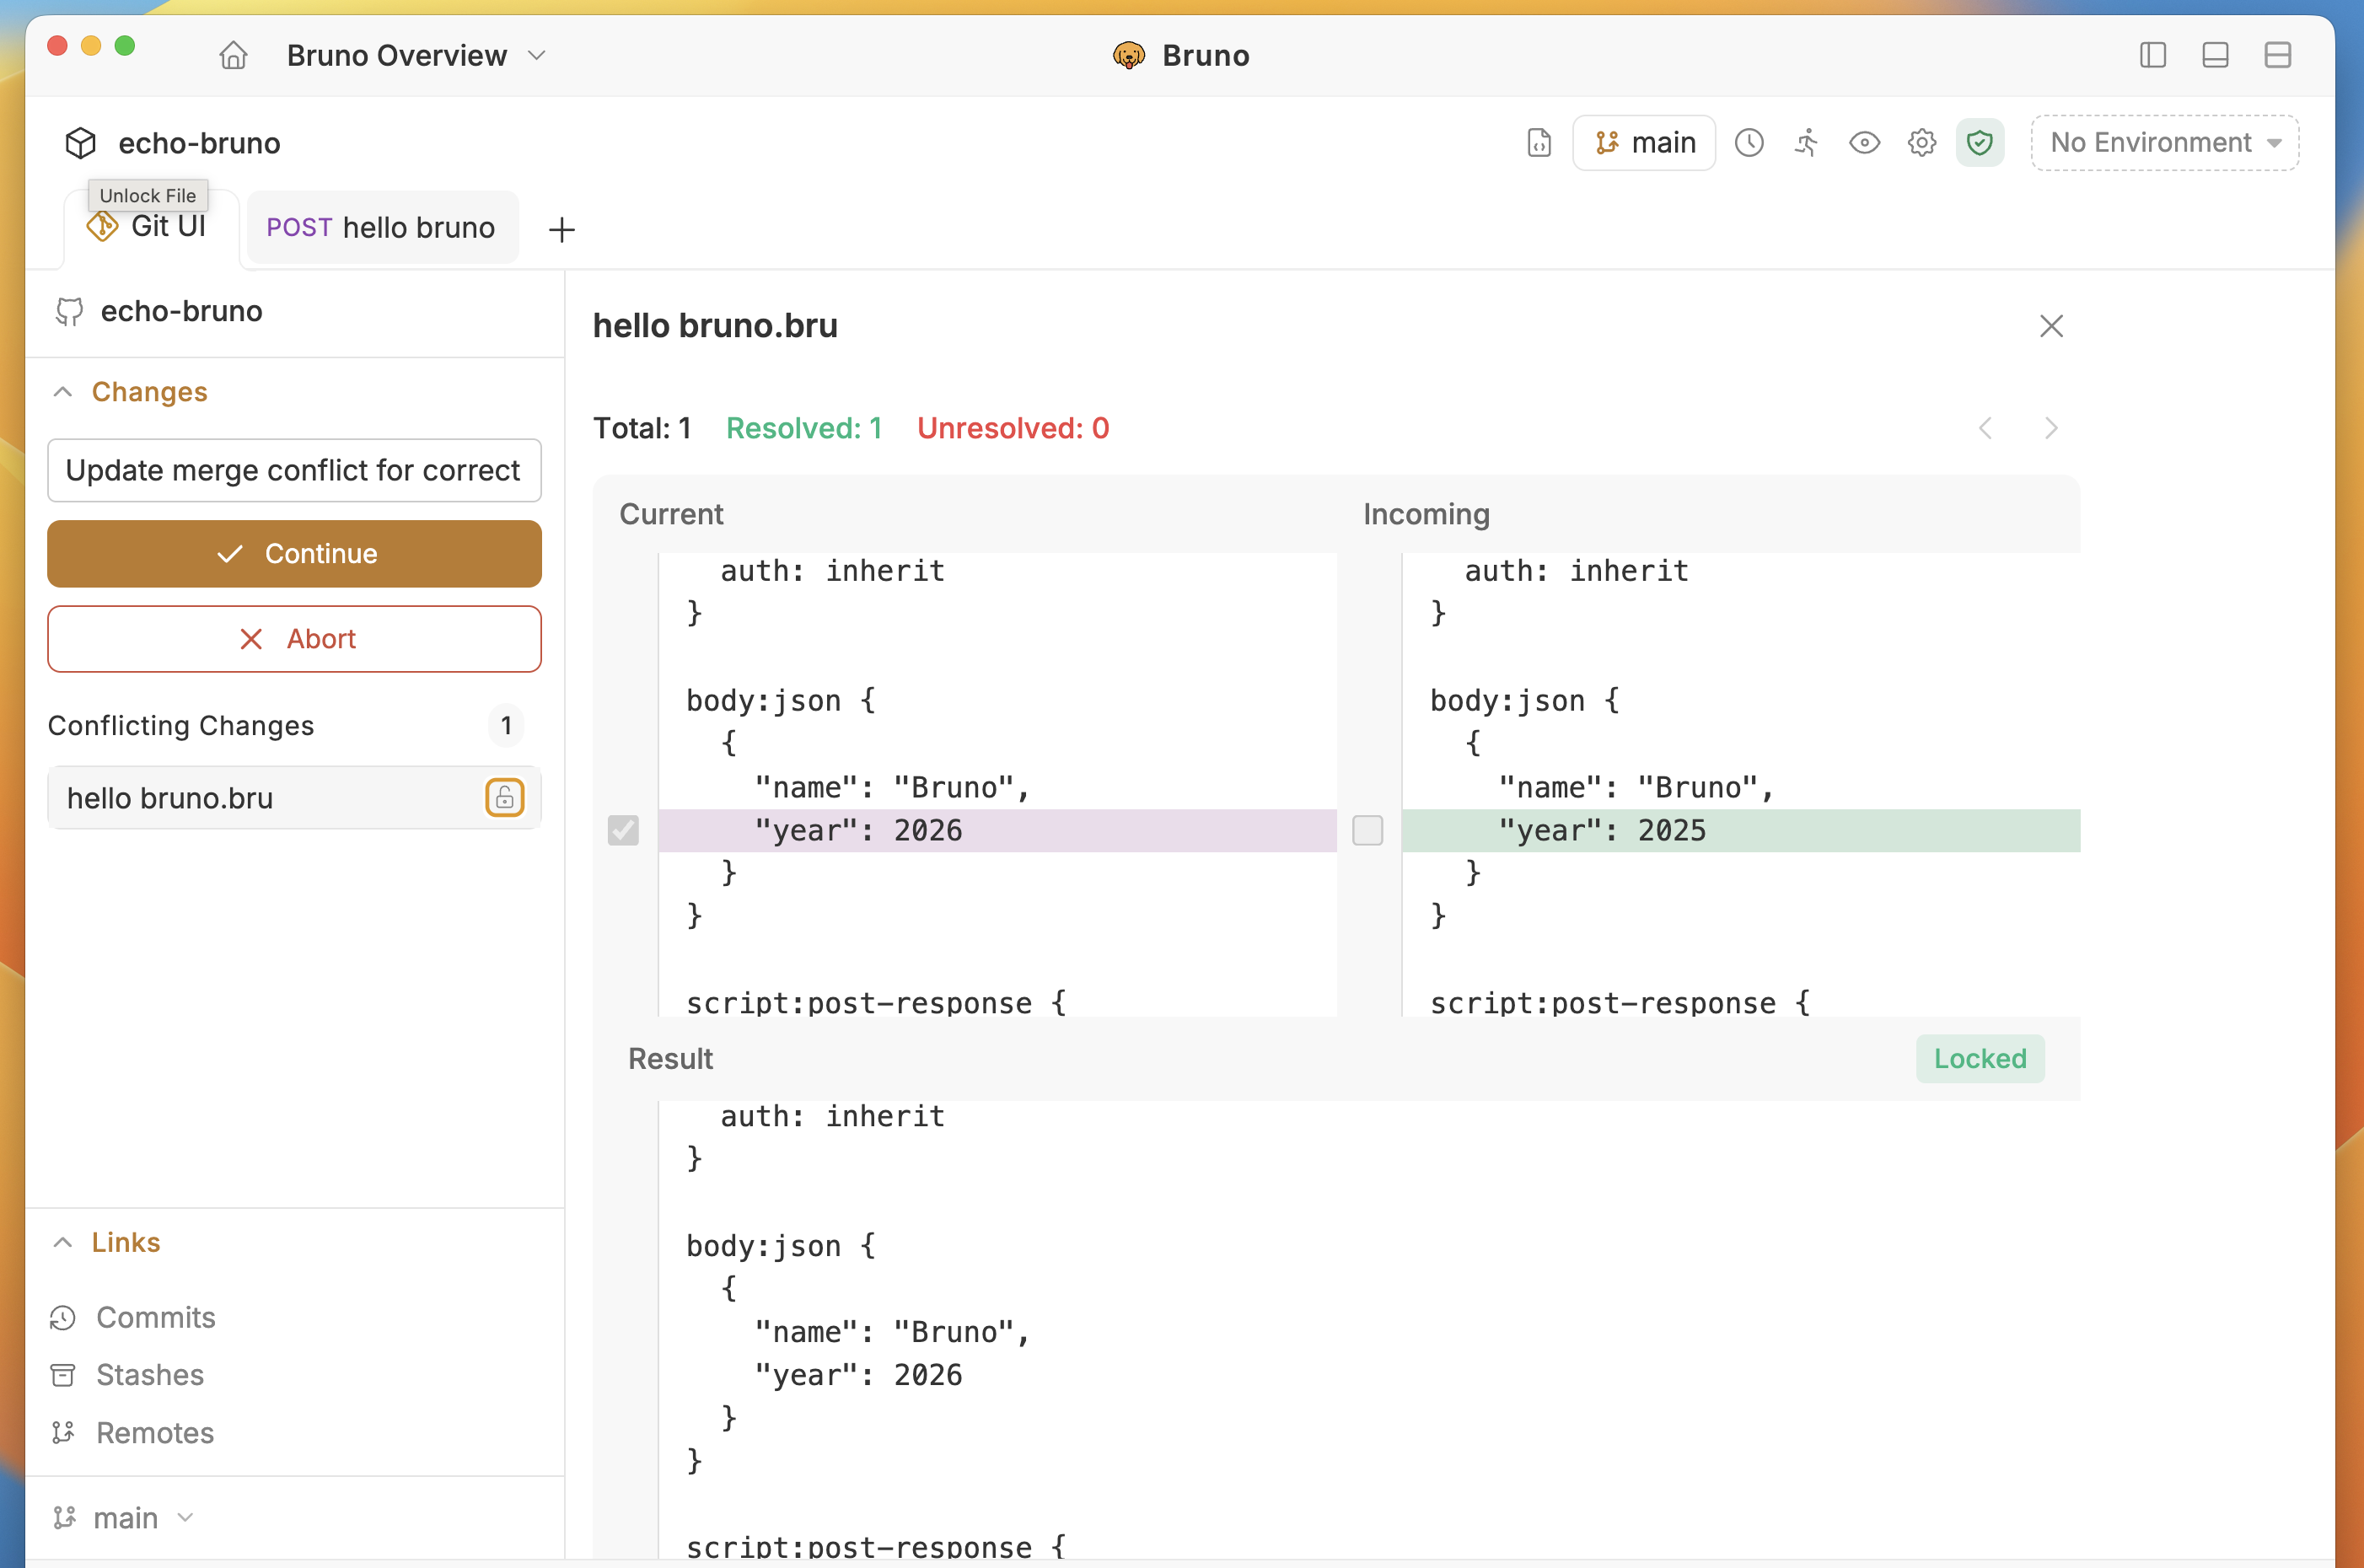
When conflicts arise during pull or stash operations, Bruno provides a visual conflict resolution interface.
#### Conflict Detection
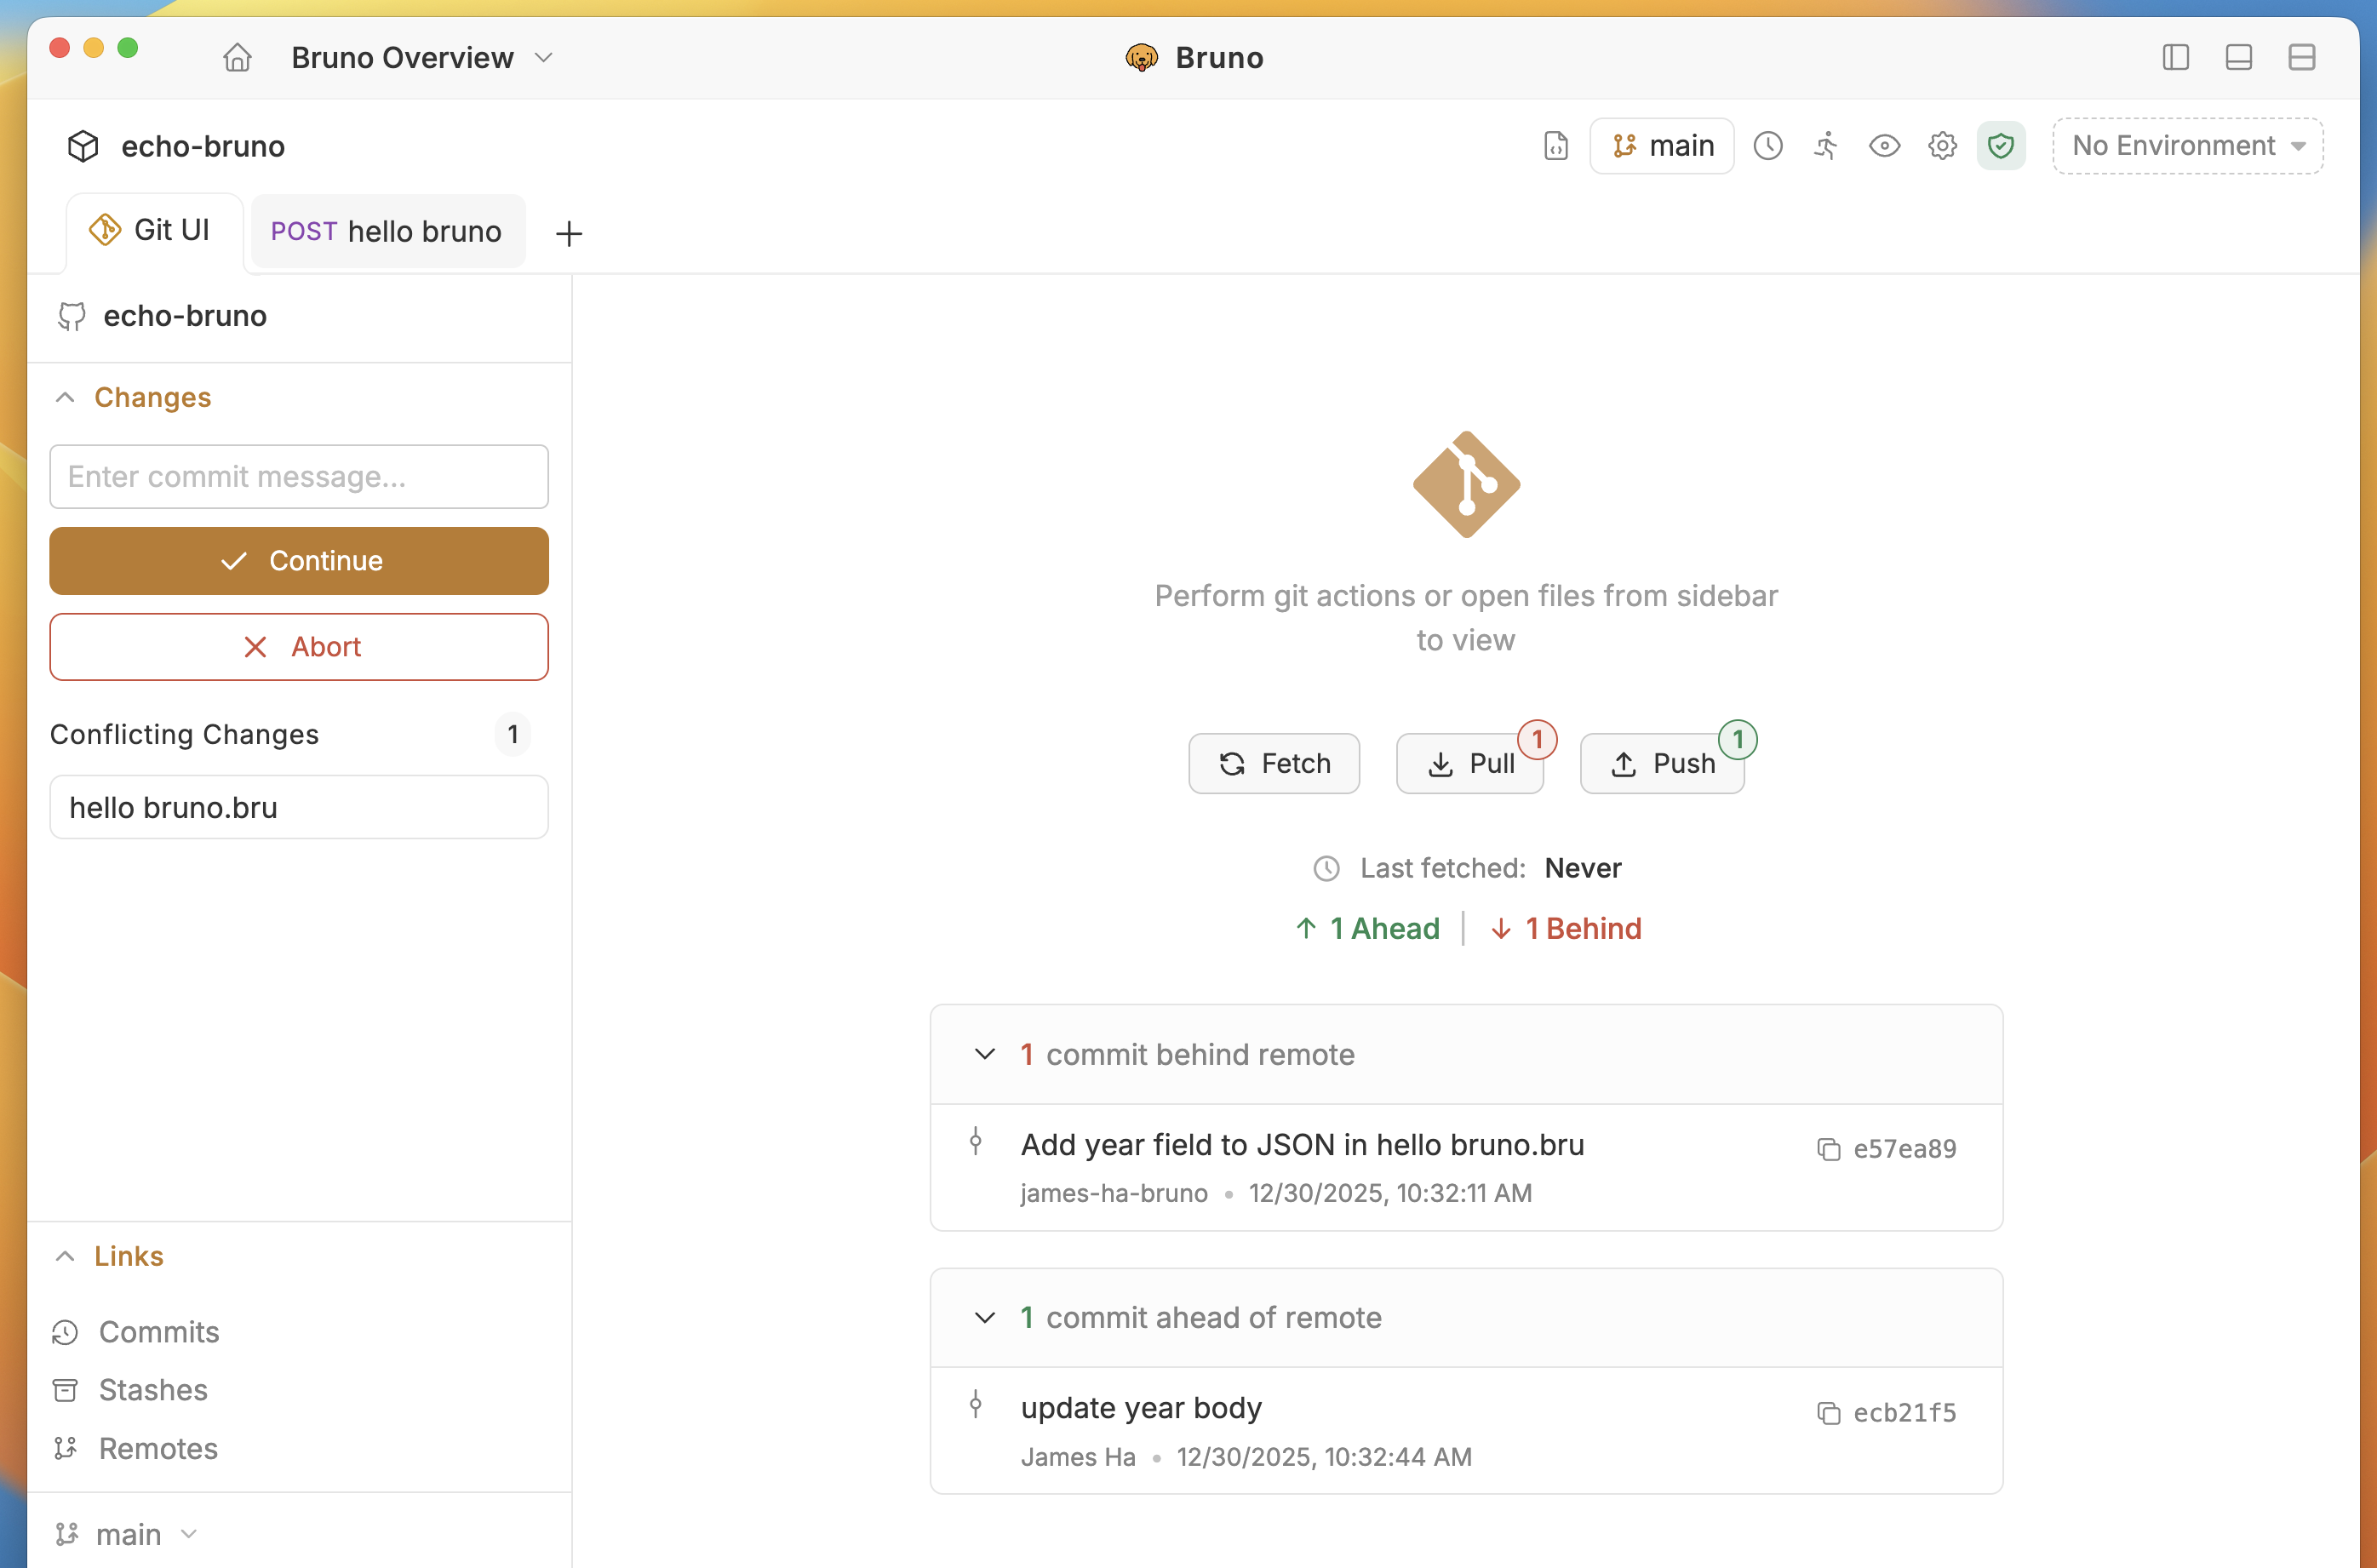
When conflicts are detected, Bruno provides information and options to resolve conflicts:
* **Commits behind and ahead of remote**
* **Conflicting changes identified**
* **Abort** - Abort the operation and restore previous state
### Merge Conflict Resolution
When conflicts arise during pull or stash operations, Bruno provides a visual conflict resolution interface.
#### Conflict Detection
When conflicts are detected, Bruno provides information and options to resolve conflicts:
* **Commits behind and ahead of remote**
* **Conflicting changes identified**
* **Abort** - Abort the operation and restore previous state
 #### Visual Conflict Editor
The conflict editor provides:
* **File List** - Shows all conflicted and non-conflicted files with status indicators
* **Diff View** - For each conflict, choose to:
* Accept Incoming (remote version)
* Accept Current (local version)
* Accept Both (merge both versions)
Once all conflicts are resolved, enter a commit message and click the **Lock** icon to complete the merge.
#### Visual Conflict Editor
The conflict editor provides:
* **File List** - Shows all conflicted and non-conflicted files with status indicators
* **Diff View** - For each conflict, choose to:
* Accept Incoming (remote version)
* Accept Current (local version)
* Accept Both (merge both versions)
Once all conflicts are resolved, enter a commit message and click the **Lock** icon to complete the merge.
 ***
### Request Git History
The **History** tab inside the Git UI lets you browse the full commit history of any individual request. You can see every commit that touched that request — complete with commit message, author, date, and short hash — and click any commit to inspect the exact diff.
#### Viewing commit history for a request
1. Open the collection in Bruno and navigate to any request.
2. Click the **History** tab in the request panel (alongside Params, Body, Headers, etc.).
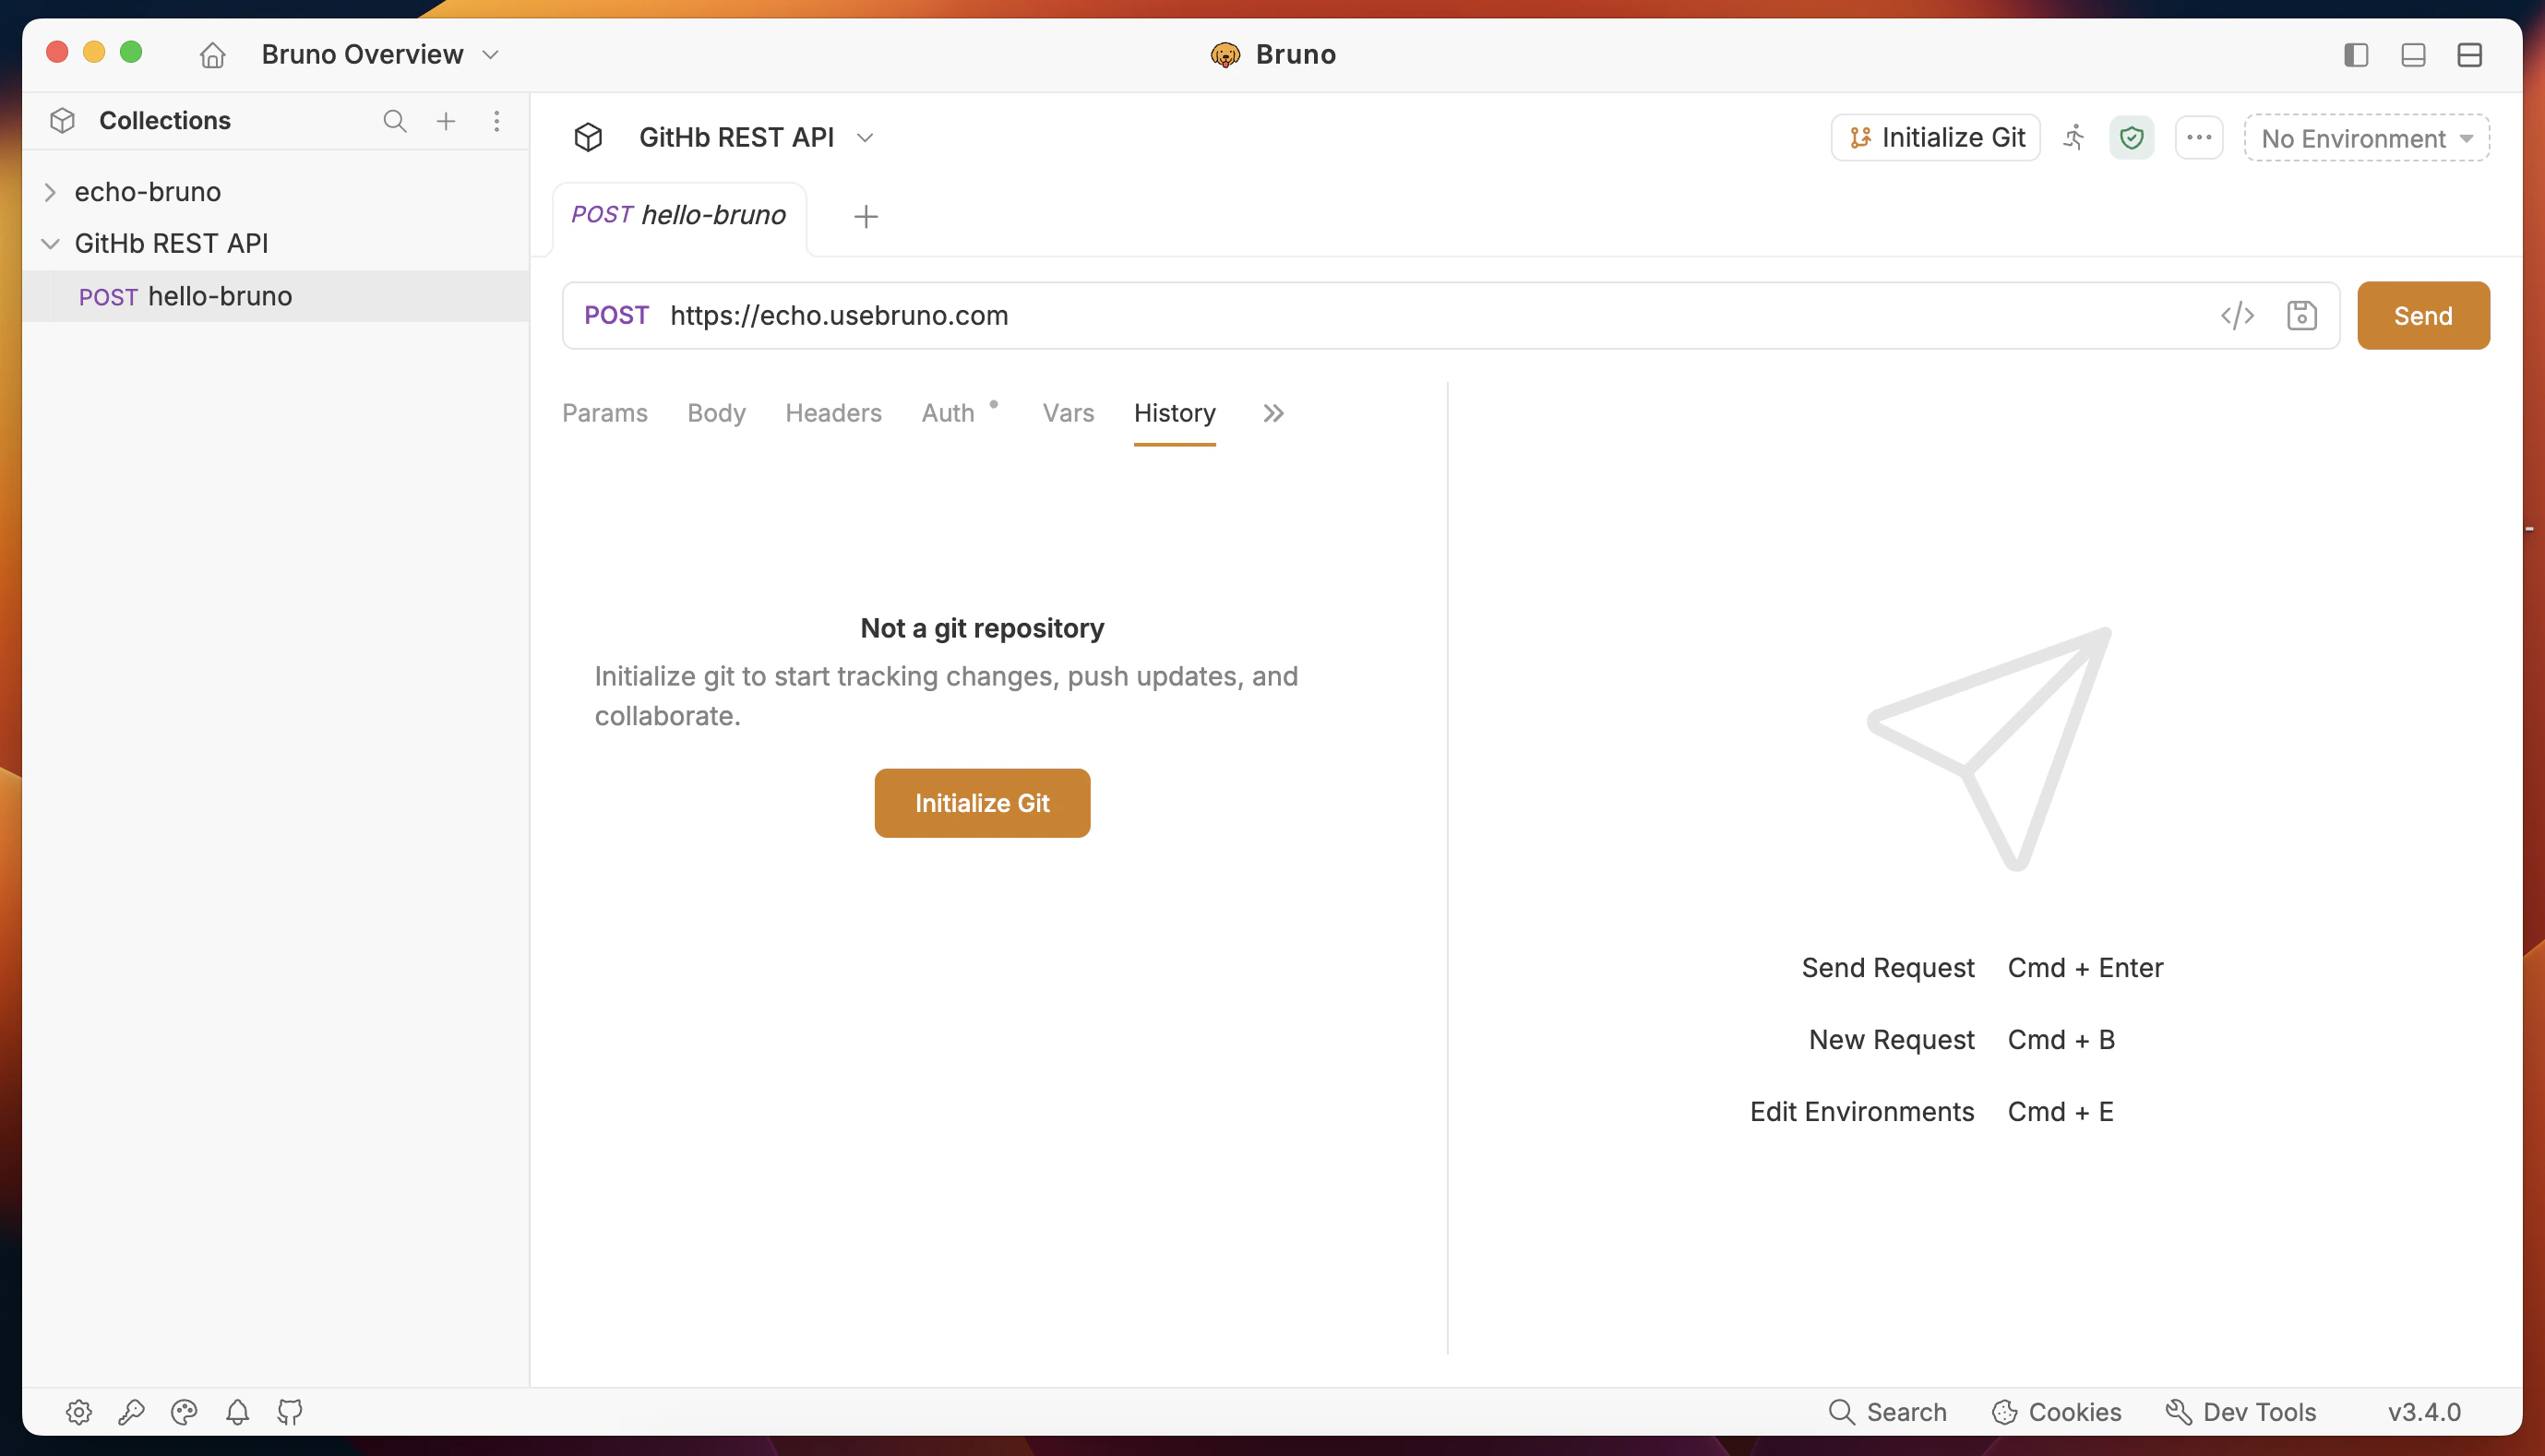
If Git has not been initialized for the collection yet, the tab shows the **Not a git repository** prompt with an **Initialize Git** button.
***
### Request Git History
The **History** tab inside the Git UI lets you browse the full commit history of any individual request. You can see every commit that touched that request — complete with commit message, author, date, and short hash — and click any commit to inspect the exact diff.
#### Viewing commit history for a request
1. Open the collection in Bruno and navigate to any request.
2. Click the **History** tab in the request panel (alongside Params, Body, Headers, etc.).
If Git has not been initialized for the collection yet, the tab shows the **Not a git repository** prompt with an **Initialize Git** button.
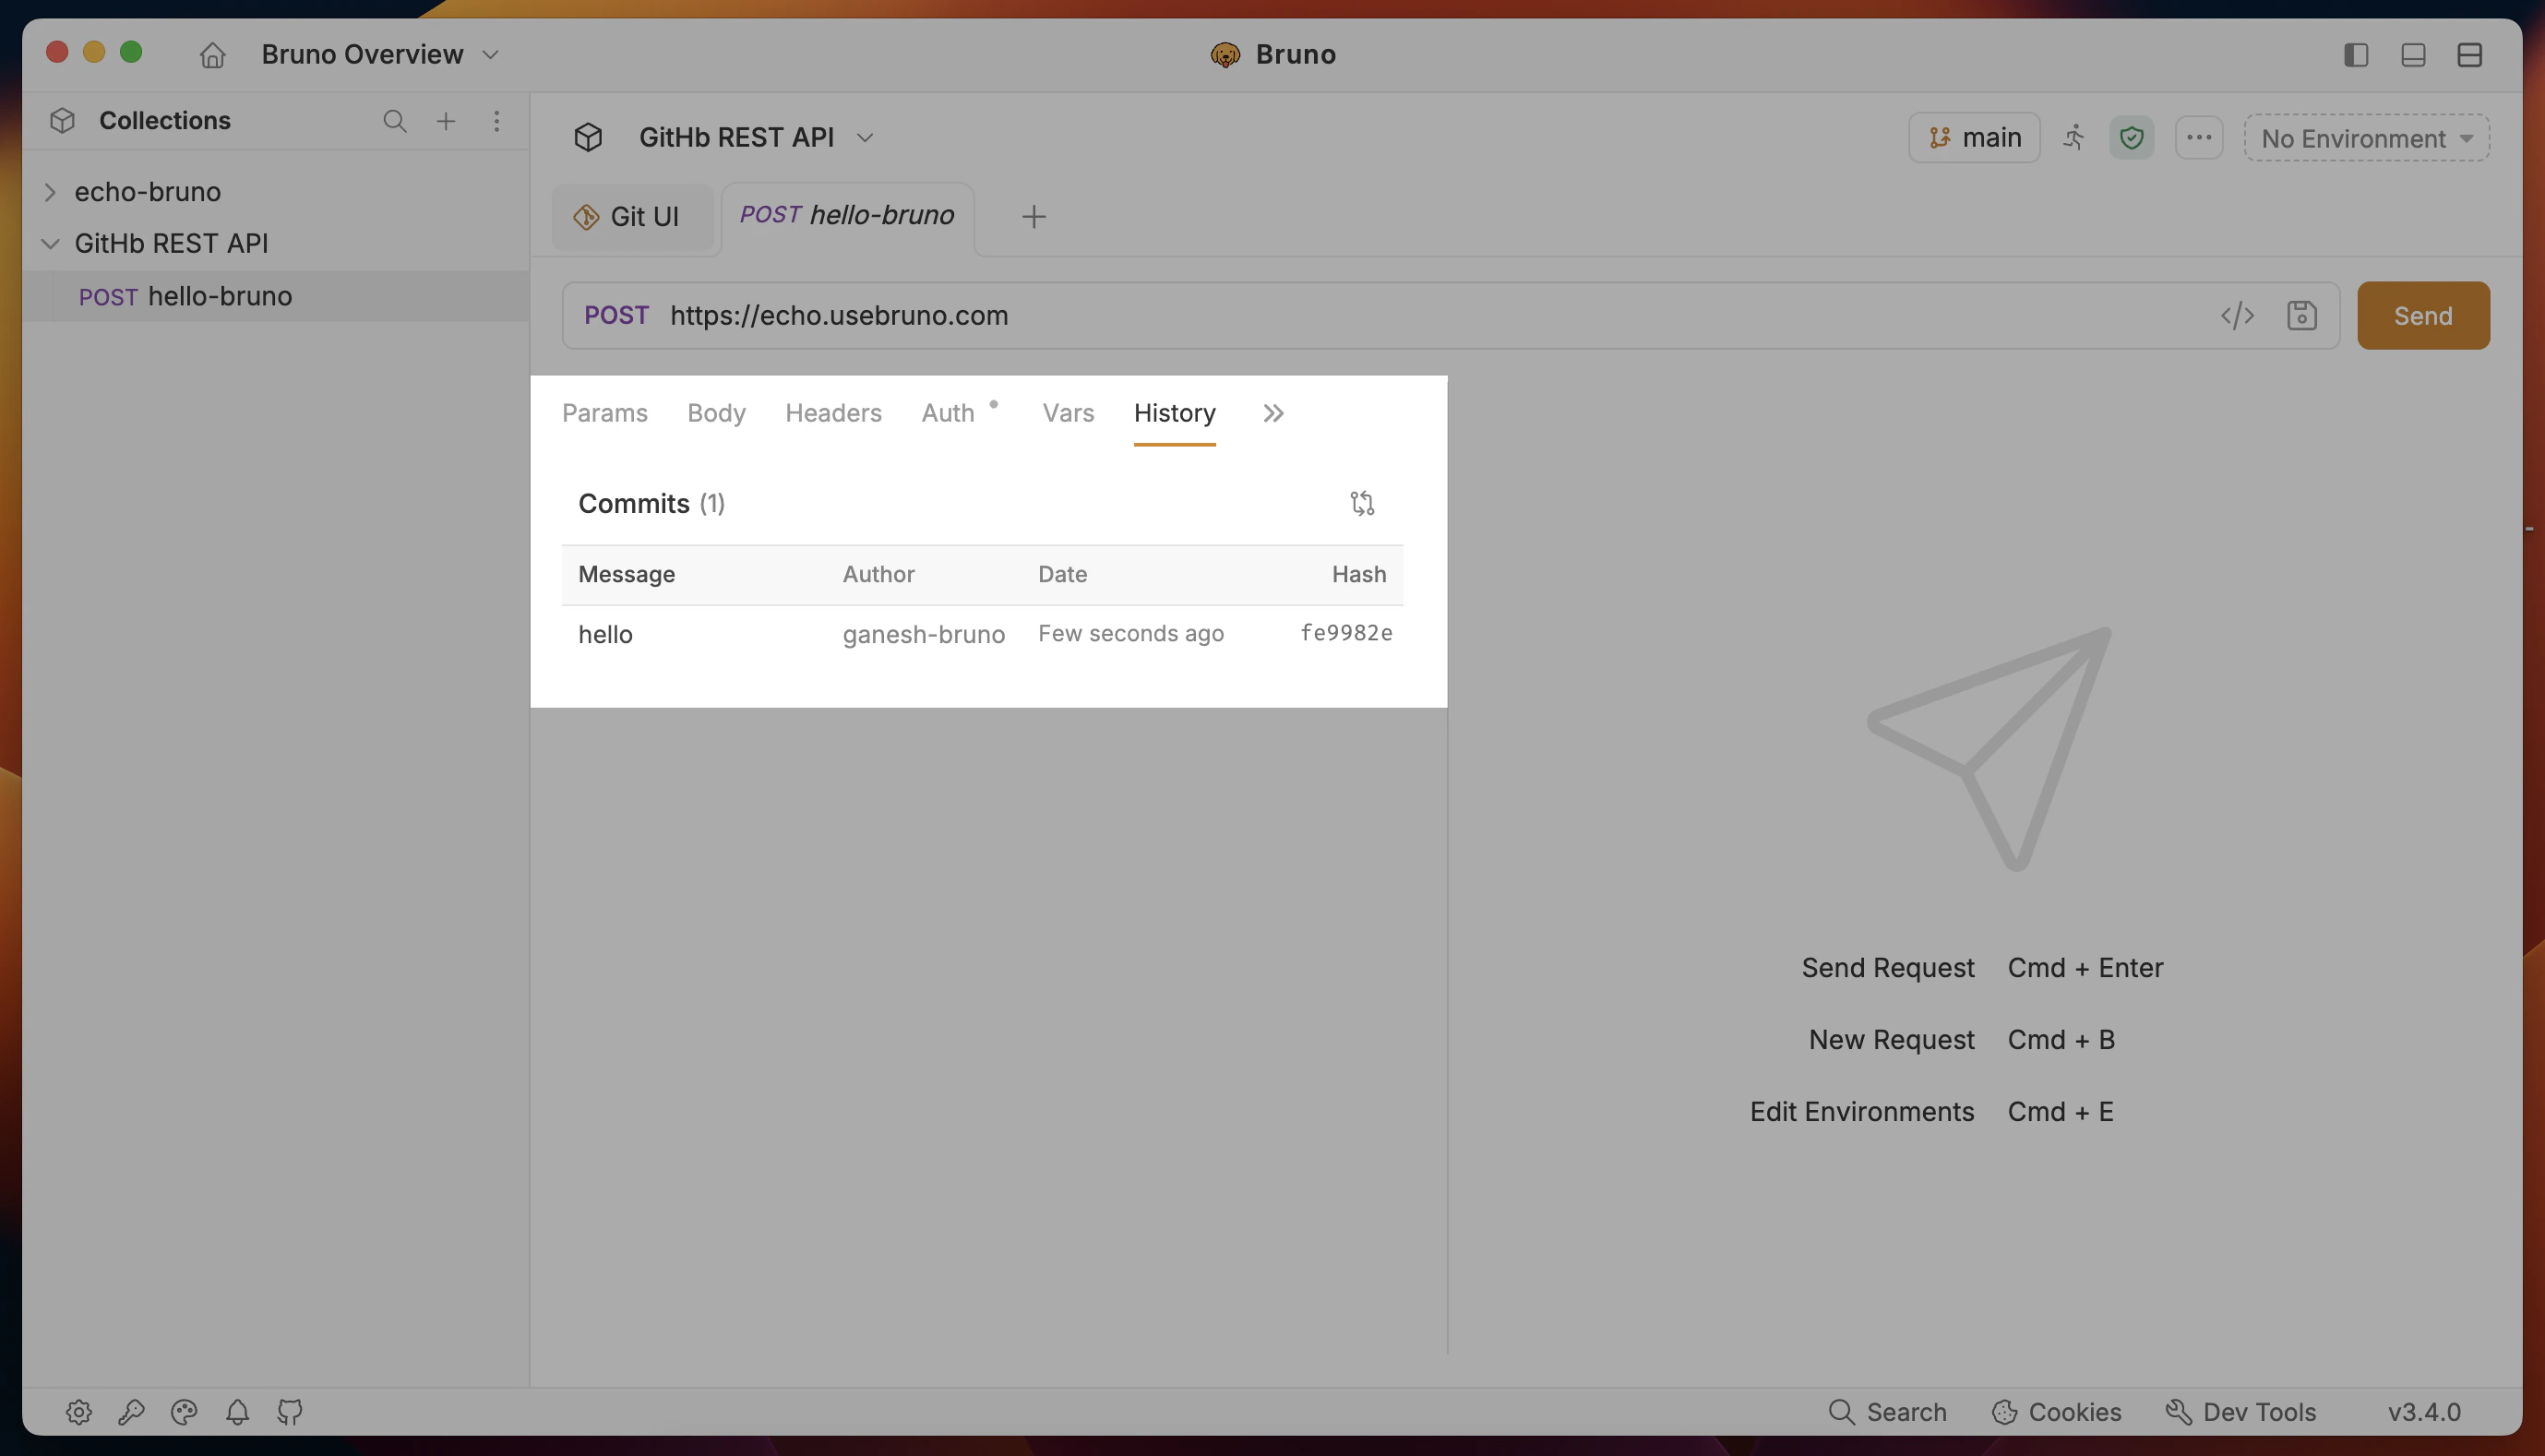
 Once Git is initialized and you have at least one commit, the History tab lists every commit that modified the current request:
| Column | Description |
| ----------- | ------------------------------------------- |
| **Message** | The commit message |
| **Author** | The Git author name |
| **Date** | Relative timestamp (e.g. "Few seconds ago") |
| **Hash** | Shortened commit SHA |
Once Git is initialized and you have at least one commit, the History tab lists every commit that modified the current request:
| Column | Description |
| ----------- | ------------------------------------------- |
| **Message** | The commit message |
| **Author** | The Git author name |
| **Date** | Relative timestamp (e.g. "Few seconds ago") |
| **Hash** | Shortened commit SHA |
 #### Inspecting a commit diff
Click any row in the commit list to open the diff for that commit. Bruno displays the file-level diff — additions and deletions — for the selected commit, using the same text and visual diff viewer available elsewhere in the Git UI.
#### Inspecting a commit diff
Click any row in the commit list to open the diff for that commit. Bruno displays the file-level diff — additions and deletions — for the selected commit, using the same text and visual diff viewer available elsewhere in the Git UI.
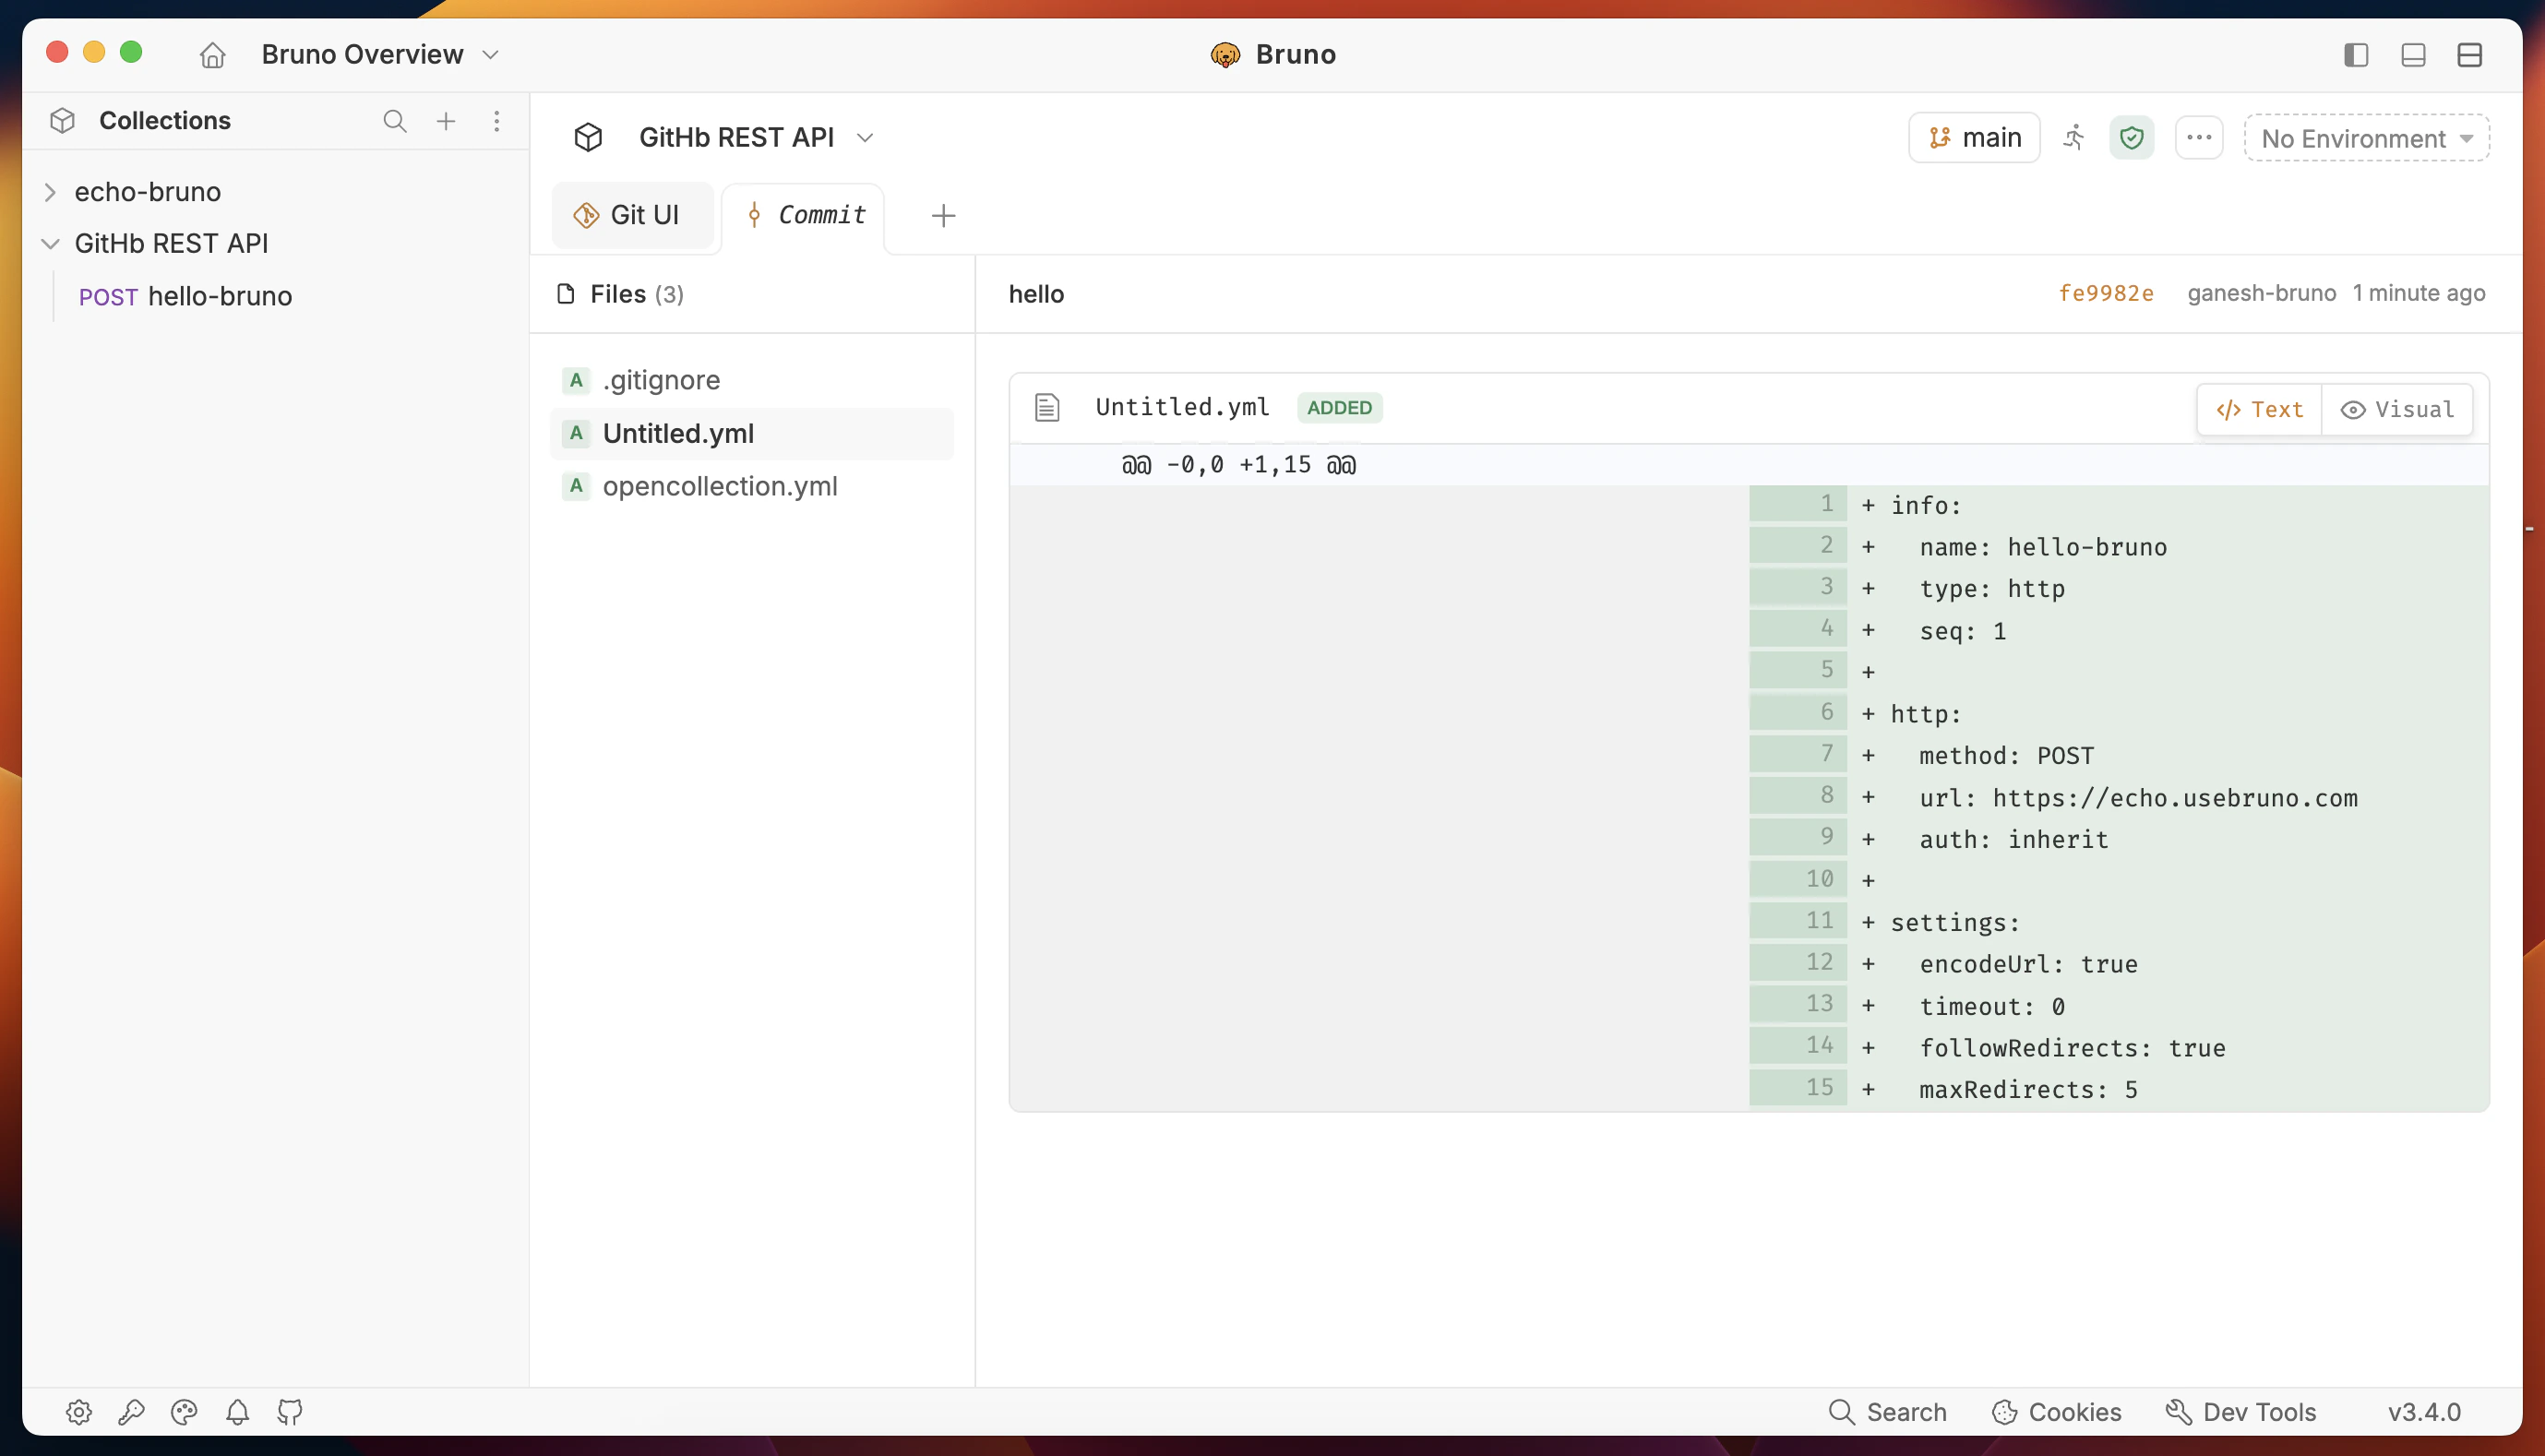 Request-level history is particularly useful during code review or debugging — you can pinpoint exactly when a URL, header, or body parameter changed and who changed it, without scanning through the full collection history.